CSA Support
GSI - General Shipping Instructions
The General Shipping Instructions (GSI) is a predefined template that holds key information required for shipping and logistics operations in ocean freight. GSIs are essential for ensuring that all parties involved - such as booking agents, freight forwarders, and vendors - follow the same guidelines when processing shipments. By using GSIs, companies can streamline the creation and management of shipment documentation, resulting in improved consistency and accuracy across multiple shipments.
The GSI template in Cargoo allows users to store and manage important shipment information such as documents, remarks, parties involved, and shipment costs. By centralizing these details, the GSI ensures that all necessary information is available for each shipment without requiring manual input for every single transaction. Cargoo GSI templates are a collaborative feature that gets shipment stakeholders involved to determine the correct documentation flow.
The GSI provides an organized and standardized approach to efficiently manage large amounts of documentation, instructions, and parties involved in every shipment, minimizing human errors.
The GSI module includes two tabs:
- General Shipping Instructions (GSI) – gathers main details of GSI, allows configuring permissions, remarks, shipment document settings and permissions, shipment party configuration, cost template application control, remarks application information, etc.
- Determination – sets rules and triggers for the automated application of GSI templates based on specific conditions.
Accessing the GSI Module
To access the GSI module, go to Administration → GSI.
Note: The module is available when enabled in the company settings, and the user is subscribed to the module.
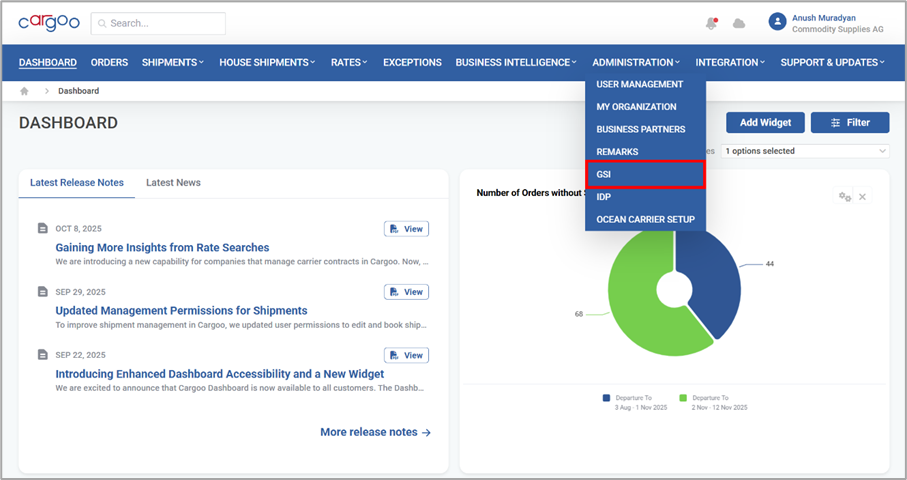
Accessing the GSI Module
In the GSI module, the records are listed in a table organized in the following columns:
Field | Description |
GSI ID | A unique identifier for each General Shipping Instruction (GSI) record |
GSI Name | The name or title of the GSI for identification |
GSI Owner | The company responsible for the GSI |
Revision Status | The state of the GSI revision:
|
Status | The current state of the GSI version: Draft, Approved, or Approved / Pending |
Version | The version number of the current GSI |
Description | A brief summary of the purpose or key details of the GSI |
Actions | The controls for viewing, editing, copying, and deleting GSI records Note: Depending on the GSI status, different actions are available. |
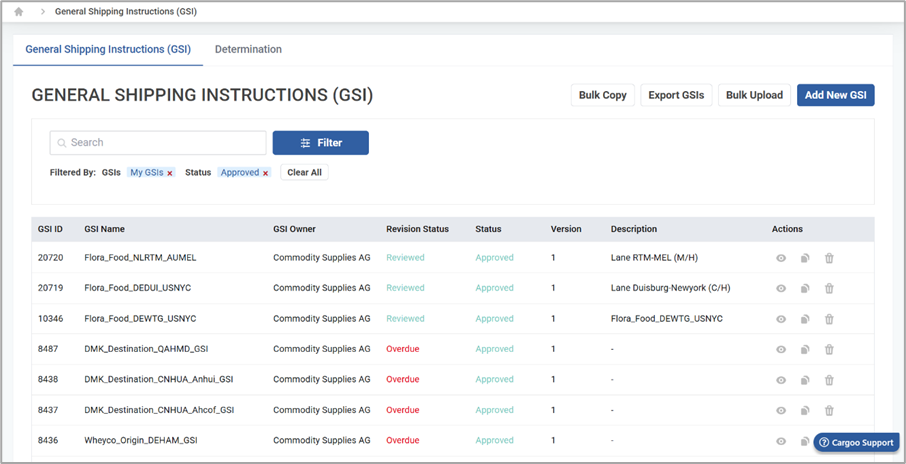
GSI Module
Working the GSI Module
The GSI module allows you to add, edit, filter, search for, view, copy, and export GSI records, create new versions, and perform bulk actions. You can efficiently keep track of pending approvals, overdue revisions, and version control, ensuring your shipping processes remain smooth and organized.
Searching for GSI Records
The GSI module allows users to search for records, making it easier to navigate through a large number of records.
To search for records:
1. Go to Administration → GSI.
2. In the search box, enter a parameter of the record by which you want to locate the GSI. You can search with the following parameters:
- GSI Name
- GSI ID
Hint: Start typing, and the system will generate all matching results.
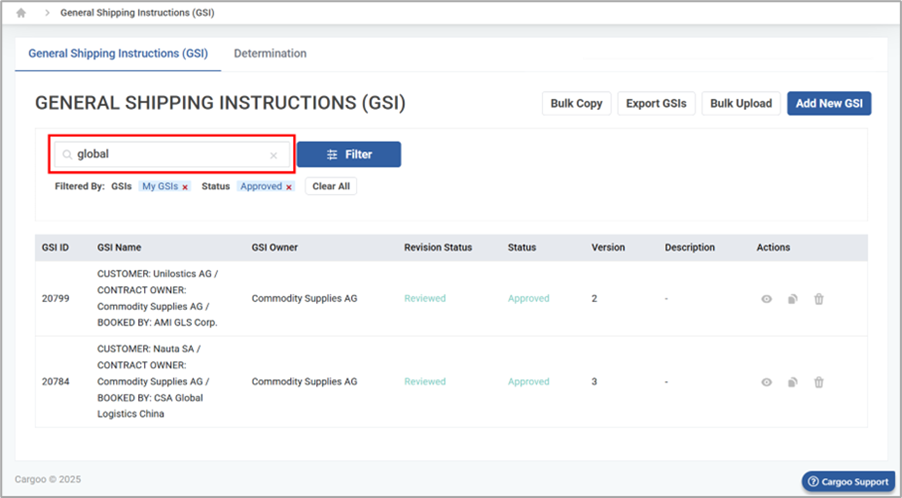
Searching for GSI Records
3. To clear the search results, click x in the search box.

Resetting Search Box
Filtering GSI Records
In the GSI module, you can filter the records by applying criteria to view records of a specific status, company, etc.
Note: By default, the module displays the records table filtered by GSIs set to My GSIs and the Status set to Approved.
To filter GSI records:
1. Go to Administration → GSI.
2. Click Filter above the records table. A pop-up opens displaying the available filtering criteria.
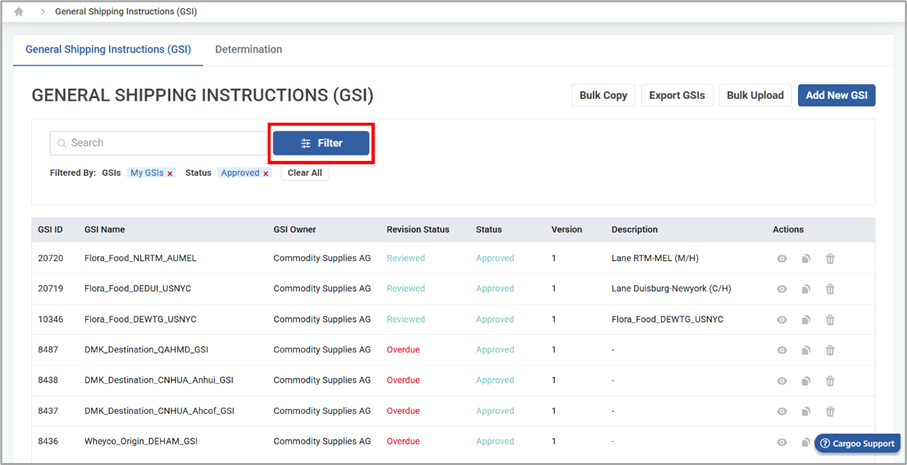
Filtering GSI Records
3. In the pop-up that opens, specify the filtering criteria as described in the table below:
4. Click Apply to confirm the selected filtering criteria or Cancel to discard changes.
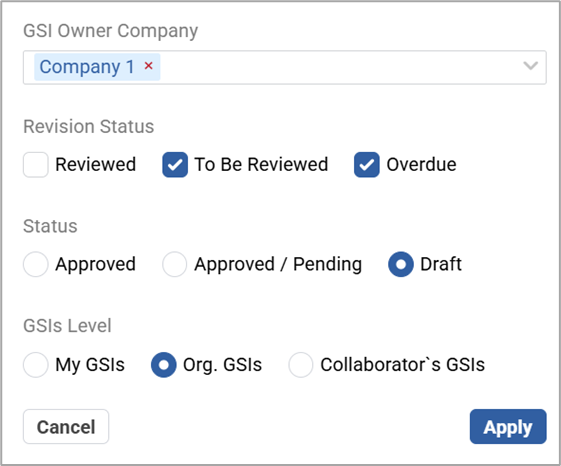
Applying Filter Criteria
5. To remove all applied filtering criteria, click Clear All.

Clearing Filtering Criteria
Viewing a GSI Record
To view a GSI record:
1. Go to Administration → GSI․
2. Locate the GSI record you want to view.
3. Click 
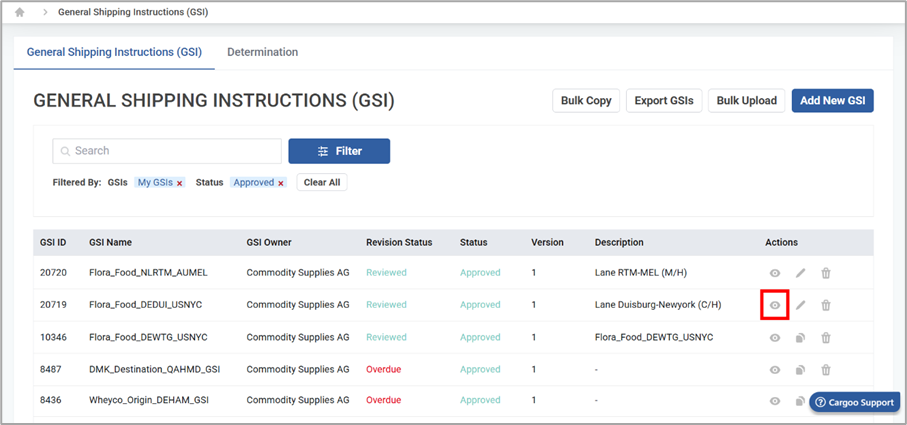
Viewing a GSI Record
The GSI form header displays the following information:
| Field / Button | Description |
| Back button | Closes the form and returns to the previous screen |
| Revision Status | The status of the GSI revision |
| Status | The status of the GSI record |
| Version | The current version of the GSI record |
| Previous / Next / Current buttons | Navigation through the respective version of the GSI |
| Approve | |
| Create New Version | Creation of a new version of an approved GSI |
| Continue / Stop Editing Draft buttons | |
| Copy button | Copies the record with a different name |
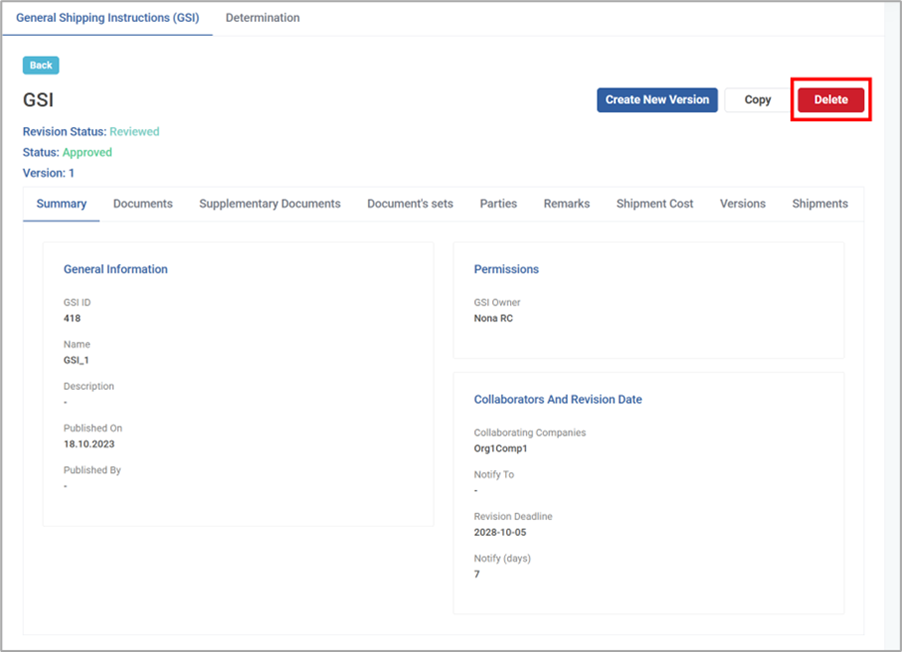
| Delete button | Deletes the record |
Note: Depending on the status of the GSI record, different actions are available.
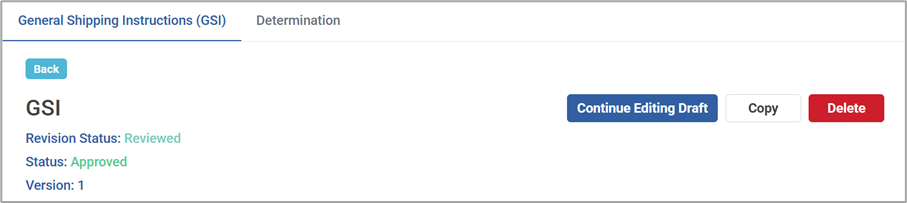
GSI Form Header
Copying a GSI Record
If the GSI is approved, you can duplicate the record in Approved status and make changes to the copied version. To do this:
1. Go to Administration → GSI.
2. Locate the GSI record you want to copy.
3. Click 
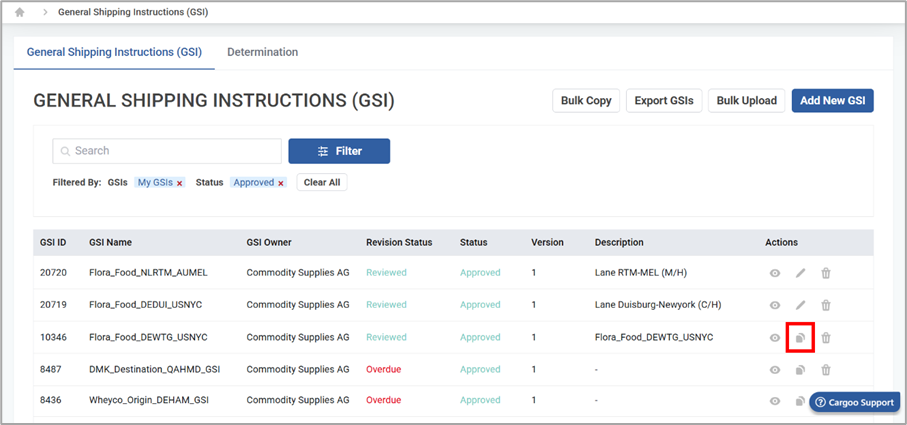
Copying a GSI Record
4. In the Copy GSI pop-up that opens, fill in the following fields:
- GSI Name * (mandatory)
- Description
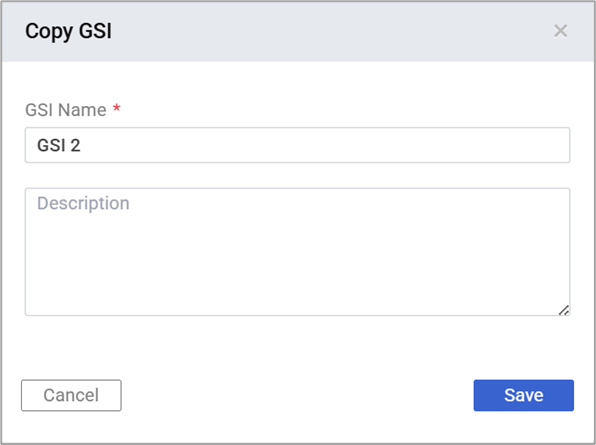
Recording Copied GSI Name
5. Click Save to confirm the entered data. The new GSI will be added to the GSI Management page in a Draft status and a Reviewed revision status. You can proceed to edit the copied record.
Copying Multiple GSI Records
In the GSI module, you can copy multiple approved GSIs. To do this:
1. Go to Administration → GSI.
2. Click Bulk Copy above the records table. A Select GSI to Make a Copy pop-up opens, displaying the records in a table organized in the following columns:
- GSI ID
- GSI Name
- GSI Owner
- Description
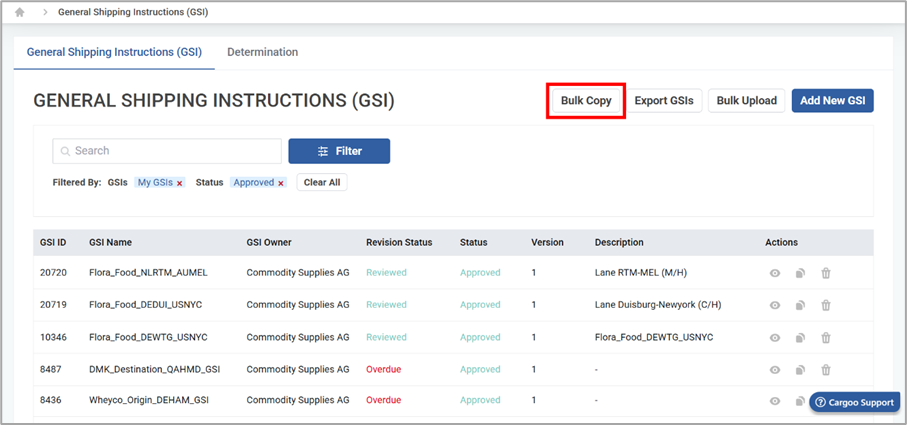
Copying Multiple GSI Records
3. Locate the records you want to copy and mark the checkboxes next to each record.
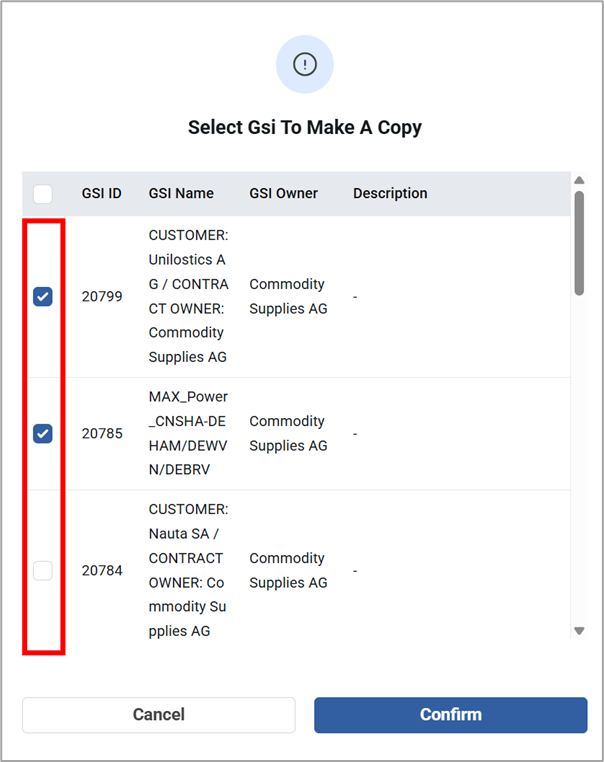
Selecting Records for Bulk Copy
Or,
4. Click the checkbox in the record table header row to select all records.
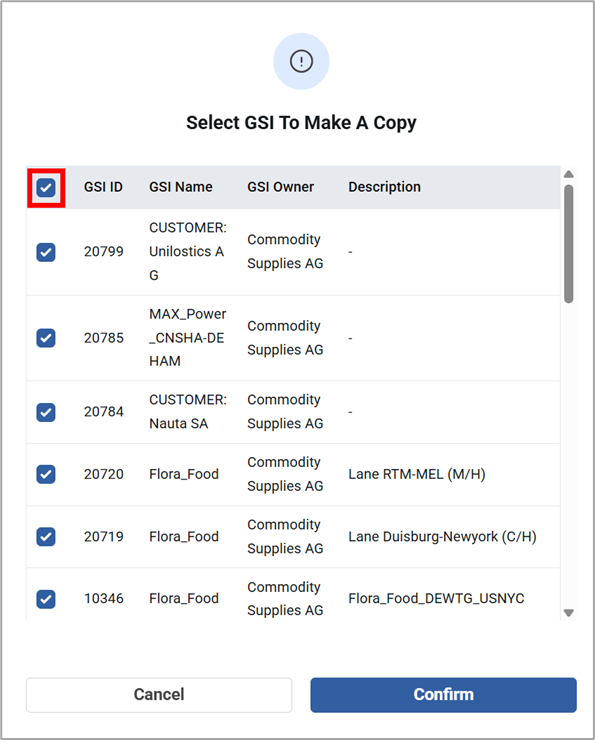
Selecting All Records for Bulk Copy
5. Click Confirm to apply the selections. A confirmation pop-up will open.
Or,
6. Click Cancel to discard the changes and close the form.
Deleting GSI Records
In the GSI module, you can delete records using 2 options.
To delete a GSI record:
1. Go to Administration → GSI.
2. Locate the GSI record you want to delete.
3. Click 
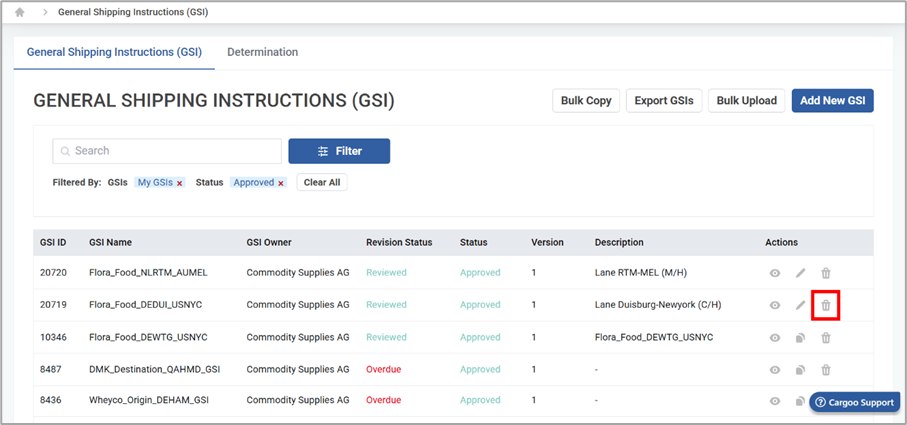
Deleting a GSI Option 1
Or,
4. Go to Administration → GSI.
5. Locate the GSI record you want to delete.
6. Click 
7. Click Delete.
Note: You can delete a GSI record in any status. You can also discard a new version of the GSI unless it is published.
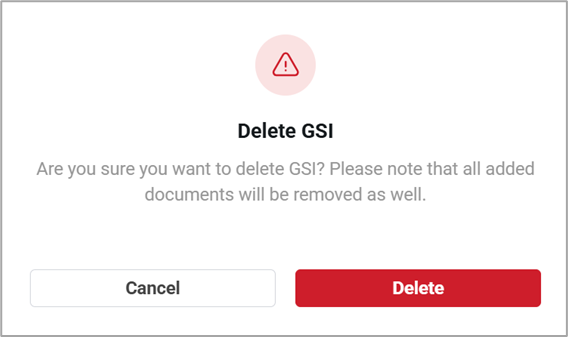
8. In the pop-up window that opens, click Delete to confirm.
Exporting GSI Records
In the GSI module, you can export all approved GSIs for external analysis or sharing with stakeholders.
Hint: You can search for and export only the specific records you need, without downloading the full set of records.
To export GSI records:
1. Go to Administration → GSI.
2. Click Export GSIs above the records table.
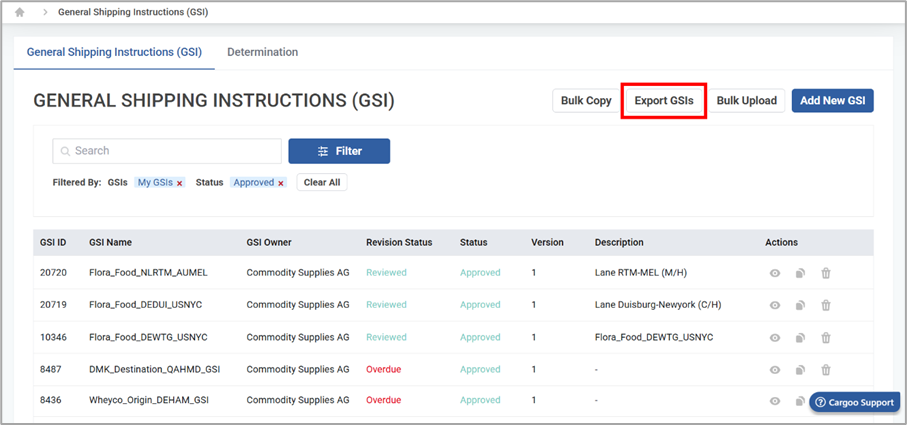
Exporting GSI Records
3. Choose where to save the exported file in your local PC.
Uploading Multiple GSI Records
You can upload GSIs in bulk via an external file to handle multiple entries at once. To do this:
1. Go to Administration → GSI.
2. Click Bulk Upload above the records table.
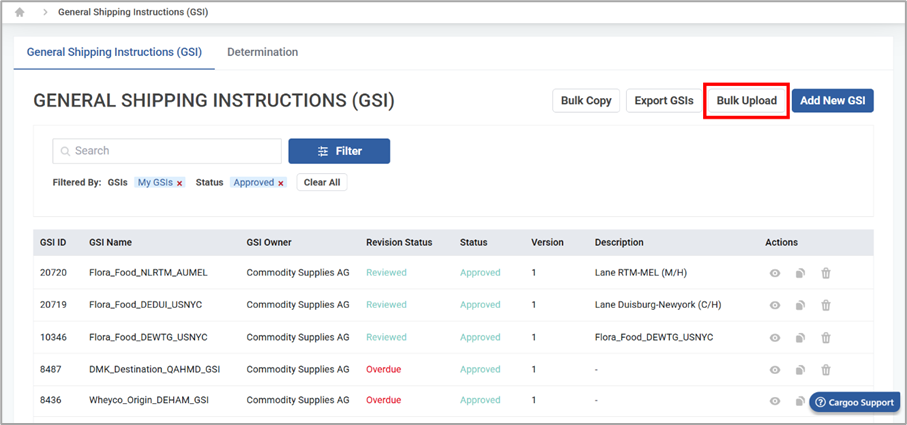
Uploading Multiple GSI Records
3. In the GSI Bulk Upload pop-up that opens, click Download Template File.
Hint: If you have the pre-filled GSI file saved on your device, proceed to step 6.
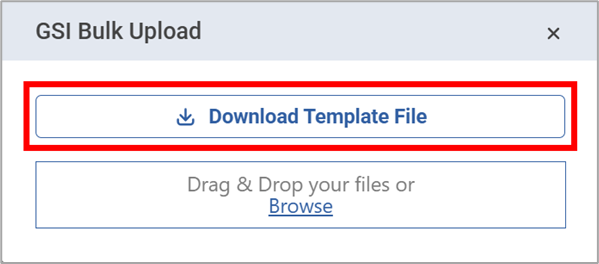
Downloading Template File
4. Choose where to save the template on your local PC.
Hint: In the Global Shipping Instructions (GSI) template, follow the instructions in the READ ME tab.
5. Fill in the file.
Hint: You can upload new GSIs by leaving the GSI ID field blank in the file, or update existing GSIs by keeping the GSI ID in the file.
6. Upload the filled-in file. To do this, see the Attaching Files paragraph.
7. Click Upload to confirm.
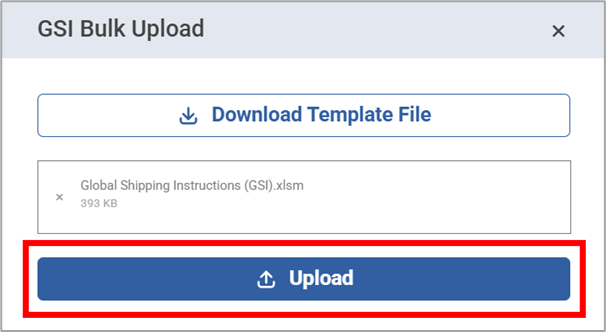
Uploading a File
Attaching Files
To attach a file:
1. In the attachment field, click Browse.
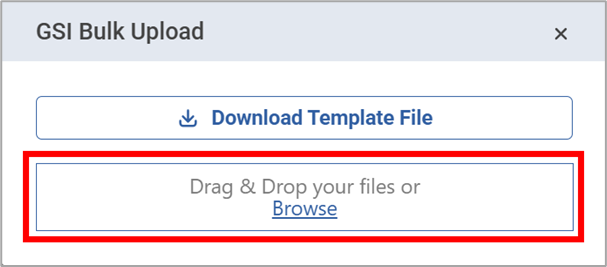
2. On your local PC, select the file you want to upload.
Or,
3. Drag and drop your file onto the respective box.
Hint: To replace the uploaded file, click x next to the document name to delete it and repeat steps 1-3.
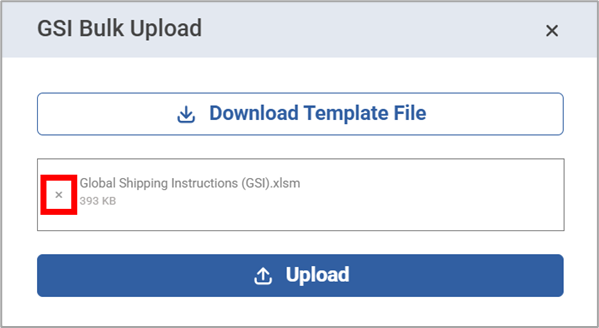
Deleting a File
General Shipping Instructions (GSI) Section
In the General Shipping Instructions (GSI) section, you can add a new record, edit, and approve GSI records.
Adding a GSI: Summary Tab
To create a new GSI record:
1. Go to Administration → GSI.
2. Click Add New GSI above the records table. The Create page opens.
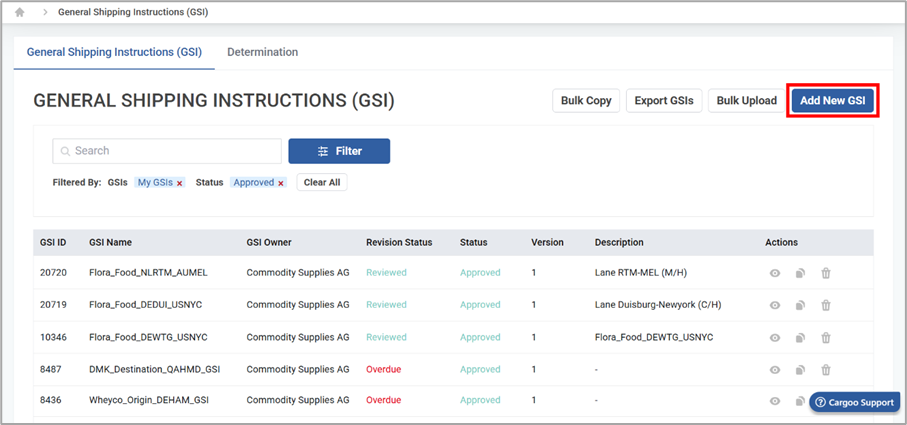
Adding a New GSI
3. In the Summary tab, provide the required information as described in the table below:
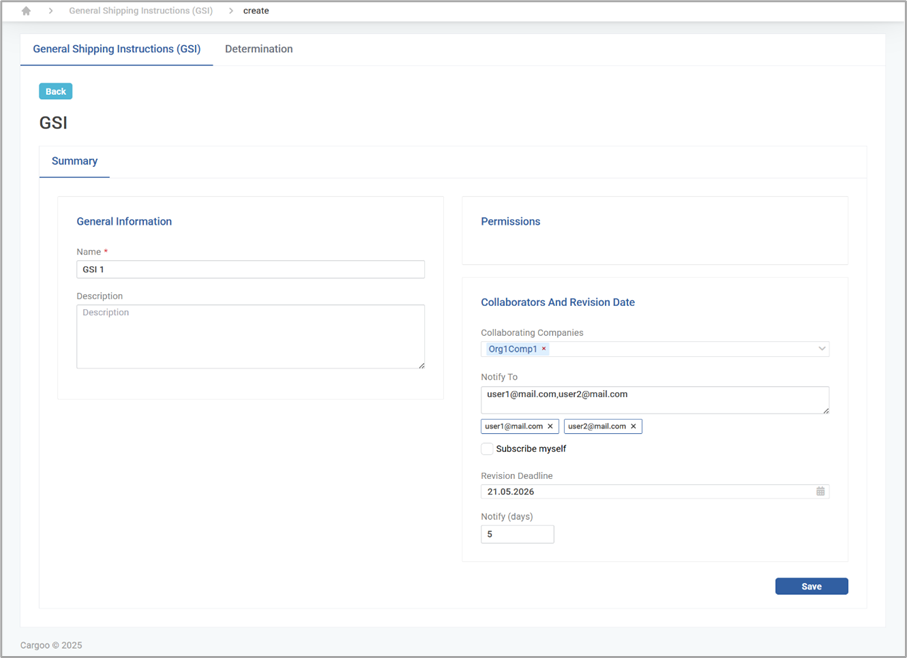
Filling in a Summary Tab
Note: All fields marked with a red asterisk (*) are mandatory.
4. Click Save to keep the data entered. The GSI record will be saved as a draft. Upon first save, additional tabs will be displayed in the General Shipping Instructions (GSI) tab.
Selecting a Date
To select a date:
1. In the date field, click the 
2. If the date you want to add is in the current month, click the corresponding date.
3. If the date is in a different month, click the name of the current month and select the desired month from the current year.
4. If the date is in a different year, click the current year to select a different year. Then, select the desired month and date.
Or,
5. Use the 


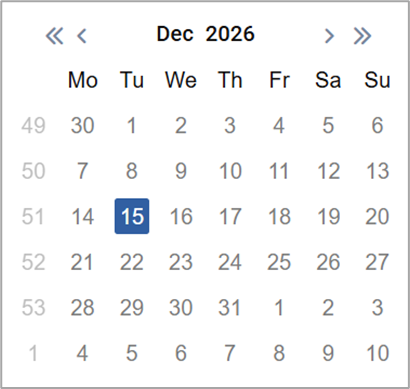
Selecting a Date
Editing a GSI Record
Once the GSI record is created and first saved, the following tabs are displayed next to the Summary tab, available for editing:
- Documents
- Supplementary Documents
- Document’s Set
- Parties
- Remarks
- Shipment Cost
- Versions
- Shipment
Note: You can edit the GSI record in Draft or Approved / Pending statuses before it is approved.
To edit the GSI record:
1. Go to Administration → GSI.
2. Locate the GSI record.
3. Click 
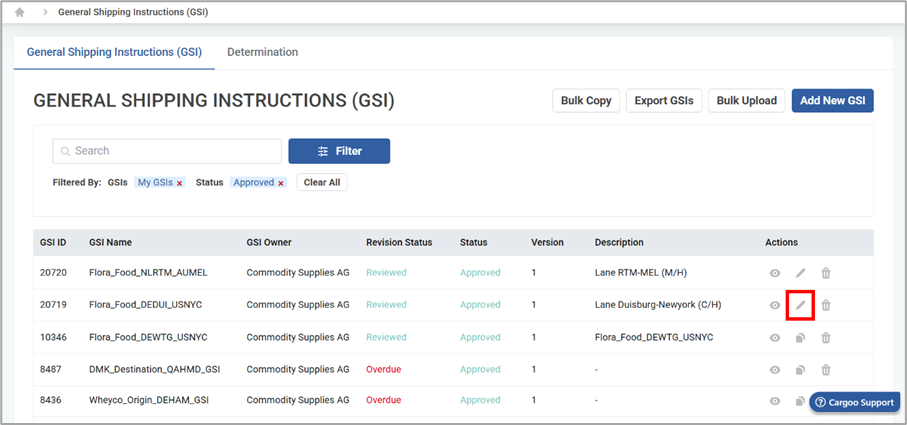
Editing a GSI Record
4. To edit the Summary tab, click Edit.
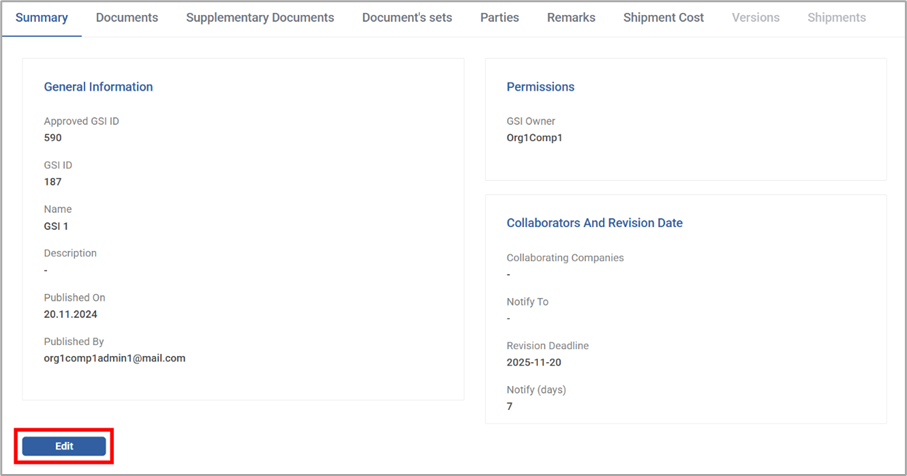
Editing the GSI Summary
5. Make necessary changes.
6. Click Update to save the changes made in the Summary tab.
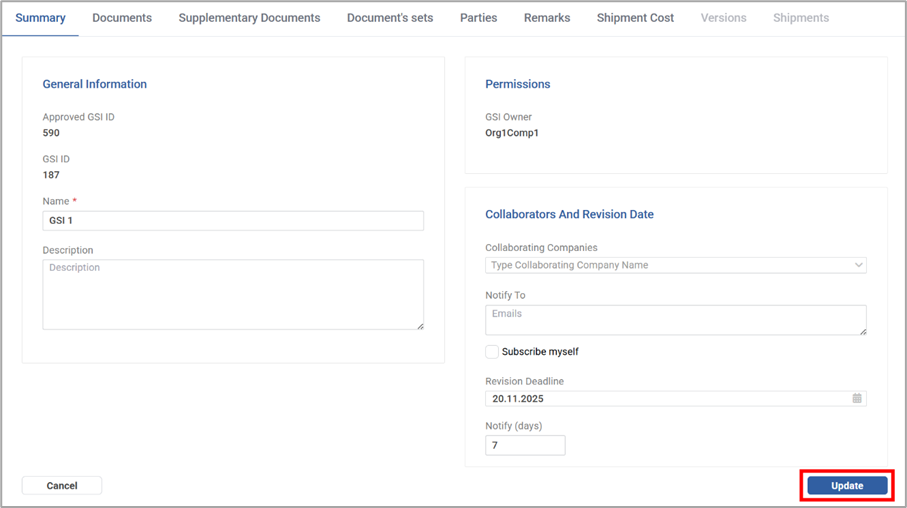
Updating the GSI Summary
7. To work on the other tabs of the GSI form, follow the instructions in the respective paragraph of this user manual.
8. Click Stop Editing Draft if you want to save the changes made. The GSI will be moved to the Approved / Pending status.
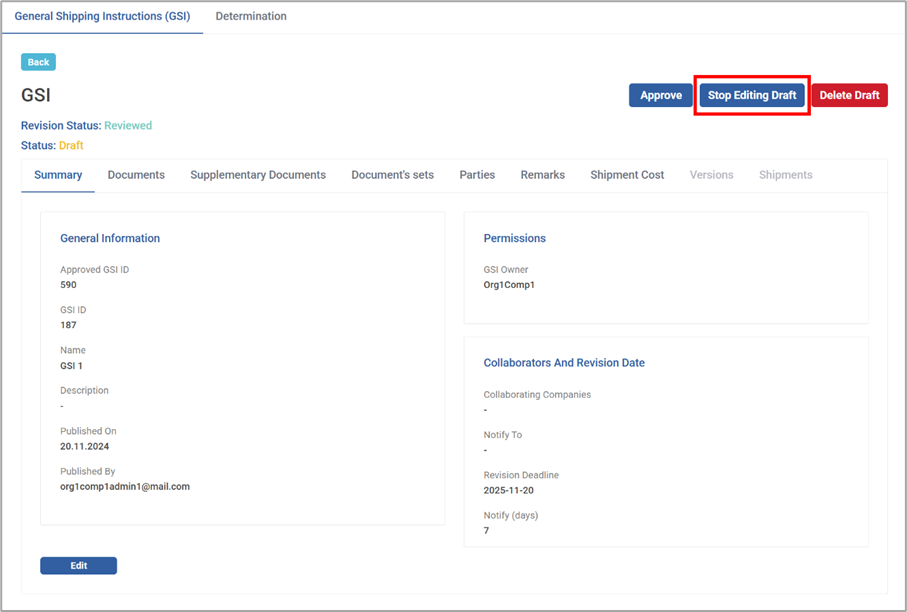
Closing the Edit Mode
9. Click Delete Draft if you want to discard the changes made and delete the draft GSI version.
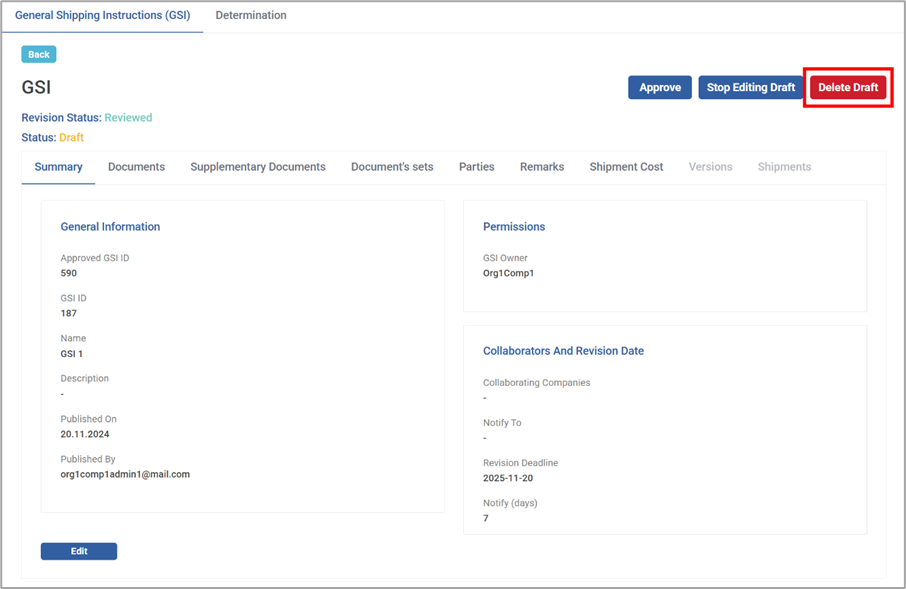
Deleting a GSI Version Draft
Documents Tab
The Documents tab allows creating types of documents to be included in the GSI.
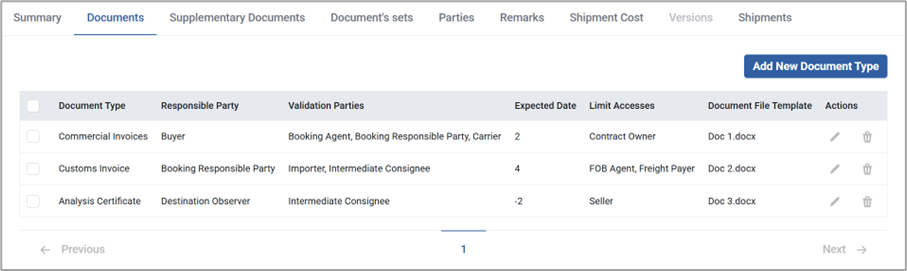
Documents Tab
In the Documents tab, the records are organized in a table with the following columns:
| Field | Description |
| Document Type | The category or purpose of the document |
| Responsible Party | The party allowed to manage the document |
| Validation Parties | The parties required to review or approve the document |
| Expected Date | The document upload deadline |
| Limit Accesses | Parties allowed to view and edit the document |
| Document File Template | The predefined format or layout applied to the document |
| Actions | The options to edit and delete (see the Managing Components paragraph) |
To add a new document tab to the GSI record:
1. Navigate to the Documents tab.
2. Click Add New Document Type above the records table.
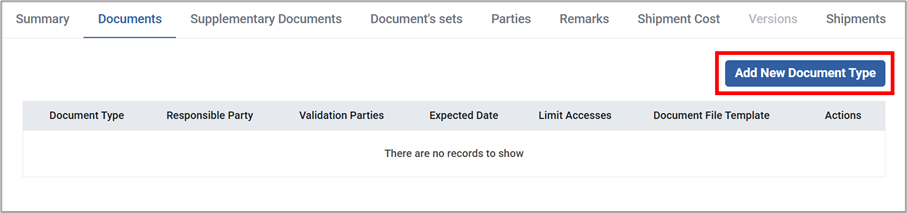
3. In the Add new document type(s) pop-up window that opens, provide the required information as described in the table below:
Note: All fields marked with a red asterisk (*) are mandatory.
| Field | Actions |
| Document Type * | Specify the types of documents you want to create with the same settings. To do this, select all options from the drop-down list. Hint: If you select more than one document type, each one will be added as a separate record in the Documents table. Note: If the Carrier Bill of Lading or the Carrier Bill of Lading (Seaway) document type(s) are selected, an additional field, Restricted Carriers, will be added, and the Validation Parties will be eliminated from the form. |
| Document Upload Deadline | Enter the number of days before or after the ETD / ETA when the document(s) must be uploaded. |
| Before / After | Specify whether the number of specified days should be considered before or after the ETD / ETA. By default, the field is populated; to modify, select an option from the drop-down list. |
| Trigger | Indicate whether the deadline for uploading the document(s) should be relative to the estimated time of delivery (ETD) or the estimated time of arrival (ETA). To do this, select an option from the drop-down list. |
| Location | Specify whether the deadline for uploading the document(s) should be applied to the place of origin (POR) or the final destination (FND). By default, the field is populated; to modify, select an option from the drop-down list. |
| Reminders / Overdue Notifications | |
| Emails | Enter the email addresses of users who should be notified about uploading of the document(s). Hint: Enter the email address and click Enter, or add a comma to add another address. To remove the added address, click x. |
| Subscribe Myself | Select the checkbox to receive notifications about the document(s) upload. Your email address will be added to the email list. |
| Send to Responsible Party | Select the checkbox to send notifications about the document(s) upload. Your email address will be added to the email list. |
| Add Emails to CC | Enter the email addresses of users who should be notified about uploading the document(s) via email in a copy (CC). Note: The field is activated if the Send to Responsible Party checkbox is selected and more than one email addresses are added in the Emails field. |
| Days (before / after expected date) | Enter how many days before / after the document upload deadline the subscribers should be reminded about the upload. |
| Add Reminder / Add Notifications | Click Add Reminder or Add Notification to create more reminders before the document upload deadline or notifications after the document upload becomes overdue. To remove an added reminder / notification, click  . .Note: The delete option becomes available for reminders / notifications only after you add a second reminder / notification. |
| Remarks | Enter any additional comments applicable to the document(s). |
| Number of Originals | Enter the number of required original documents. |
| Number of Copies | Enter the number of required document copies. |
Responsible Party | Indicate a party responsible for managing document(s). To do this, select an option from the drop-down list. |
| View and Edit Rights | Assign the rights to view and edit documents to parties. To do this, select all options from the drop-down list. Note: If no party is selected, all shipment parties can view and edit the document(s). |
View Rights | Assign the rights to only view documents to parties. To do this, select all options from the drop-down list. Note: If no party is selected, all shipment parties can view the document(s). |
Restricted Carriers | Specify carriers that should not be allowed to upload bill of lading (BL) documents. Note: This field is only available if Carrier Bill of Lading / Carrier Bill of Lading (Seaway) document type(s) are selected in the Document Type field. |
Validation Parties | Assign view-only document access to the relevant parties. To do this, select all options from the drop-down list. Note: Validation parties can also approve or reject the GSI file, provided the appropriate party is selected under shipment parties. |
Receive a Copy of The Document by Email | Enter the email addresses of users who should receive a copy of the uploaded document(s). Hint: Enter the email address and click Enter or add a comma to add another address. To remove the added address, click x. |
Subscribe myself | Select the checkbox to receive a copy of the document by email. Your email address will be added to the email list. |
Document File Template | Upload the document. To do this, see the Attaching Files paragraph. Note: You can add a template only if one option is selected in the Document Type field. |
Document File Upload is Optional | Indicate if uploading the document file is not mandatory. To do this, select the checkbox. |
Allow Only the Newer Version of the Excel File | Indicate if you want to restrict the document type to the newer version of the Excel format. To do this, select the checkbox. |
4. Click Save to finalize adding the document type.
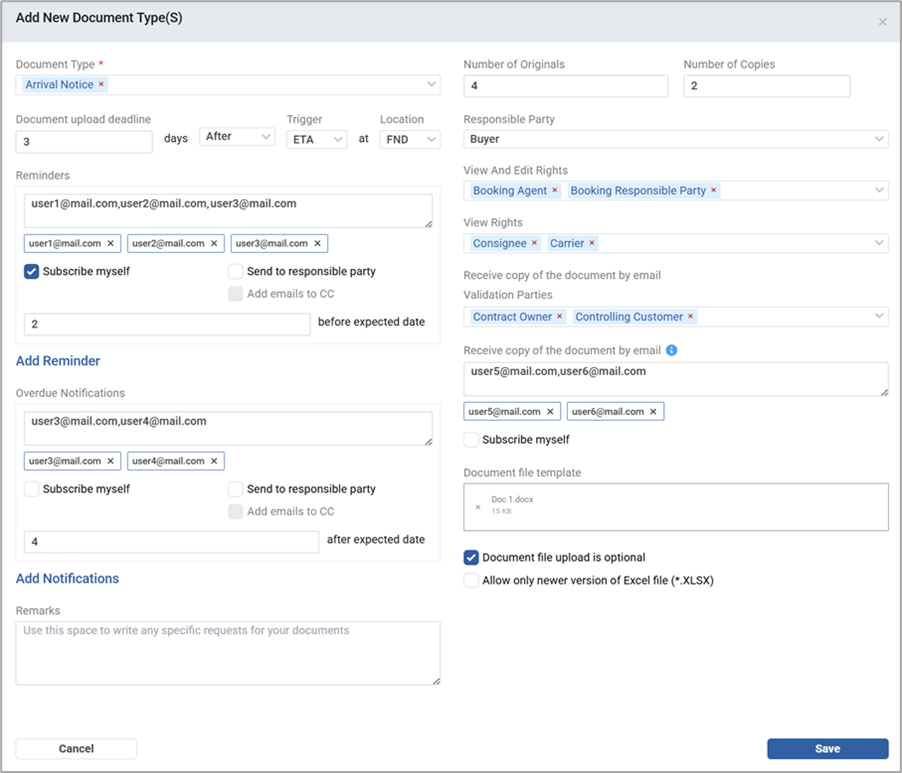
Recording a New Document Type Details
Supplementary Documents Tab
While the Documents are mandatory for completing a shipment, the Supplementary Documents are additional documents that are only applied under specific conditions. For instance, when a particular product requires extra documentation, such as certificates, you can use the Supplementary Documents tab.
The documents predefined in the Supplementary Documents tab are not required by default, but can be triggered automatically based on certain criteria. To apply a supplementary document, you must set the conditions for its use in the Determination process (see the Determination Section paragraph).
The Supplementary Documents tab is organized identically to the Documents tab. Adding supplementary documents follows the same steps as regular documents, including setting reminders, assigning parties, and uploading templates. Documents already selected as a Document or Supplementary Document will no longer be available in the Document Type drop-down list.
To work in the Supplementary Documents tab, see the Documents Tab paragraph.
Document’s Set Tab
The Document’s Set tab allows sending notification emails to subscribed users. A notification is automatically sent for every document upload defined in the document set.
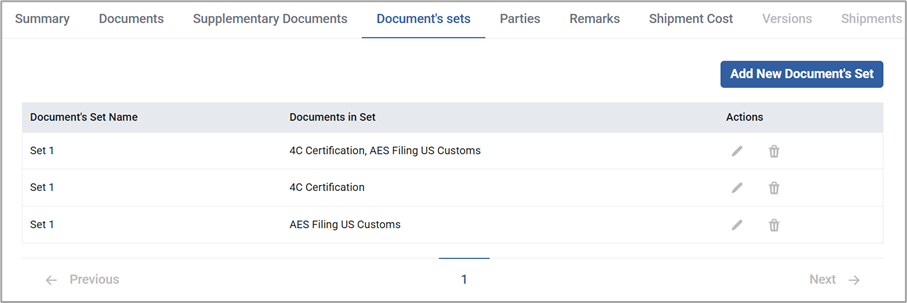
Document's Sets
In the Document’s Set tab, the records are organized in a table with the following columns:
Field | Description |
Document’s Set Name | The name of the document set given during the creation |
Documents in Set | The types of documents added to the document set |
Actions | The options to edit and delete (see the Managing Components paragraph) |
To create a document set in the GSI:
1. Navigate to the Document’s Set tab.
2. Click Add a New Document’s Set above the records table.
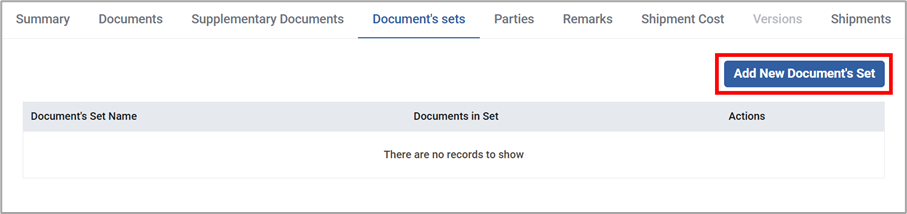
Adding a New Document’s Set
3. In the Add New Document's Set pop-up that opens, provide the required information as described in the table below:
Note: All fields marked with a red asterisk (*) are mandatory.
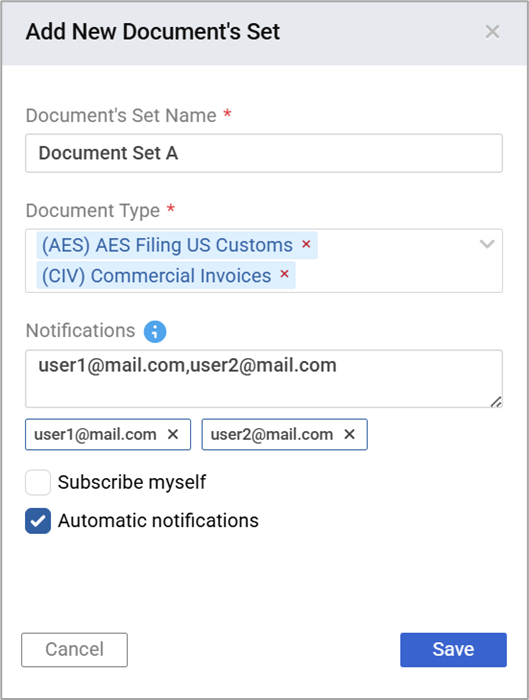
Parties Tab
In the Parties tab, you define the key stakeholders related to the order and shipment. When the GSI is applied, these parties are automatically added at both the order and shipment levels. Each party plays a specific role, and its information is stored within the GSI for easy reference.
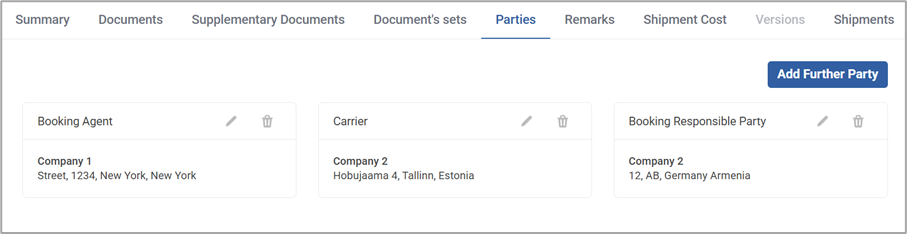
Parties Tab
In the Parties tab, the records are organized in cards with the following information:
| Field | Description |
| Party Name | The name given to the party during creation |
| Partner | The name of the partner company added to the party |
| BL Address | The bill of lading (BL) address of the partner company |
| Actions | The options to edit and delete records (see the Managing Components paragraph) |
Adding parties to GSI ensures that all relevant parties are clearly defined and associated with their roles, allowing efficient management of parties on order and shipment levels. It reduces the time and effort to add each party separately during an order or shipment creation.
To add a party to the GSI record:
1. Navigate to the Parties tab.
2. Click Add Further Party above the records table.

Adding a Party to the GSI
3. In the drop-down list that opens, select the type of party you want to add to the GSI. The respective party cards are added to the table.
4. In the party card, select the respective options from the drop-down lists in the following fields:
- Partner * (mandatory)
- BL Address – displayed after selecting the Partner.
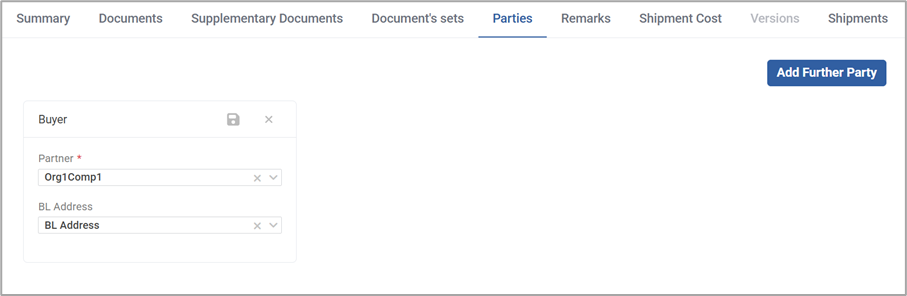
5. Click 
Remarks Tab
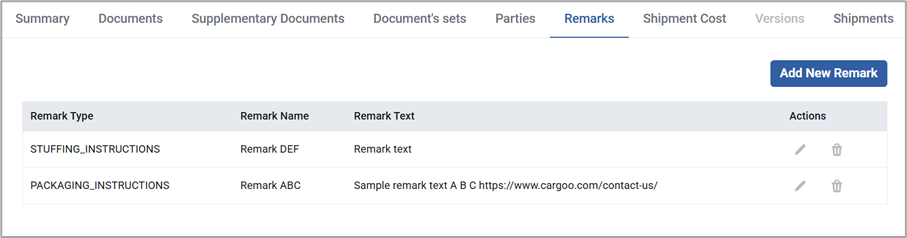
In the Remarks tab, you can ensure that important instructions and notes are captured and communicated clearly to all relevant parties in the shipping process. These instructions could include packing instructions, sample details, or special requirements for the shipper.
In the Remarks tab, the records are organized in a table with the following columns:
Field | Description |
Remark Type | The type of added remark |
Remark Name | The name given to the remark during creation |
Remark Text | The text created within the remark during creation |
Actions | The options to edit and delete records (see the Managing Components paragraph) |
To create a remark to the record:
1. Navigate to the Remarks tab.
2. Click Add New Remark above the records table.
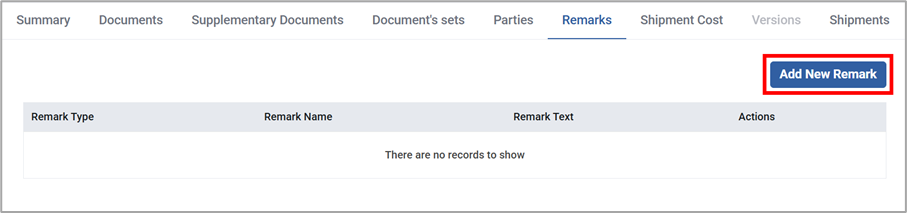
Adding a New Remark
3. In the Add New Remark pop-up that opens, provide the required information as described in the table below:
Note: All fields marked with a red asterisk (*) are mandatory.
Field | Actions |
Remark Type | Specify the type of remark. To do this, select an option from the drop-down list. |
Remark Name * | Enter the name of the remark. |
Remark Text | Enter the text of the remark. You can customize the text using a standard set of text formatting tools included in the field. |
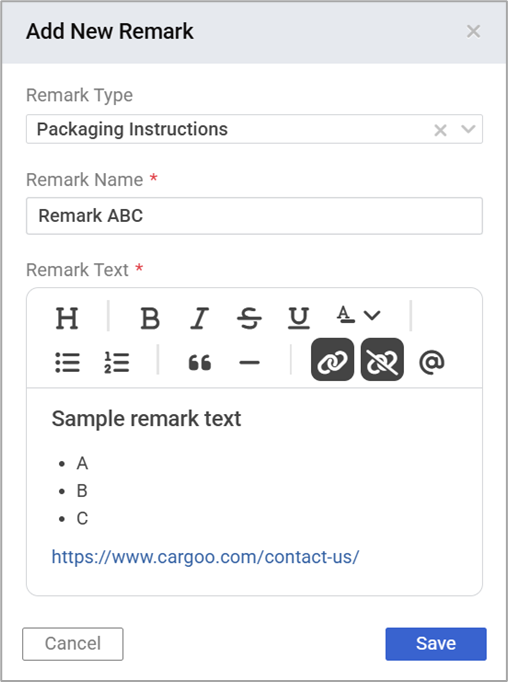
Recording a GSI Remark Details
4. Click Save to keep the changes made.
Shipment Cost Tab
The Shipment Cost tab allows you to manage the financial aspects of the shipment by applying predefined cost templates.
This feature ensures that all relevant shipment costs, such as freight rates, surcharges, and additional fees, are captured and applied consistently across shipments, minimizing the chances of cost-related discrepancies.
In the Shipment Cost tab, the records are organized in cards with the following information:
Field | Description |
Card Title | The title of the card identifying the type as a template |
Template Name | The name of the template given to it during creation |
Actions | The options to edit and delete records (see the Managing Components paragraph) |
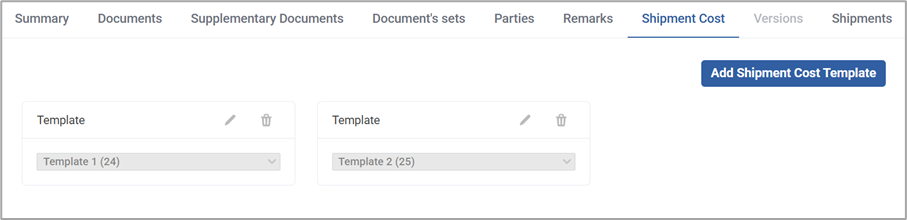
To fill in the Shipment Cost tab of a GSI record:
1. Navigate to the Shipment Cost tab.
2. Click Add Shipment Cost Template.

3. In the Add Template card that opens, specify the cost template name or ID.
Hint: Start typing, and the system will generate all matching results.
Note: To be able to select a shipment cost, you should create a template in the Administration →Shipment Costs Templates section.
4. Click 
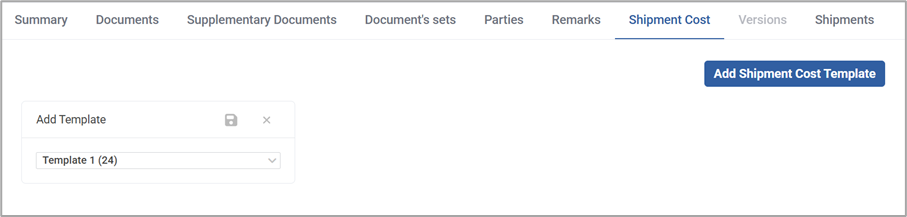
Shipments Tab
The Shipments tab allows users to view the list of shipments to which the current GSI is applied. This helps track and manage shipments following a specific set of instructions or requirements in the GSI.
In the Shipments tab, after changes are made to the GSI, you can once again apply the GSI to shipments, with the Re-apply functionality.
To track shipments of a GSI record:
1. Navigate to the Shipments tab. This displays shipments where the current GSI has been applied.
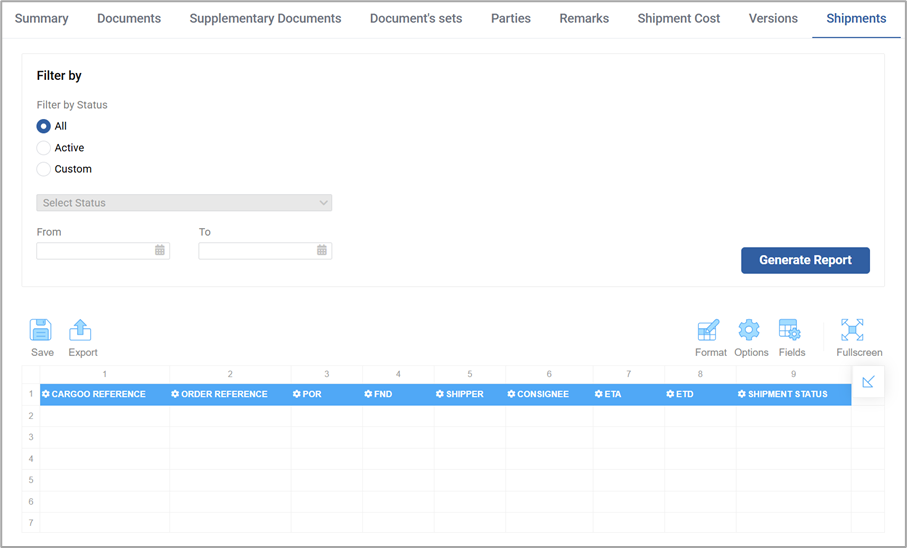
2. Manage the shipment information as described in the table below:
Field | Actions |
Filter by | |
Filter by Status | Specify the filtering criteria. To do this, select the status of the shipment. The following options are available:
For the Custom status, select all applicable options from the drop-down list. |
From / To | Indicate the dates of shipments you want to view. To do this, see Selecting_a_Date. Hint: If you select Active / Custom in the Filter by Status, the From / To dates will apply to the selected status. If All statuses is selected, the From / To dates will apply to the shipment creation date. |
Generate Report | Click Generate Report to get a list of shipments where the current GSI is applied. |
Re-apply GSI | Click Re-apply GSI to apply the latest version of the GSI to the shipment, reflecting the recent changes made, keeping the GSI ID the same. Note: The button becomes available only after generating the report. |
Actions | Apply the header icons to manage the generated report:
|
Export Report | Click |
 − allows formatting and conditional formatting of the cells
 − suggest layout options for the data
 − displays all fields of the report content to filter and customize per need
 − expands the report view to a full-screen
 − returns the report view to the system default
 − downloads the generated report in a JSON format
 to download the generated report on your device in HTML, CSV, or PDF formats, in an Excel file, or an image. You can also print the file directly from the system. To do this, select the respective option from the drop-down list.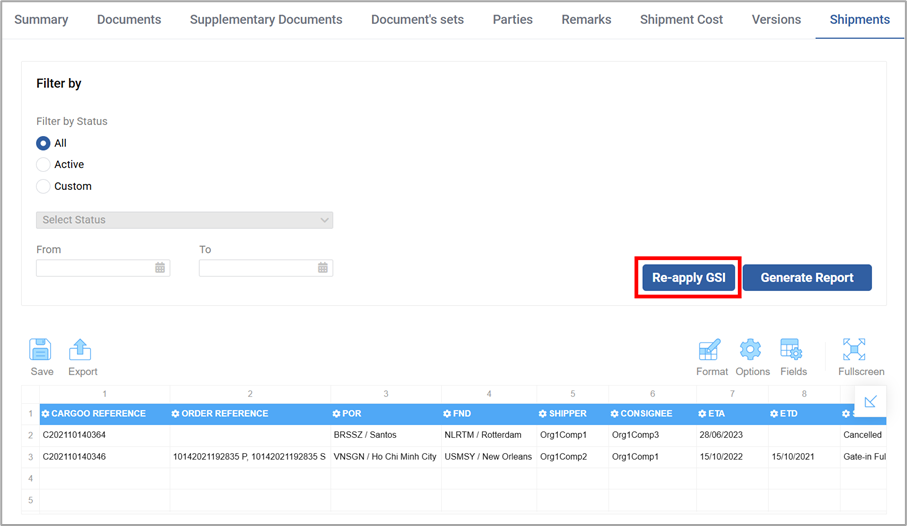
Approving GSIs
Once you complete working on a draft GSI record, you should approve it to finalize the initial version of the record.
To approve a GSI:
1. Go to Administration → GSI.
2. Locate and open the GSI record you want to approve.
3. Click Approve. A confirmation pop-up will open.
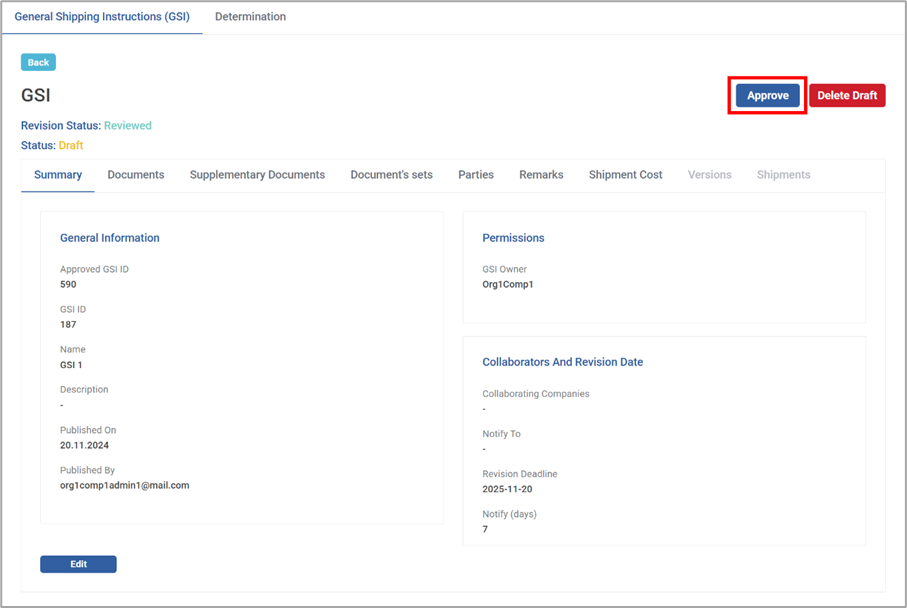
Approving a GSI Record
Note: To approve a GSI record, the General Shipping Instructions module must be enabled for your company.
If you do not see GSI in the Administration menu:
1. Go to Administration → My Organization → Companies → Modules.
2. Locate General Shipping Instructions.
3. Click Send Request. The Cargoo Admin Team will review and approve it.
Hint: If the module is enabled for your company but not for a specific user, contact your company / organization admin.
- The Support User always has full access to view / manage and perform all actions in GSI.
- If the view / manage rights are disabled for the Company User, Company Admin, and Organization Admin, they will not be able to view or perform any actions in GSI.
- If NOT disabled, all users are able to view the list of records, export, copy, bulk copy, and view records in the GSI and Determination tabs.
For the remaining permissions per role, refer to the table above:
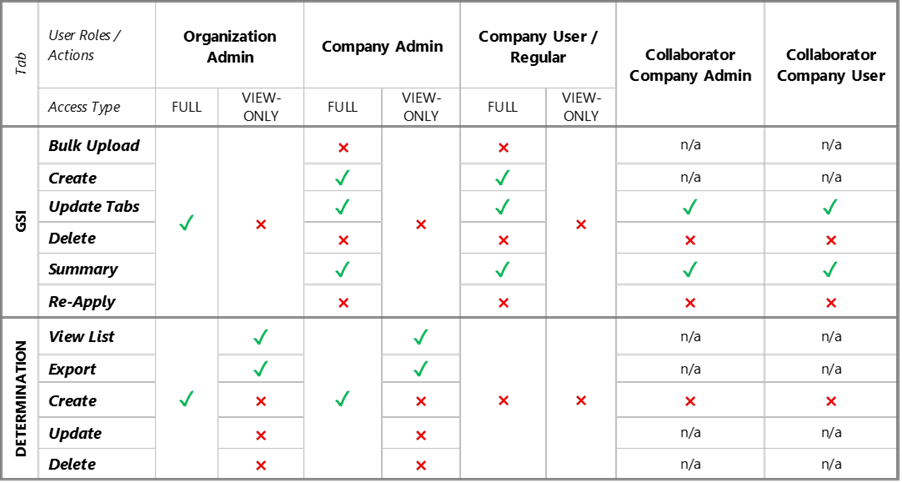
Note: View-only indicates that the manage rights are disabled. Full access indicates that both view and manage permissions are enabled.
Versions Tab
In the GSI module, you can create, save, share, and track new versions of the approved GSIs. Versioning ensures that the most up-to-date instructions are applied while older versions are archived for reference.

In the Versions tab, the records are organized in a table with the following columns:
Field | Description |
Version | The name of the version of the GSI |
Published | The date of creation of the GSI version |
Created By | The email address of the creator of the GSI version |
To add a new GSI version:
1. Go to Administration → GSI.
2. Locate the approved GSI record for which you want to add a new version.
3. Click
4. Click Create New Version.
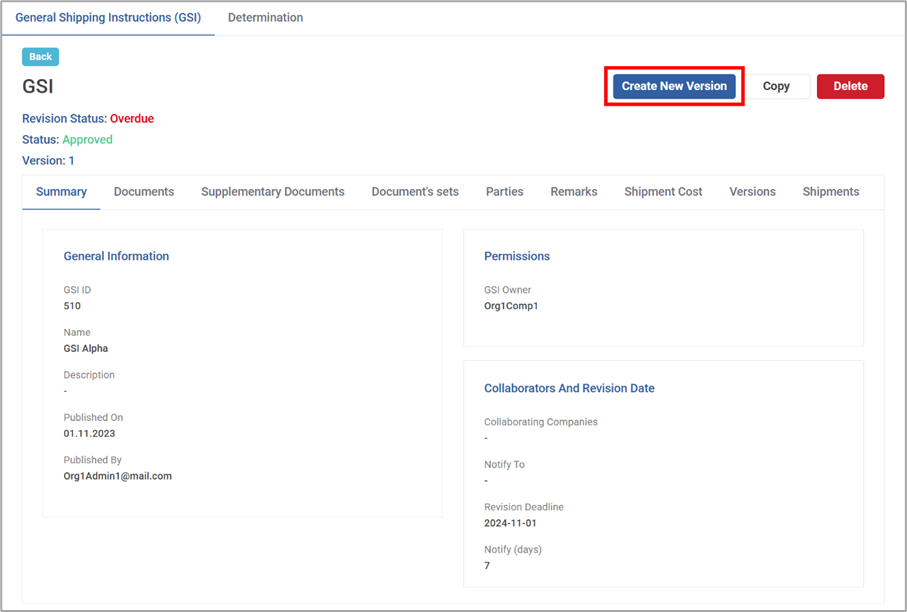
5. Proceed to editing the new version as described in the Adding a GSI: Summary Tab paragraph.
Note: After approval, the new version becomes the active GSI, and the old one is archived. Cargoo uses the latest approved version of the GSI in any determination or shipment application.
All versions of a GSI share the same GSI ID. Cargoo applies the latest approved version of the GSI record.
Hint: There can only be one approved version of a GSI attached to a GSI ID at any given point in time. If you need multiple approved versions of a GSI, you can copy and approve it.
Applying GSIs Manually
After creation, you can manually apply approved GSIs to the shipment.
When you apply a GSI manually, the system checks whether the shipment already contains a document card for each document type from the GSI.
- If the shipment does not contain the document type, the system creates a new document card and sends the respective email or push notifications to the related parties.
Note: This does not apply to the Supplementary Documents.
- If the shipment already contains the document type, the system updates the existing document card, eliminating duplicates. Next, it recalculates upload deadlines only for documents without uploaded files. For documents with uploaded files, the deadline will not be changed.
For document validation parties:
- If the GSI adds validation parties that did not exist before, all existing files on the document will change to the Pending validation status.
- If the GSI removes validation parties, the validation status on all files will reset.
- If the validation parties existed before and still exist after, the validation status will remain unchanged.
For both cases, whether the document types existed in the shipment when applying GSI or not, the system will apply the GSI details with the following rules:
- Parties – applies to the shipment only for shipments with Delegated or further status. For the shipments in Draft or Delegated status, parties from the GSI will not be applied.
- Remarks – always applies if configured in the GSI.
- Shipment cost templates – applies if the GSI has cost templates configured.
- Documents with no files and no document type link - removes before the new GSI is applied.
To apply approved GSIs to the shipment manually:
To add an ISF filing document:
1. Go to Shipments.
2. Locate the shipment to which you want to apply a GSI and click the shipment card to navigate to the Track & Trace page.
3. Go to the Documents tab.
4. Click Select Template.
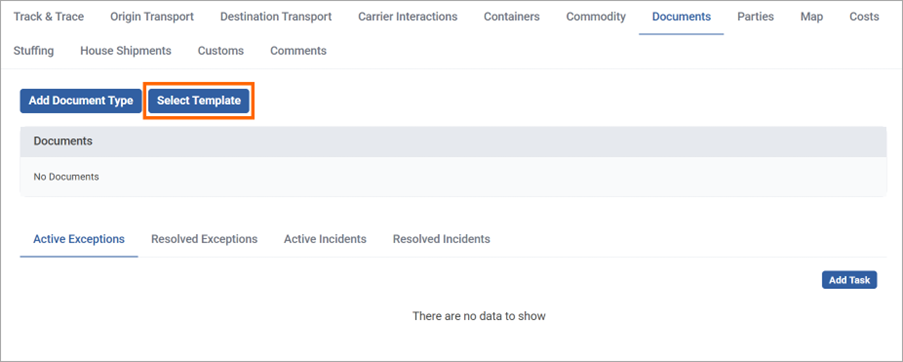
Selecting a GSI Template from the Documents Tab
5. In the pop-up that opens, select the template from the drop-down list.
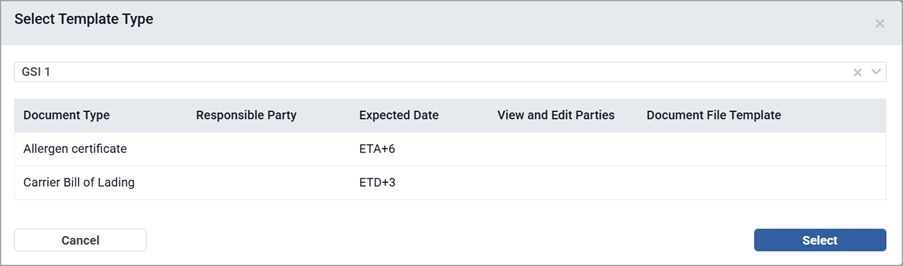
6. Click Select to confirm the selection. All documents of the selected template will be added to the Documents tab of the shipment.
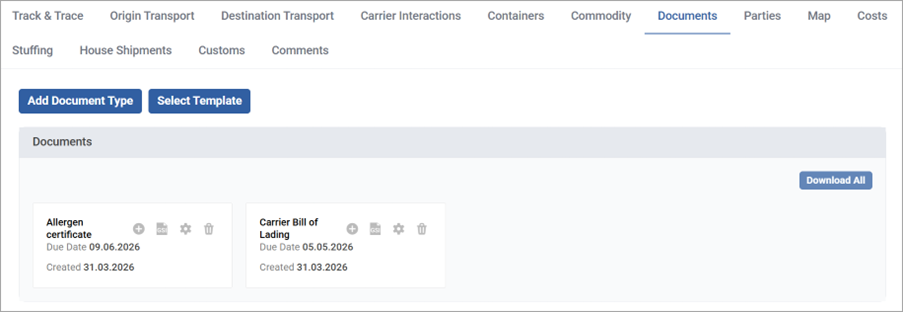
Managing Components
In the GSI form, you can edit and delete components in different tabs, as well as update documents in bulk in the Documents and the Supplementary Documents tabs.
Editing a Component
To edit a component:
1. Navigate to the respective tab of the GSI form.
2. Locate the component record you want to edit.
3. Click
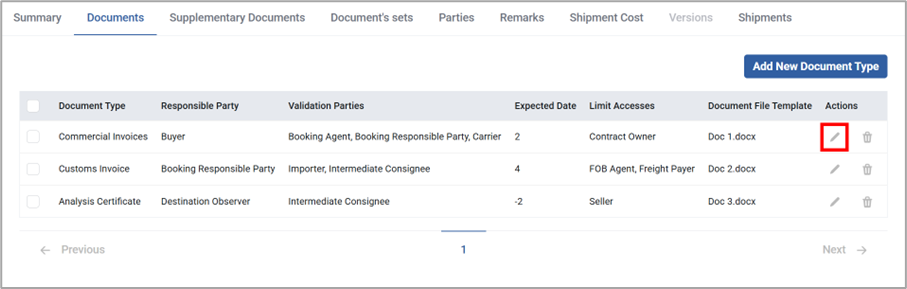
4. Make necessary changes.
5. Click Save to keep the changes made.
Deleting a Component
To delete a component:
1. Navigate to the respective tab of the GSI form.
2. Locate the component you want to delete.
3. Click 
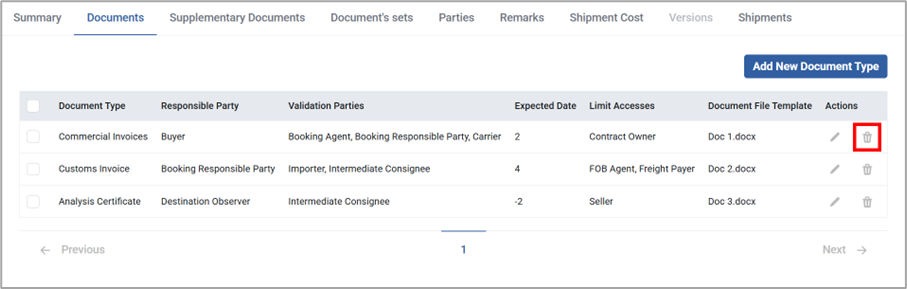
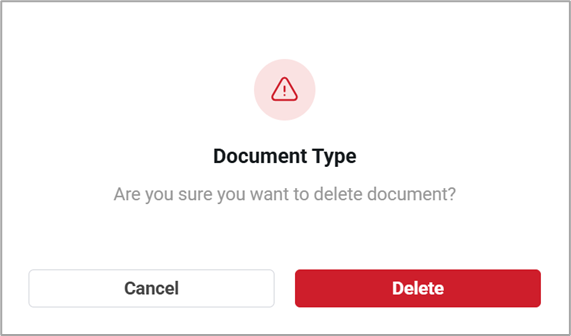
4. In the pop-up window that opens, click Delete to confirm.
Updating Multiple Documents
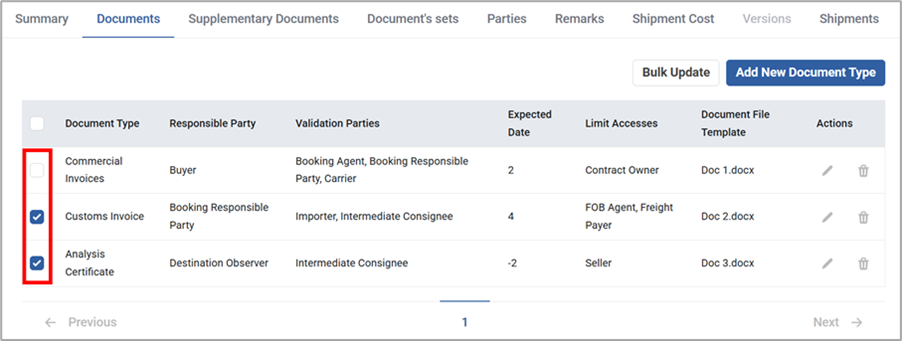
In the Documents and the Supplementary Documents tabs, you can update multiple documents at once. To do this:
1. Navigate to the respective tab of the GSI form.
2. Locate the documents you want to update and mark the checkboxes next to each record.
Or,
3. Click the checkbox in the record table header row to select all records.
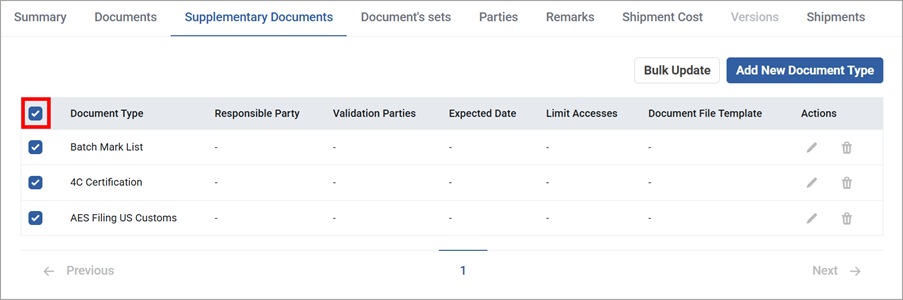
4. In the Bulk Document Type Updates form that opens, make necessary changes.
Note: The form opens with editable empty fields, except for the Document Type field, which is view-only.
5. Click Apply to confirm changes made. After saving, any fields left unchanged will retain their current values.
Determination Section
In the GSI module, determination allows users to automate the application of a GSI on orders and / or shipments based on specific conditions and triggers.
The new GSI version is automatically applied the next time a determination action is triggered. However, creating a new GSI version does not automatically trigger the determination action. If the determination action is not triggered, the new version will not be applied.
Note: The application of the new version of the GSI is not related to when a shipment is created, but only to the execution of the determination. The latest approved GSI version is used in the determination, regardless of shipment timing.
In the Determination tab, the records are organized in a table with the following columns:
Field | Description |
Setup Id | A unique identifier for the determination setup given by the system |
Owner Company | The name of the company that owns the determination setup |
Owner Party | The role of the user within the owner company accountable for this setup |
Trigger Name | The event that initiates the setup’s process or workflow |
GSI Id / GSI Name | The unique identifier of the General Shipping Instruction (GSI) record to which the determination is applied |
Actions | The options to edit and delete (see the Managing Components paragraph) |
In the Determination section, you can filter the existing determination records, export the records, and add a new record.
Filtering Determination Records
In the Determination section, you can filter the records by applying criteria to view records of a specific owner company and setup.
Note: This paragraph is not available to Support Users.
To filter determination records:
1. Go to Administration → GSI.
2. Navigate to the Determination tab.
3. Click Filter above the records table. A pop-up opens displaying the available filtering criteria.
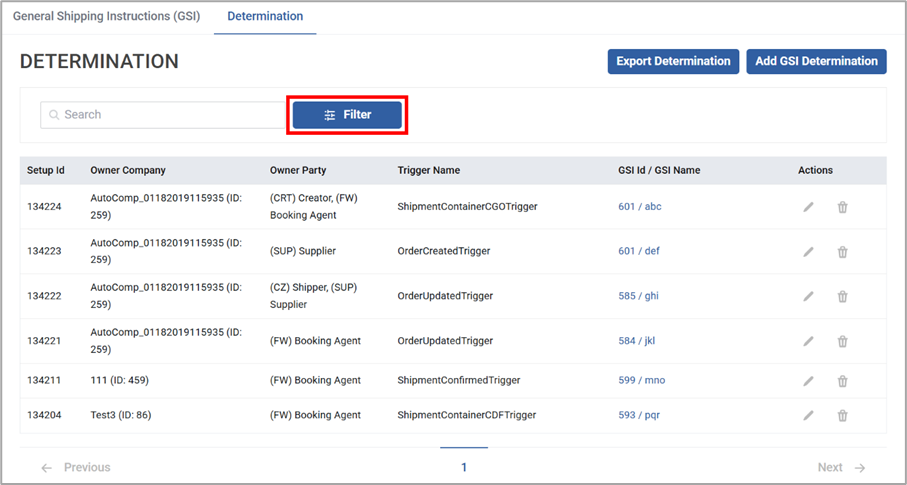
Filtering Determination Records
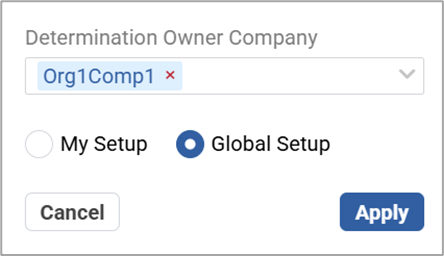
4. In the pop-up that opens, specify the filtering criteria as described in the table below:
Field | Description |
Determination Owner Company | Specify the owner company(ies) of the determination for the Global Setup. To do this, select all options from the drop-down list. Note: For My Setup, the owner company is auto-generated and read-only. |
Setup | Select the setup of the determination. The following options are available:
|
5. Click Apply to confirm the selected filtering criteria.
6. To remove all applied filtering criteria, click Clear All.

Clearing Determination Filtering Criteria
Exporting Determination Records
In the Determination section, you can export all records to your local PC. To do this:
1. Go to Administration → GSI.
2. Navigate to the Determination tab.
Hint: You can search for and export only the specific records you need, without downloading the full set of records.
3. Click Export Determination above the records table.
4. Choose where to save the exported file.
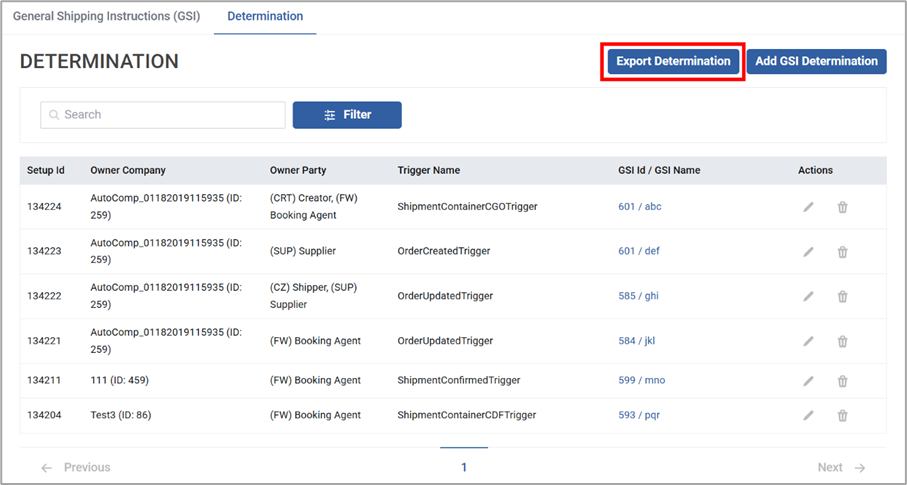
Exporting Determination Records
Adding Determination Records
In the GSI module, the Determination tab allows users to automate the application of a GSI on orders and/or shipments based on specific conditions and triggers.
To add a determination to the GSI record:
1. Go to Administration → GSI.
2. Navigate to the Determination tab.
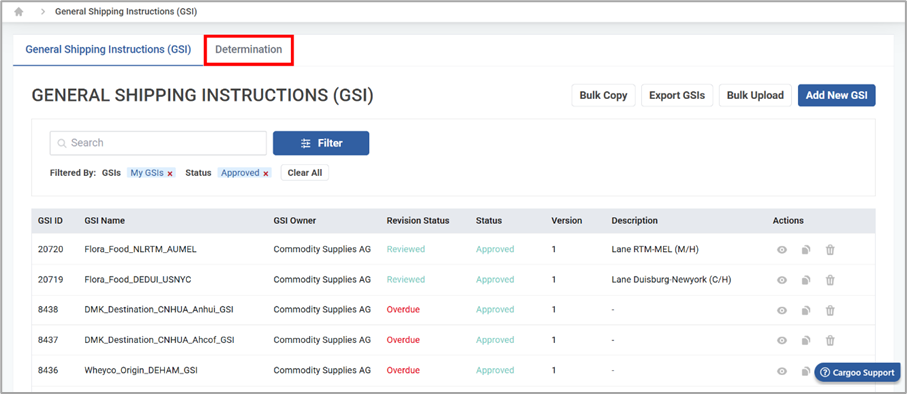
Determination Tab
3. Click Add GSI Determination.
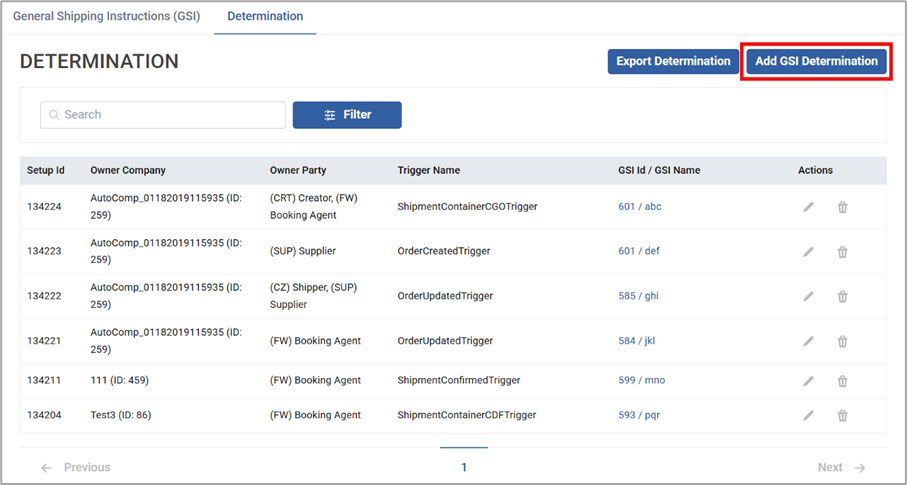
Adding GSI Determination
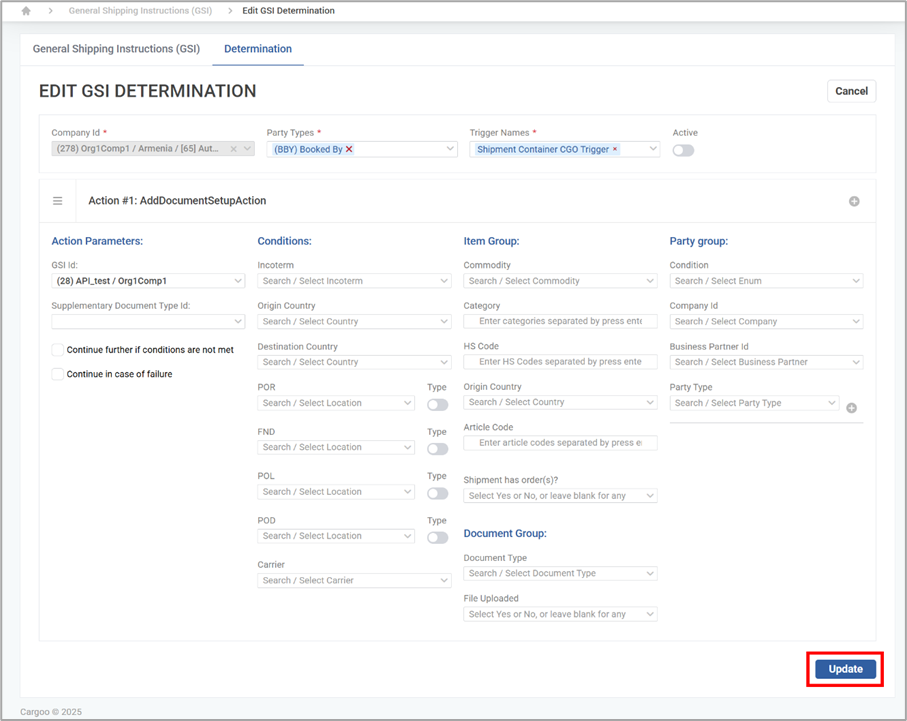
4. In the determination setup screen that opens, provide the required information as described in the table below:
Note: All fields marked with a red asterisk (*) are mandatory.
Field | Description |
Party Types (*) | Specify the types of parties responsible for executing the determination. To do this, select all options from the drop-down list. |
Trigger Names (*) | Specify the triggers that will initiate the determination. To do this, select all options from the drop-down list. Hint: Triggers are events like shipment creation or updates that prompt the system to check whether the conditions for the determination are met. The determination only applies to the GSI, when an action is triggered. |
Active | To activate the determination, keep the toggle enabled. Or, disable, to create the record without activating. Note: Only Organization Admin and Support User roles are allowed to create and modify determinations. |
Action Parameters − the actions to perform to define conditions | |
GSI ID | Identify the GSI to be applied by this determination. To do this, select the GSI ID from the drop-down list. The system will automatically apply the most recent version of the GSI when the trigger conditions are met. Note: The selected GSI must be approved. |
Supplementary Document Type ID | Specify the ID of the supplementary document type. To do this, select the respective option from the drop-down list. |
Continue further if conditions are not met | Select the checkbox if you want to proceed even if the conditions are not met. |
Continue in case of failure | Select the checkbox if you want to proceed to the next action even if the actions fail to be executed for any reason, i.e. conditions mismatch, technical issue, etc. |
Conditions − the criteria that must be met for a rule to be applied | |
Incoterm | Specify the appropriate incoterm. To do this, select the respective option from the drop-down list. |
Origin Country | Identify the country of origin. To do this, select the respective option from the drop-down list. |
Destination Country | Identify the country of destination. To do this, select the respective option from the drop-down list. |
POR | Specify the place of origin (POR). To do this, select the respective option from the drop-down list. |
Enable the toggle to display the place of origin (POR) type, such as Door / Port. | |
FND | Specify the final destination (FND). To do this, select the respective option from the drop-down list. |
FND Type | Enable the toggle to display the final destination (FND) type, such as Door / Port. |
POL | Specify the port of loading (POL). To do this, select the respective option from the drop-down list. |
POL Type | Enable the toggle to display the port of loading (POL) type, such as Door / Port. |
POD | Specify the port of discharge (POD). To do this, select the respective option from the drop-down list. |
POD Type | Enable the toggle to display the port of discharge (POD) type, such as Door / Port. |
Carrier | Identify the carrier(s). To do this, select the respective option(s) from the drop-down list. |
Item Group − the product-related criteria for a shipment | |
Commodity | Specify the commodity(ies). To do this, select the respective option(s) from the drop-down list. |
Category | Add all categories of the product. Hint: Enter the category, click Enter / comma, or click Add. To remove the added category, click  . . |
HS Code | |
Origin Country | Identify the country of origin. To do this, select the respective option from the drop-down list. |
Article Code | |
Shipment has order(s)? | Identify whether the shipment has order(s). To do this, select Yes / No from the drop-down list. |
Document Group − the documents related to the shipment | |
Document Type | Specify the type of document. To do this, select an option from the drop-down list. |
File Status | Identify the status of the selected document. To do this, select an option from the drop-down list. |
File Uploaded | Identify whether the file was uploaded. To do this, select Yes / No from the drop-down list. |
Party group − the entities or stakeholders involved in the shipment | |
Condition | Specify the condition of the party group. To do this, select an option from the drop-down list. |
Company ID | Identify the ID of the company. To do this, select an option from the drop-down list. Note: This field is active if the Business Partner ID is not selected. |
Business Partner ID | Identify the ID of the business partner. To do this, select an option from the drop-down list. Note: This field is active if the Company ID is not selected. |
Party Type | Specify the type of party. To do this, select an option from the drop-down list. |
Add another Party group | Click  to add another party group with its Company ID, Business Partner ID, and Party Type. to add another party group with its Company ID, Business Partner ID, and Party Type.To remove the added party group, click  . . |
Hint: To receive updates when a GSI is applied via determination, ensure that you are subscribed to notifications in the GSI Summary tab.
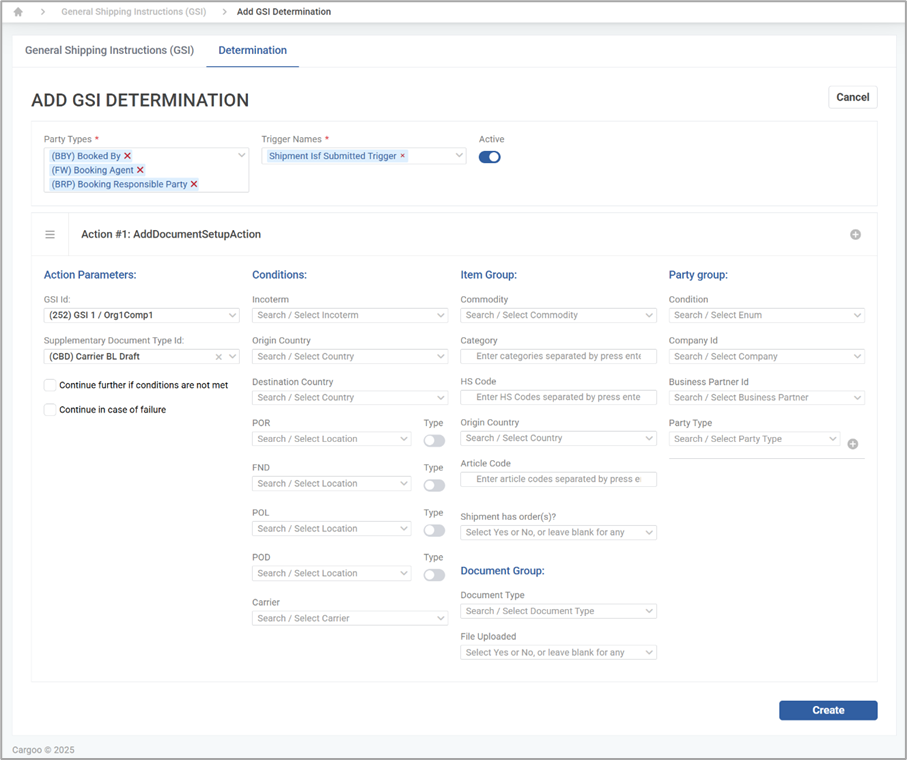
Adding Determination Records
5. Click
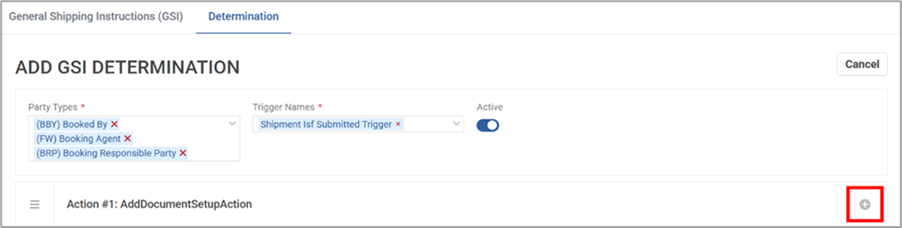
Adding Another Document Setup Action
6. Use the
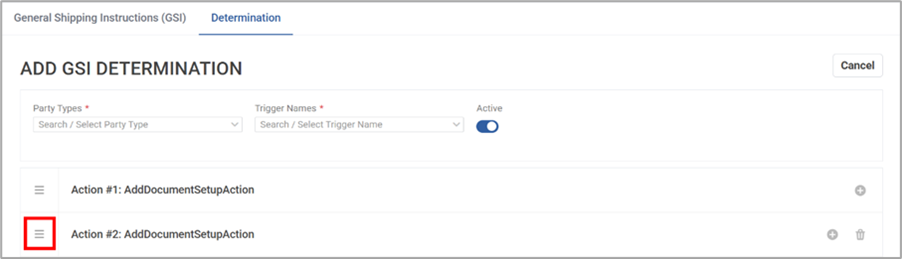
7. To remove the added action group, click
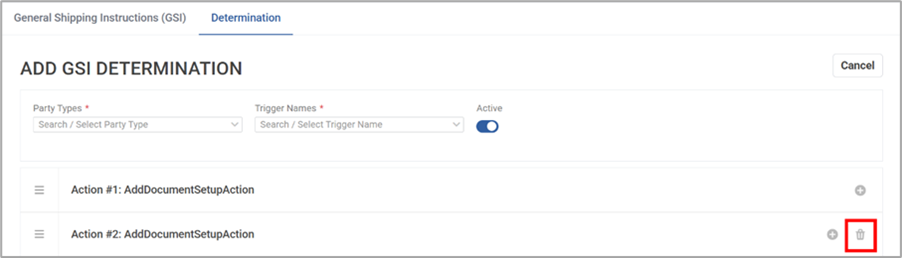
Deleting the Action
8. Click Create to save the data entered. The new determination will be added to the records table.
Updating Determinations
To update an existing determination:
1. Go to Administration → GSI.
2. Navigate to the Determination tab.
3. Locate the determination record.
4. Click 
5. Make necessary changes.
6. Click Update to keep the changes made.