 Carrier Integration Support
Submitting or Delegating a Booking Request
As you click the Create shipment plan button (irrespective of your intention to create a single shipment plan, multiple shipment plans or shipment plans on multiple orders), you are delegated to the Shipment Plan page. On this page, you first of all have to select between the following two booking submission flows:
- I want to submit booking request myself (hereinafter referred to “Submission flow”)
- I want to delegate booking submission to my business partner (hereinafter referred to as “Delegation flow”).
Note | As you select one of the booking submissions options and the rate consumer, you will not have any opportunity to edit it at later stages after you confirm the delegation or submit the booking request. |
Both flows include Initial and 4 consecutive steps. They are described separately below.
Submission Flow
Submission flow can be implemented if your company is a shipper, a booking agent, or an Origin Handling Agent (OHA).
As you click the Create shipment plan button from the Orders page, you are delegated to the Shipment Plan page. On this page, you have to pass the following steps:
- Initial step
- Step 1 - Commodities
- Step 2 - Rate and Schedule
- Step 3 - Parties and Charges
- Step 4 – Terms and Conditions, modified into Summary and Shipping Instructions, after Parties and Charges are filled in.
Initial Step
At this step you have to select booking submission by yourself option as well as the rate consumer.
Submit Booking Request by Yourself
For the submission of the booking request by yourself:
- Take the first 3 steps described in Option 1 or 4 steps, described in Option 2.
- As you are redirected to the Shipment Plan page, at the upper part of the page, click I want to submit the booking request myself.

Rate Consumer
Rate Consumer allows you to select Business Partner whose shipment contracts you want to use instead of yours.
To select the rate contract
- Under the delegation options, click the Rates Consumer searchable drop-down, select from the list.
- Click Next to continue to Step 1 – Commodities.

Note | If you as a Shipment Creator, Origin Handling Agent or Booking Agent are involved in any Rate Group, then the logged in company name is pre-filled in Rate Consumer field, otherwise the shipment’s Buyer Business Partner name is pre-filled in Rate Consumer field. If there is no buyer’s contract either, the contract should be provided manually. |
Step 1- Commodities
In this section, you review booking commodities and containers inherited from the linked order. All data is copied from Order, but can be adjusted in Shipment plan and this change will not be reflected in the details of the linked order.
From this section you can manage
- Commodity Data
- Loading Type
- Container Details
Manage Commodity Data
While reviewing the linked order, you can
- Update the Order
- Add Further Item
- Split Shipment Plan
- Merge shipment Plan
Update Commodity
To edit the commodity details
- Under actions click the Edit button.
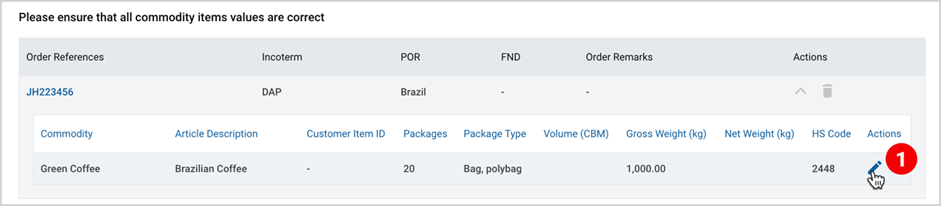
2. As the popup-window appears, update the commodity details and click Update
commodity.
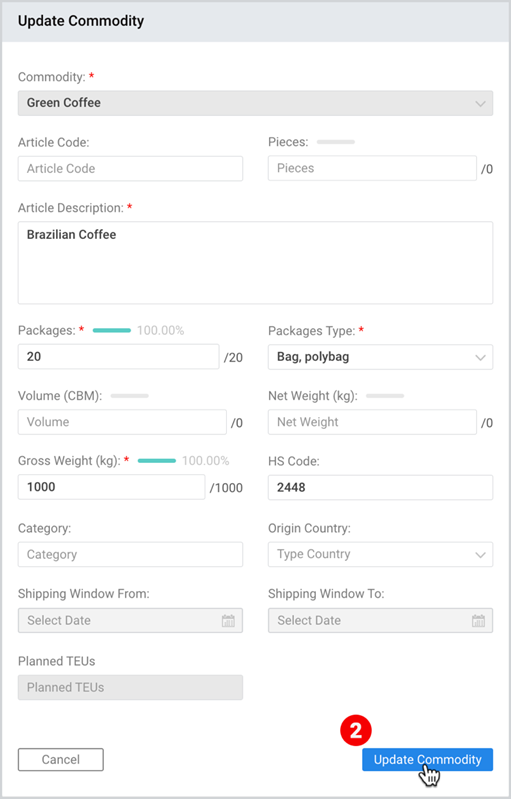
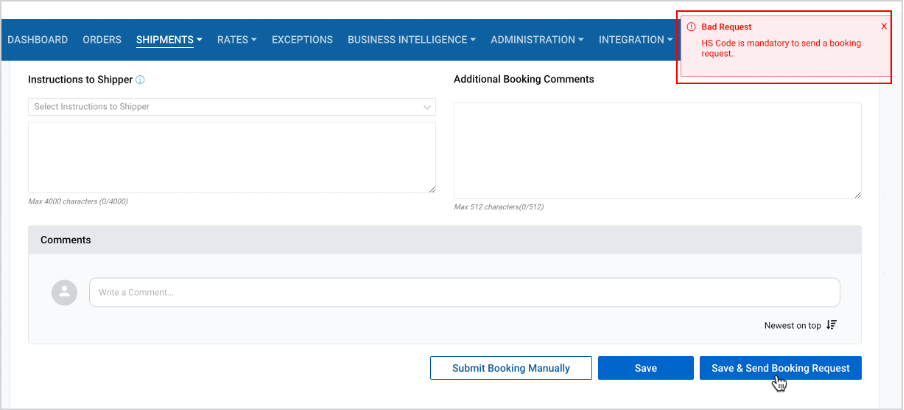
In the Submission Flow, in case of shipments from Brazil (POR or POL is in Brazil), it is required to fill in the HS code; otherwise, while sending the booking request to the carrier, the system will generate an error message at the upper-right part of the page.
To add the HS code
- Scroll up to Step 1 – Commodities and click the Edit button.

2. Add the HS code in the pop-up window, and click Update Commodity, as shown here.
Add Further Item
Add Further Item can be performed by the shipment creator/delegated party, booking agent and OHA and is available for Shipments with statuses Draft, Delegated, to be Booked and allows to link multiple re-planned orders with the same/alternative commodities to the shipment. The alternative commodity is the one, that is defined by Master data as “alternative”. E.g., if your initial commodity is “green coffee”, while adding further item, the system will show green coffee and roasted coffee (alternative).
To add further item
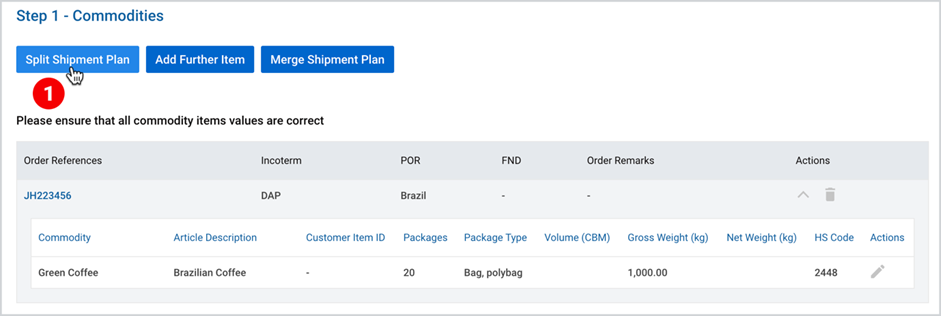
- Under Step 1 – Commodities, click Add Further Item.
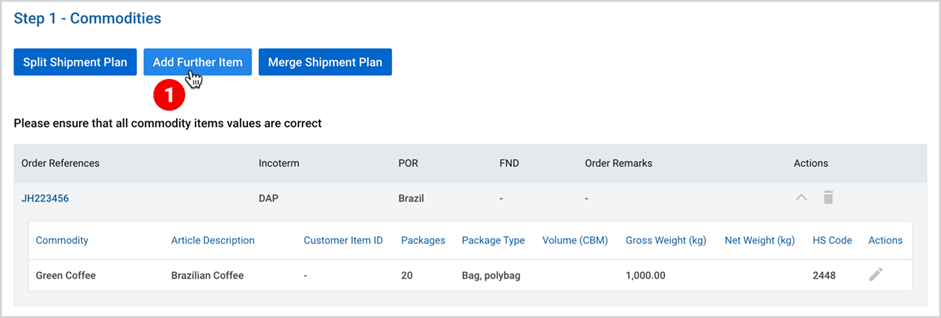
2. From the appeared list, select the desired order or order item(s) and click Add.
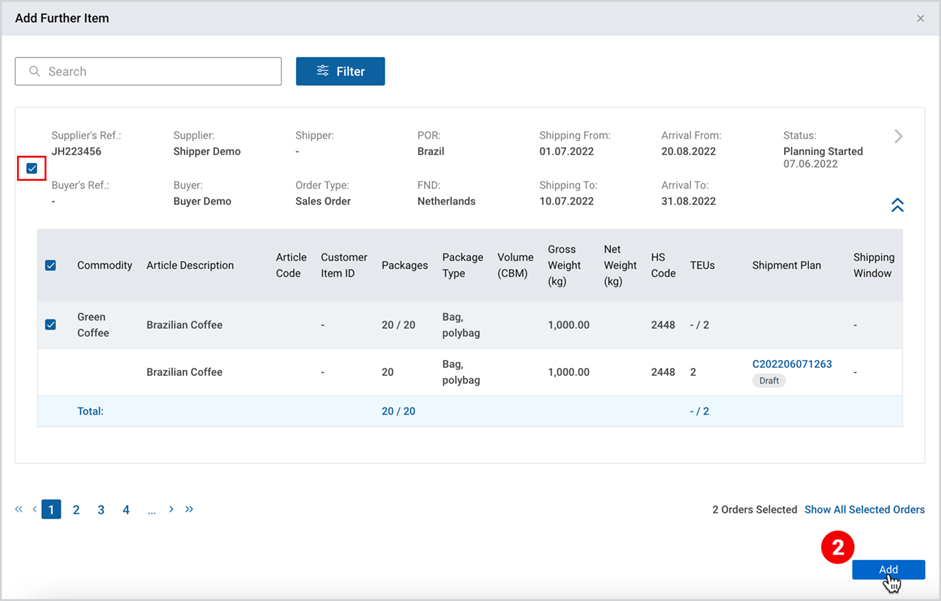
Note | When adding further item into the shipment, the system automatically adds the parties from the order(s) which does not exists in current shipment plan. |
Split Shipment Plan
Split Shipment Plan tool can be used by the shipment creator/delegated party, booking agent and OHA and is available only for Shipments (in standard flow) with linked Orders in Draft, Delegated, and To be Booked statuses and allows to create multiple shipment plans from the same order.
The following values can be split:
- Packages
- Gross Weight
- Net Weight (optional)
- Planned TEUs (optional)
To split shipment, you have to take the following steps:
- Under Step 1 – Commodities, click Split Shipment Plan.
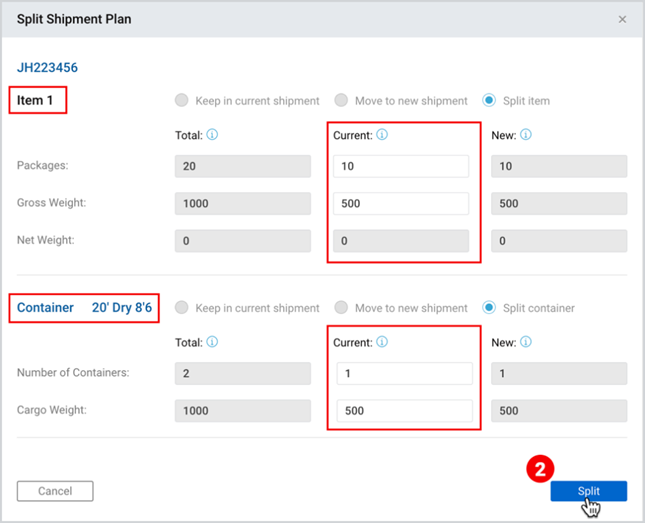
2. As the popup appears, split the following fields and click Split.
- Commodity items fields
- Packages
- Gross/Net Weights
b. Available containers
- Container Number
- Cargo Weight
As a result of split shipment, all available information (except documents) from the current shipment will be copied, including
- status of the shipment
- delegation history (last saved)
- linked orders
- parties
Note | The current shipment will be saved with the filled in data in “current” section and a new shipment plan will be created with the data in “new” section. |
In case there was a delegation, standard e-mail is sent to the last delegated party only.
Merge Shipment Plan
Merge shipment plan can be performed by the shipment creator/delegated party, booking agent and OHA. Only shipments that are in Draft, Delegated and to be Booked status can be merged into current shipment plan. You can merge shipment plans if the commodities included in both of them are of the same type.
You can select a shipment linked to the same order, or a shipment linked to another order.
To merge shipment plan
- Under Step 1 – Commodities, click Merge Shipment Plan.
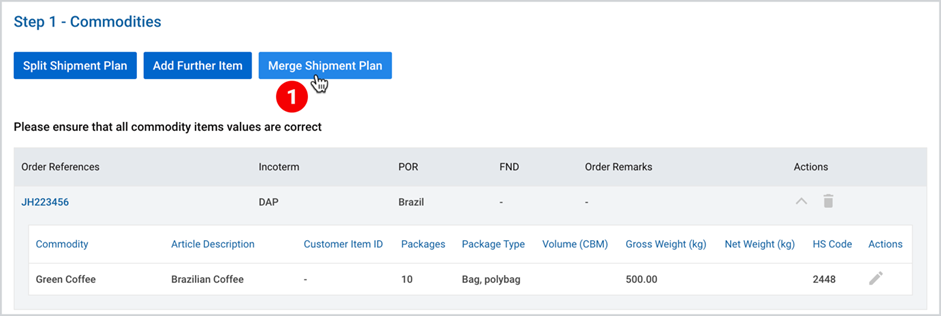
2. Select a desired shipment by hovering it over.
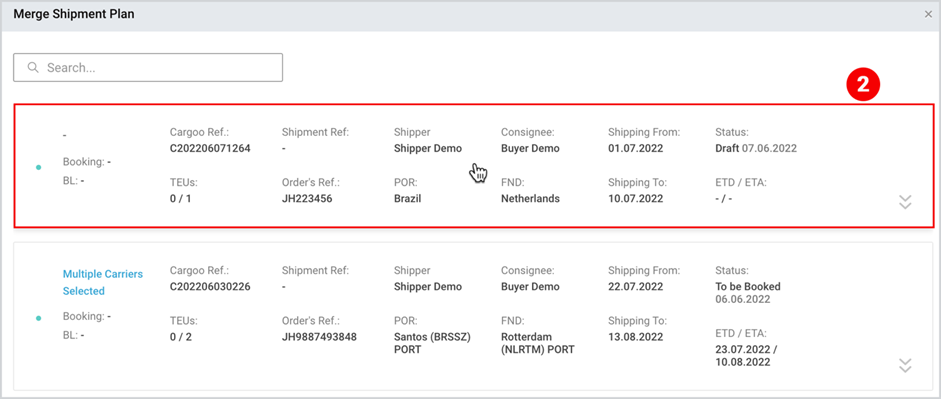
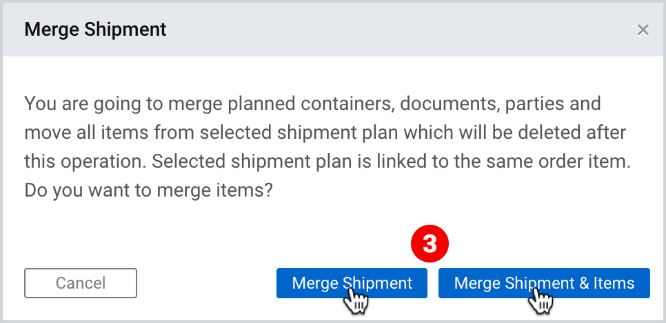
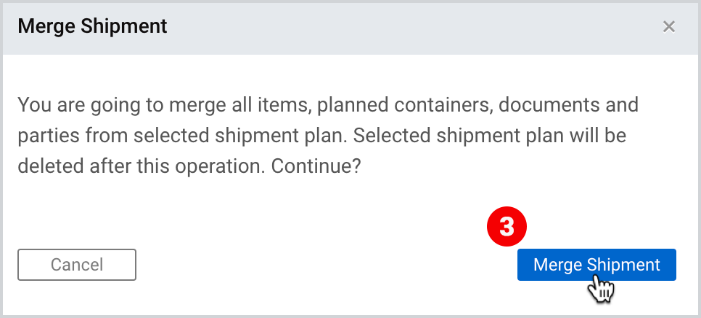
3. As a popup-window appears, click either Merge Shipment or Merge Shipment and
Items icon (the system may provide also only Merge Shipment option – see the
Figures and the explained two cases below).
 |
| or |
 |
Case 1: If you select a shipment linked to the same order, the Cargoo system will verify if all the data are the same (commodity, article description, article code, package type, HS code), and suggest to select either “Merge shipment” or “Merge Shipment & Items”. If you select Merge Shipment, all item lines will be displayed separately on shipment (commodity table in Step 2; Commodity tab in track and trace) and order (order card, commodity table). If you click Merge Shipment and Items, the item lines will be merged and displayed as one item on shipment (commodity table in Step 2; Commodity tab in track and trace) and order (order card, commodity table), by summing up all the numeric data.
Case 2: If you select a shipment linked to another order, after verifying it, the Cargoo system will suggest to select only Merge shipment, again displaying the item lines separately, as described in Case 1.
Note | As you merge shipment plan, all items of the selected shipment will be unlinked from it and added to your current shipment plan, while containers, documents and parties will be added to the current shipment plan if they do not exist. The selected shipment plan will also be deleted from the shipment list. |
Loading Type
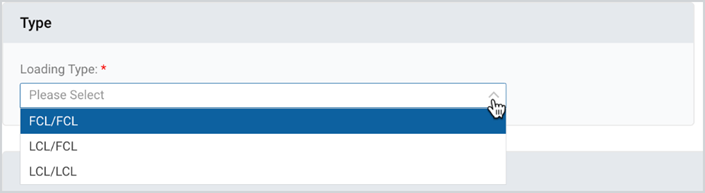
The loading type is by default set as FCL/FCL by the system, however you can edit it manually.
To edit the loading type
- Click the drop-down and select from the available options.
Container Details
This section includes main container data and haulage in origin. This section is, however, not available when LCL/LCL loading type is selected.
Main Container Data
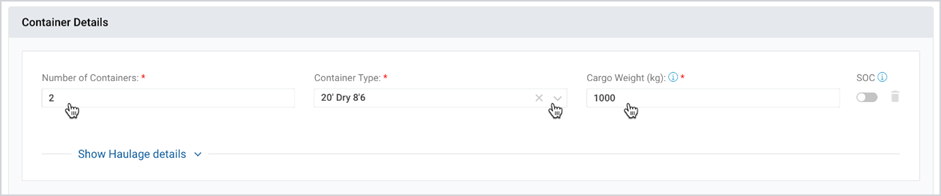
Container data are inherited from the Order, but you can edit it by taking the following action:
- Under Container Details fill in/update the required values.
Haulage in Origin
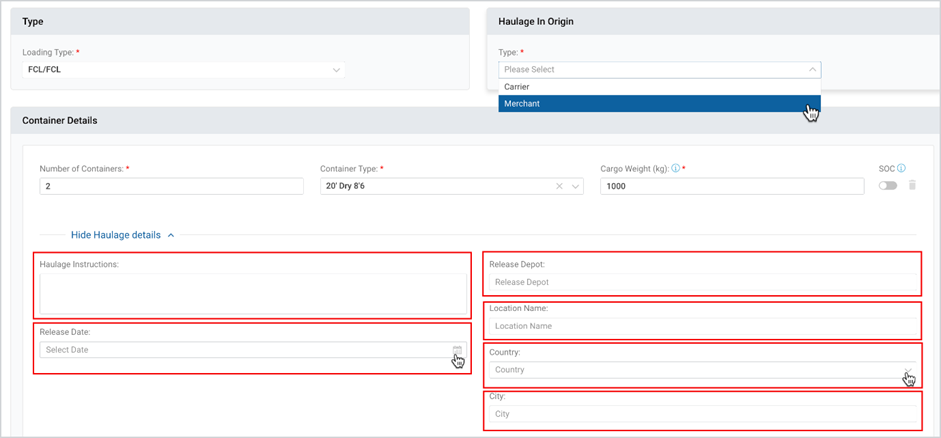
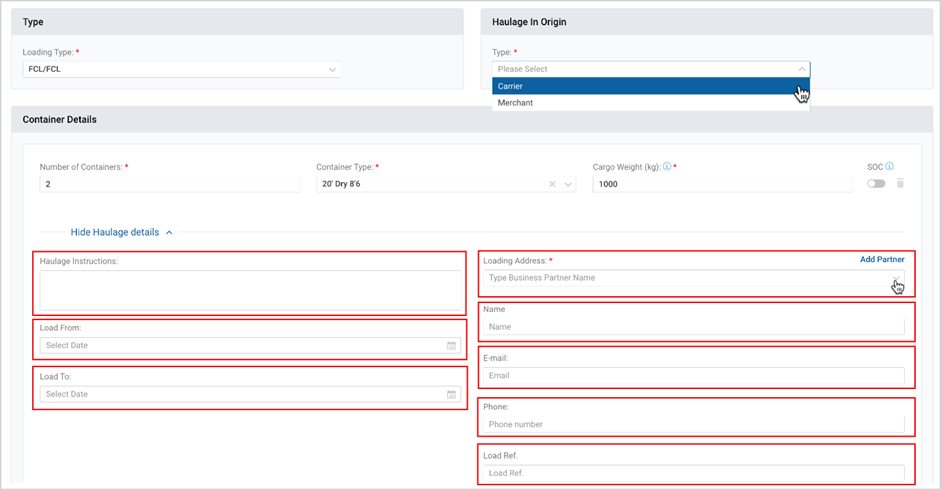
At this step you have to select between the carrier haulage and merchant haulage, and depending on your choice, the details to be filled will differ (see the Figure below).
| Merchant Haulage |
 |
| Carrier Haulage |
 |
Step 2 - Rate and Schedule
In this section, you review/update
- Origin and Destination
- Departure From and Departure to
- Select Carrier
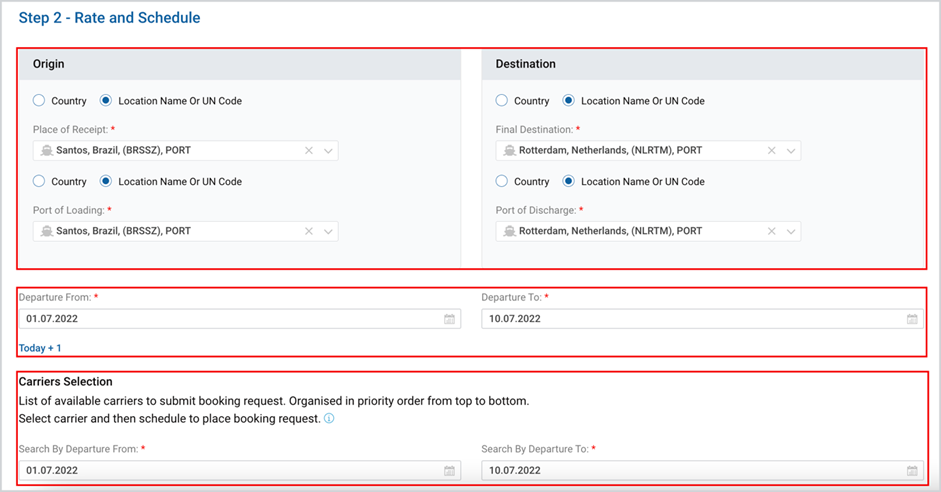
Note | If the origin and destination have been defined by country at the time of order creation, then to be able to submit the booking request, exact location name/UN code must be defined. Otherwise, the system will not proceed with the suggestion of the carrier contracts. |
Carrier Selection
While selecting the carrier, you can either pick the carrier that the rate consumer has a current contract with, or add a new carrier contract.
Select Existing Carrier Contract
At this step, the system will automatically suggest the carrier contracts as per the pre-set criteria (commodity type, origin and destination, container, loading type and departure window), as well as the selected consumer rate.
To select a carrier
- Under Carriers Selection, review or set the new dates for departure from and departure to.
- Sort by Price or Carrier or Transit Time (highest to lowest) (optional).
- Select the Include Alternative Ports checkbox (optional) and click Search.
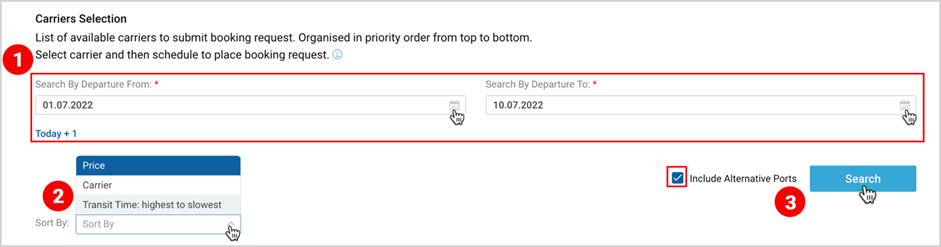
4. Select the desired carrier and the shipment schedule option and click Next.
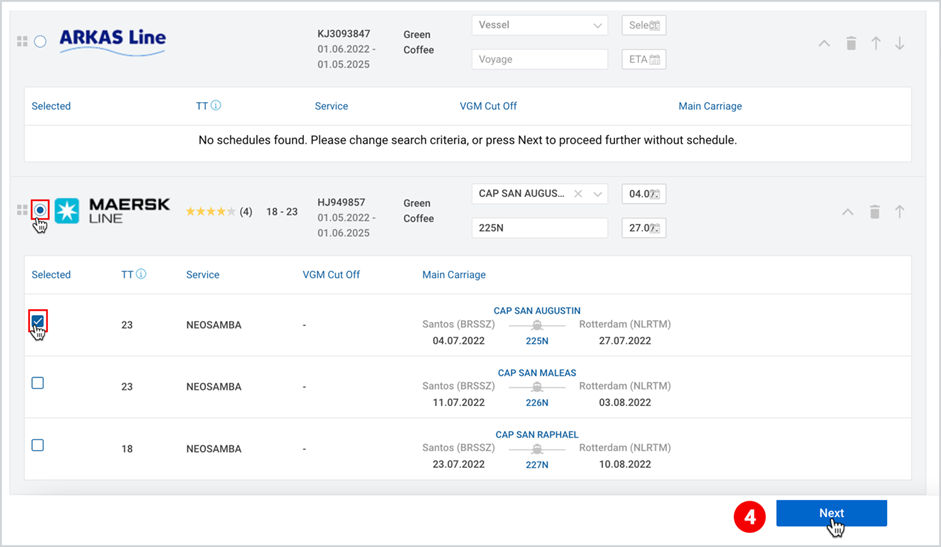
Note | In the submission flow, as the list of available carriers appears, you can select only one shipment option to proceed with the booking request. |
Sometimes, the system can provide a carrier without shipment schedule options. In this case, you have to add schedule information manually (at least ETD) for the provided contract to be able to submit your booking request.
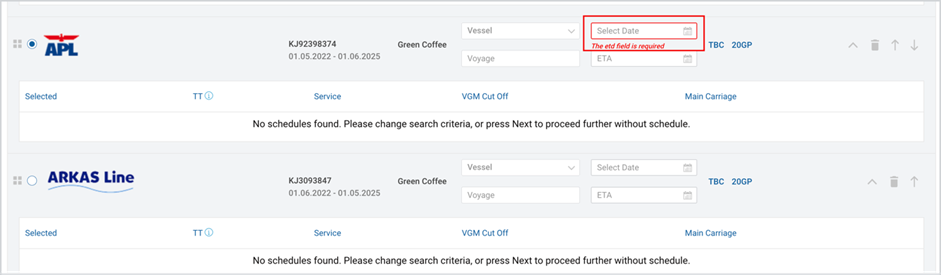
Add Carrier
This option is used if no carrier contract is available on the carrier contracts list as per the set parameters, or the shipment plan creator wants to add a new carrier contract and use it while submitting the booking request. You cannot at the same time select a carrier from the suggested list and add a carrier. Either of the selection will be dropped.
To add a carrier contract:
- At the bottom of the Rates and Schedule click Add Carrier.

2. From the drop-down menu select the desired carrier.
3. As several shipment schedules appear, select the one which best matches your
criteria.
4. Type in the Contract number (required field).
5. Click Next to continue to Parties and Charges.
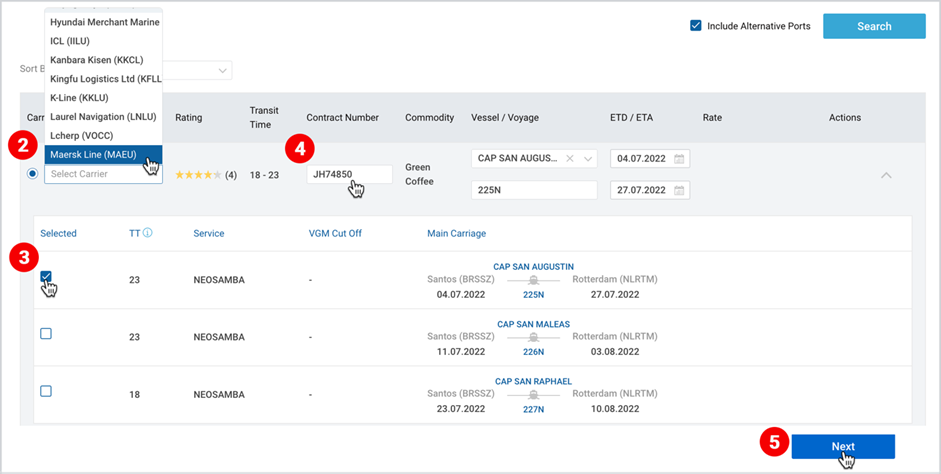
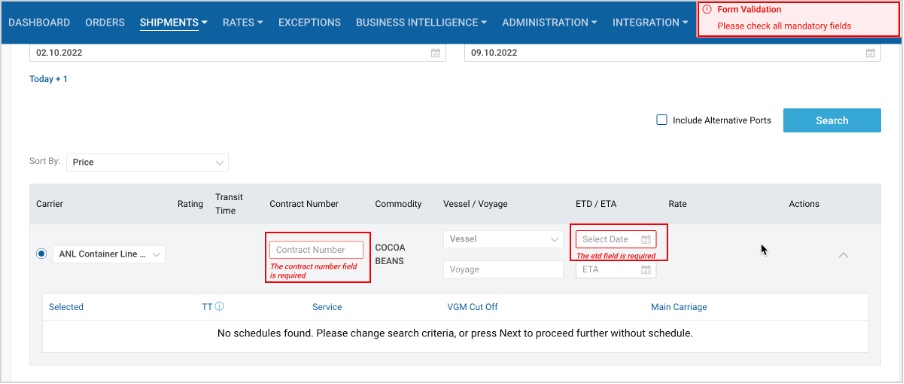
In manually added contracts as well, the system sometimes will not provide shipment schedule options. In this case you have to add schedule information manually, where you should provide at least ETD along with the Contract number to proceed with the submission of the booking request. If you do not fill in these two required fields, then at the upper right part of the page, the system will generate an error message at the upper right part of the page, highlighting those fields in red.
Step 3 - Parties and Charges
At this step you review/add booking parties, and charge payers upon necessity editing them.
Booking Parties
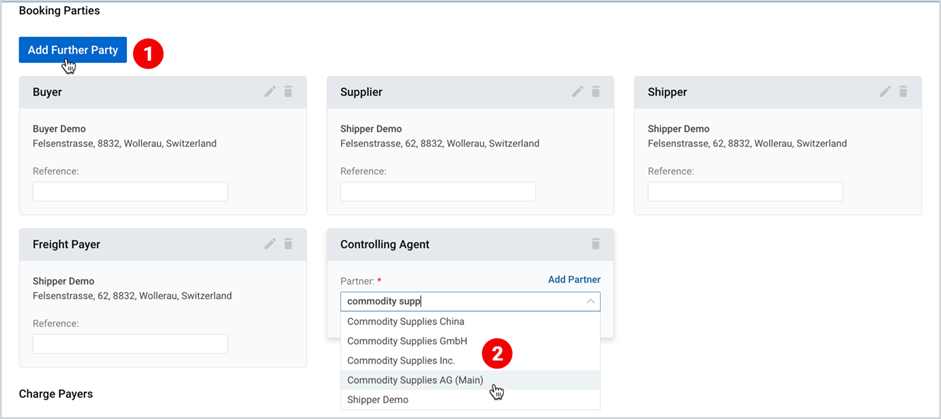
If you have not filled in further parties while creating your order, or want to add new ones
- Under Booking Parties click Add Further Party and select the party type from the suggested list.
- In the appeared card, fill in the name of the business partner.
In the Submission Flow (the flow can be implemented by a shipper, booking agent, OHA), the shipper company must be added in the booking parties; otherwise, while sending the booking request to the carrier, the system will generate an error message at the upper-right part of the page.
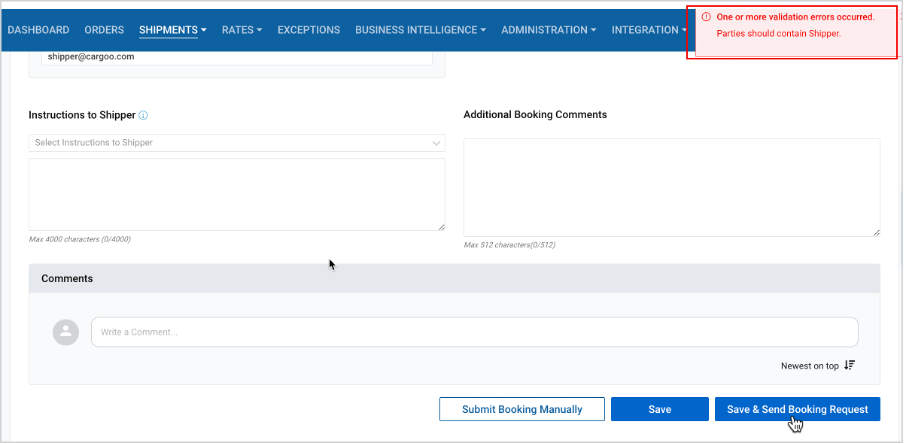
To add the shipper.
- Scroll up to Step 3 – Parties and Charges and click on “Edit” icon.
- Take the steps, shown here.

Charge Payers
Under the Charge Payers based on the Incoterm, the system by default shows the parties (editable) responsible for the following charges:
- Origin Transport Charges (available if Place of Receipt is not “port” but “door”
- Origin Terminal Charges
- Ocean Freight Charges
- Destination Terminal Charges
- Destination Transport Charges (available if final destination is “door” instead of “port”)
The charges terms are defined as
- Prepaid
- Payable elsewhere, or
- Collected
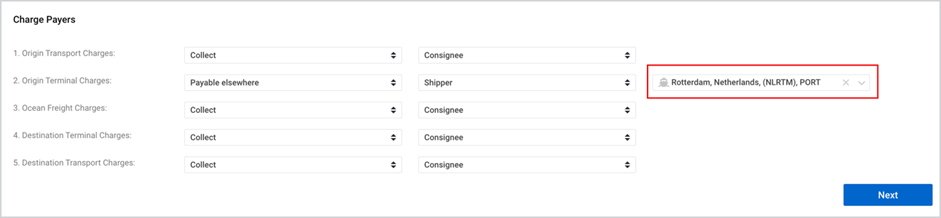
Note | If you select Payable elsewhere option, you will have also to fill in the location for the payment to be done. |
Step 4 - Summary and Shipping Instructions
As you click Next after setting up the Parties and Charges, the Terms and Conditions section is modified into Summary and Shipping Instructions, where you have to review the already filled information without any editing options as well as to fill in additional information, at the bottom, such as
- Documents Upload
- Subscriptions for Updates
- Instructions and Additional Comments
Upload Documents
At this step you can attach a number of shipment-required documents to the shipment plan. You can either attach your documents or upload a template based on the company setup. The same document cannot be added twice.
For this action:
- Under Step 4 – Summary and Shipping Instructions, scroll to Add Document Type and click on it.
- Select the document from the suggested list.
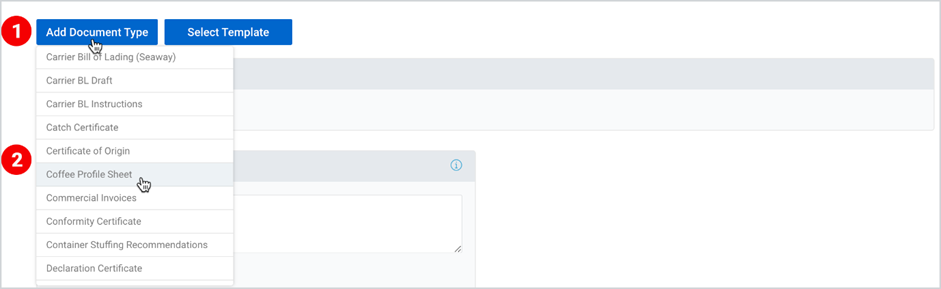
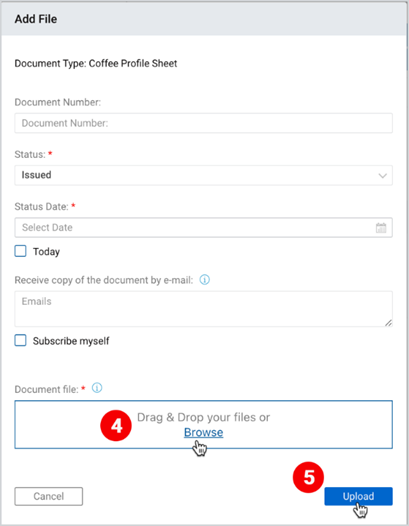
3. As the card with the document name appears, click Upload Document.

4. As a pop-up window appears, click Drag and Drop your files or Browse, at the same
time filling in the required (and optional) details.
5. After browsing or drag and dropping, click Upload.
Select Template
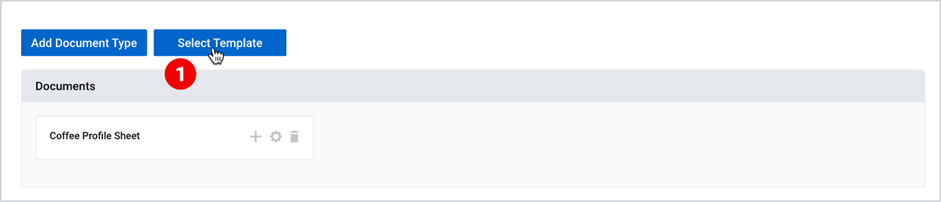
You also have an option to select a template already available (created in advance under GSI, Administration) in the system for the document to be uploaded.
- Next to Upload Document, click Select Template.
2. On the appeared popup, click the drop-down icon and select the desired template.
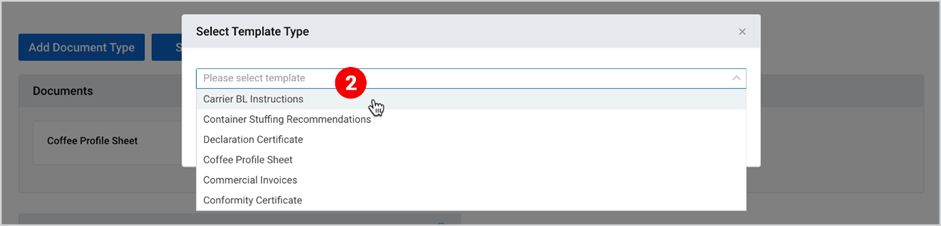
3. As a window with the list of the documents appears, click Select.
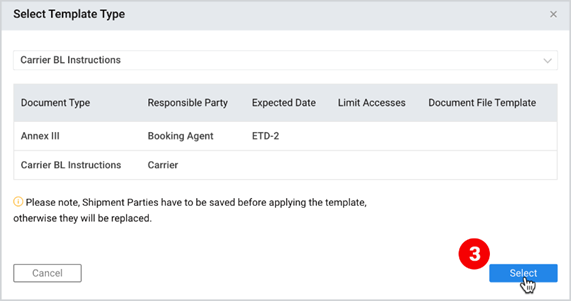
Note | The steps for the upload of the template are the same as in the case of the Upload Documents, starting from step 3. |
You can add settings both to the documents and templates by filling in the details (including responsible party, expected date of submission, etc.) appeared in the popup-window.
For this action:
- On the Documents or Requested Documents card, click the Add Settings icon.
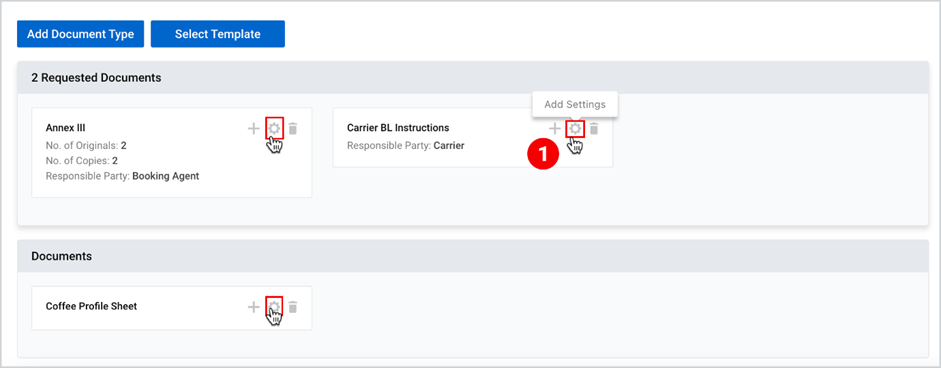
2. As the pop-up window appears, make the necessary set-ups while scrolling up all the
fields and click Update.
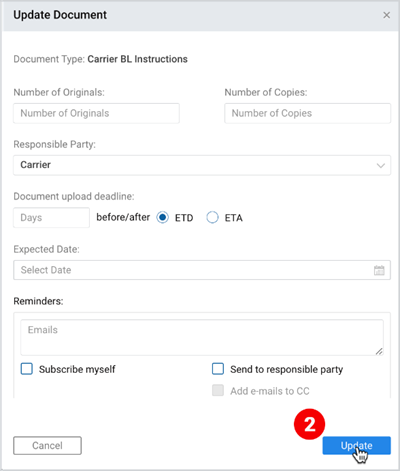
Note | Template settings can only be updated if you are the owner of the template, and blocked if template of other parties is applied. |
Subscriptions for Updates
Subscriptions for updates include
- Subscribe to Shipments Updates
- Email address for Booking Agents
Subscribe to Shipment updates
This section automatically displays all emails from current (logged in) Company profile. It is not mandatory, so if no email exists in the Company profile, then section is kept empty.
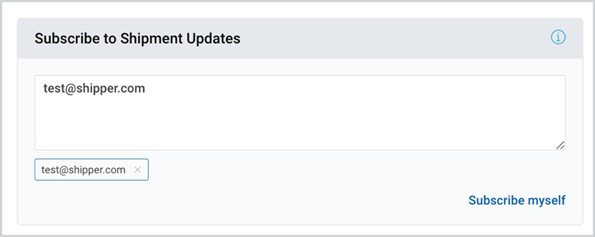
Subscribed users receive the following notification types:
- Shipment update & booking
- Receive notification for a shipment your Company is submitter and
when the shipment is updated or booked or updated & booked at the same time.
2. Shipment confirmation & rejection
- Receive notification for a shipment your Company is submitter and
when the shipment is confirmed or rejected by the Carrier.
3. Shipment status update
- Receive notification for a shipment your Company is submitter and
when the shipment status is updated.
4. Shipment exception
- Receive notification for a shipment your Company is submitter and
when exception is recorded on the shipment.
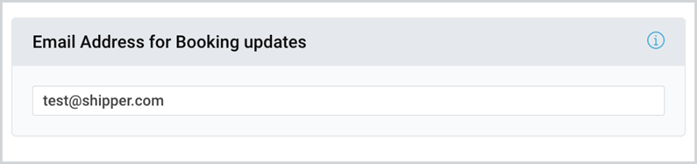
Email address for Booking Agents
During booking submission, this field is automatically prefilled with the current booking user and allows to receive notifications from the carriers on booking changes. The system allows to submit only one email address or group email address.
Instructions and Additional Comments
Instructions to shipper can be pre-set by the org or company admin from the Remarks feature of the Administration module or added manually. This is not mandatory during the shipment plan creation.
To submit additional instruction to the shipper,
- Click the drop-down icon and select the generated template or add comment in the text box.
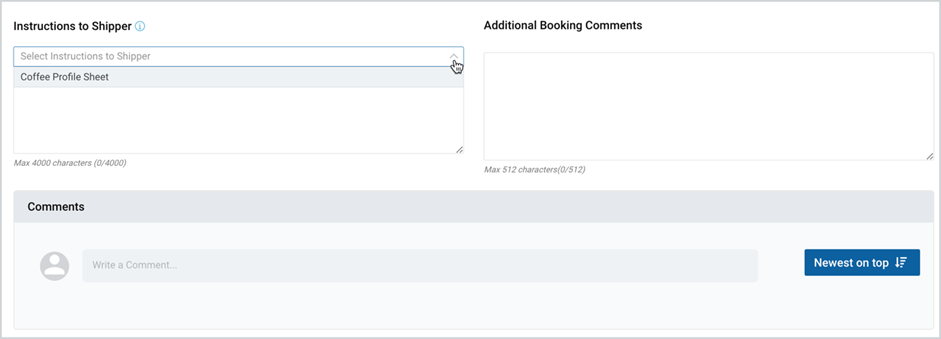
Additional booking comments are optional, available only in the submission flow and are submitted to the carrier.
Comments are also optional and are only for the internal communication between the involved parties.
As you review/update all the shipping information, at the bottom of the page, you can
- Submit Booking Manually
- Save
- Save and send booking request
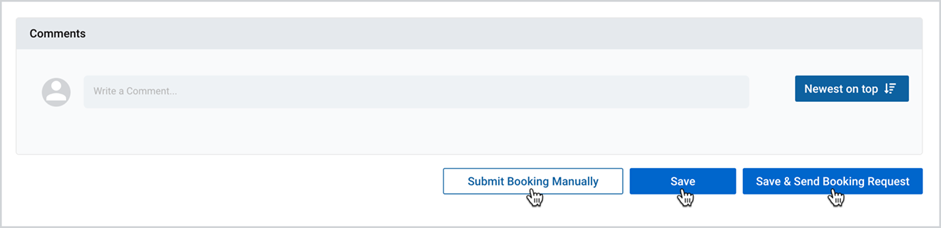
Note | In case you select Submit Booking Manually option, Cargoo will not send booking request to the carrier and you take the responsibility to keep the shipment data up-to-date for Track&Trace. |
Delegation Flow
Shipment can be delegated as far as it is in Draft, Delegated/to be Booked status, and can be delegated in unlimited times.
As you click the Create shipment plan button from the Orders page, you are delegated to the Shipment Plan page. On this page, as in case of the submission flow, you have to pass the following steps:
- Initial step
- Step 1 - Commodities
- Step 2 - Rate and Schedule
- Step 3 - Parties and Charges
- Step 4 – Terms and Conditions, modified into Summary and Shipping Instructions, after Parties and Charges are filled in.
Initial Step
At this step you, as a shipment creator/last delegated company have to select I want to delegate my booking submission to my business partner option as well as the rate consumer.
Delegate booking submission to your business partner
For the delegation of the booking submission to the BP take the following steps:
- Take the first 3 steps described in Option 1 or 4 steps described in Option 2.
- As you are redirected to the Shipment Plan page, at the upper part of the page, I want to delegate my booking submission to my business partner (the third party will book the shipment on your behalf).
- On the appeared searchable drop-down, type the business partner’s name and an email will be automatically generated to whom the delegation notification will be submitted (for more information on notification emails, see My Organization, Notification Emails).
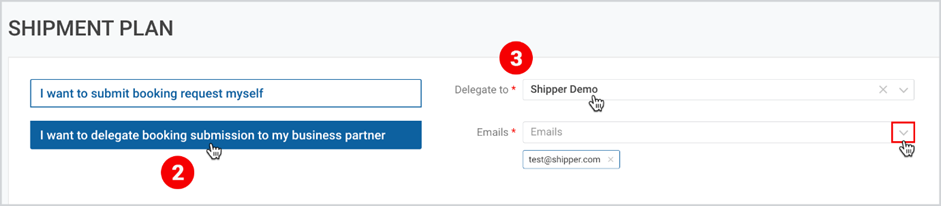
Note | You can add as many emails as you wish by clicking the drop-down icon at the right part of the Emails. |
Note | While delegating the booking request you have to select among the linked business partners, that is the existing company registered on the Cargoo. |
Rate Consumer
As a shipment creator, who is the first delegator of the delegation chain, you can select Rate Consumer, i.e. either you select your business partner’s carrier contract, or proceed without selection (see also the Note above).
The steps for the selection of the rate contract are the same as in case of the submission flow, described here.
Note | The rate consumer will be disabled for the further delegated parties, and the selected rate consumer will be automatically transmitted to the next delegated parties. |
Note | After delegation shipment creator/all companies in delegation chain (Supplier, previous delegate to) cannot submit the booking but can edit and save the booking changes starting from 1. Commodities step.
|
Step 1 – Commodities
The actions involved in this step are completely the same as in case of the “Submission flow”, described here.
Step 2 - Rate and Schedule
In this section, you
- Review/update origin and destination (defined by country or location
- Departure From and Departure to
- Select Carrier
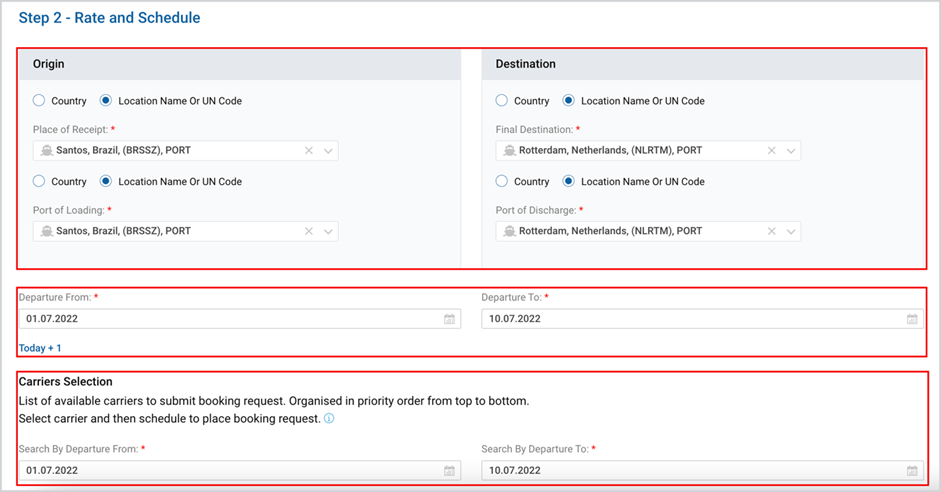
Note | If the origin and destination have been defined by country at the time of order creation, then the system will not proceed with the suggestion of the carrier contracts, unless exact location name/UN code is defined. Otherwise, you can proceed only with either Any Carrier or Continue without Carrier Selection options. |
Carrier Selection
While selecting the carrier, you can
- Select one or multiple (alternative) contracts:
a. Select the carrier(s) that the rate consumer has a contract with
and/or
b. Add new carrier contract (s)
- Continue without carrier selection
- Continue with any Carrier option
Select Existing Carrier Contract(s)
At this step, the system will automatically suggest the carrier contracts as per the pre-set criteria (commodity, container, origin and destination, loading type and departure window), as well as the selected consumer rate.
The steps for the selection of the carrier are the same as in the submission flow, described here.
Note | Unlike the carrier selection of the submission flow, in the delegation flow you can select multiple carriers as well as multiple shipments schedule options suggested by one carrier to leave the final choice on the next delegated parties. If you select however, one option, then the delegated party will see only the selected choice. |
Add Carrier
Unlike in the submission flow, in the delegation flow, a new carrier contract can be added in addition to the selection of the carrier(s). Both checkboxes can be selected by the user. In this case the next delegated party will see all the selected options and have the opportunity to select from this list. The multiselect option is also available while you add several contracts, where you can select several contracts checkboxes.
The steps for adding a carrier contract are the same as in the case of the submission flow, described here.
Continue without carrier selection
The shipment creator can delegate shipment plan using the option “Continue without Carrier selection”, which is being used when at the point of creation/delegation Creator either does not have an active contract yet or wants to come back and select alternative contracts at the later stage. Using this option Creator is still responsible for selection of the Contract later, delegated party can delegate further but cannot proceed with submission flow until Creator has not specified Contract(s).
To proceed with this option
- Under the suggested Carrier selection options, select the Continue without carrier selection checkbox and click Next.

Note | You cannot at the same time select Continue without carrier selection option and pick contracts from the suggested list or add a new carrier. |
Any Carrier
As you as a delegating/shipment creator party do not want to select specific contract(s) you have an option to proceed with Any Carrier option. In this case the next delegated party will see all the available/valid contracts as per pre-set criteria and the rate consumer, and will select contract(s) at his discretion or can again select the Any Carrier option to delegate to the next delegated party unless the party to be delegated is a booking agent or an OHA. In this case they can add a carrier by themselves.
To proceed with this option:
- Under the suggested Carrier selection options, select the Any Carrier checkbox and click Next.

Note | You cannot at the same time select Any Carrier option and pick contracts from the suggested list or add a new carrier. |
Step 3 - Parties and Charges
The actions involved in step 3 - Parties and Charges are completely the same as in the submission flow, described here.
Step 4 - Summary and Shipping Instructions
The actions involved in Step 4 – Summary and shipping instructions are almost the same, as in the submission flow, described here, however, with the following slight differences.
1. In addition to the existing subscriptions, Delegation emails card is added, and the subscribed users will get notification on the shipment delegations.
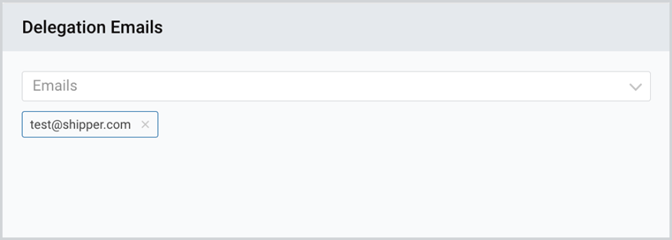
- Shipment delegation & delegation cancelation
- Receive notification for a shipment your Company Delegates or when the shipment delegation is discarded by the Company to who was delegated the shipment.
3. Additional booking comments are disabled.
As you review/update all the shipping information, at the bottom of the page, you can either
- Save, or
- Confirm and Delegate to the “name of the delegated party/business partner”
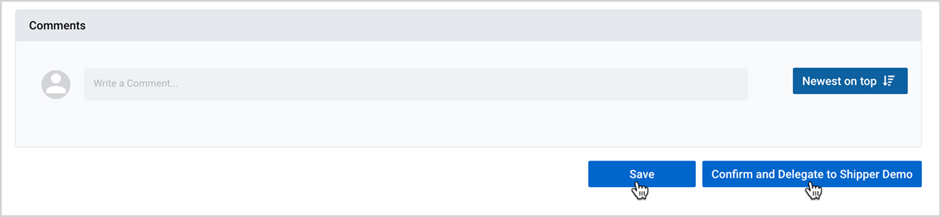
The next delegated party can further select between either of the booking submission flows. In case he/she selects the Delegation flow, Step 1 – Commodities will be disabled and he/she can skip to Steps 2, 3 and 4.

Note | As you delegate the booking request to the next party, the following points should be considered:
|