 BIM Support
Special Features: Containers Report Category
Here you can view all the data on the containers in use or returned by your company.
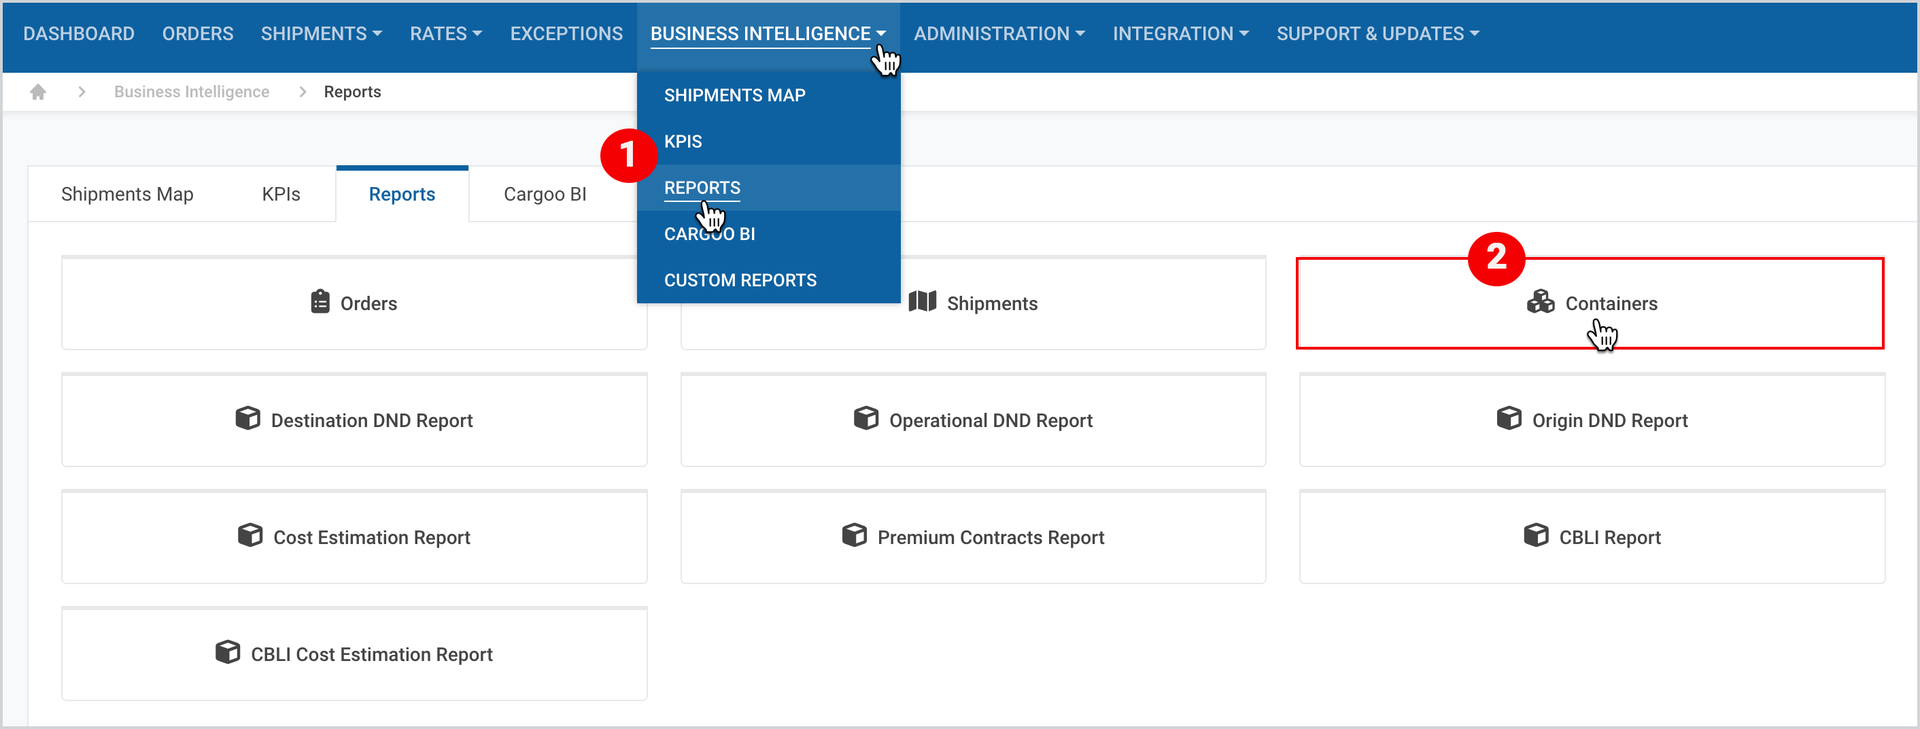
To view the Containers report category
- Click Business Intelligence>Reports.
- Select Containers report category.
Before generating a report, make sure that
- You’re using the right Company account.
(For more details, please see Business Intelligence: Reports Section article.) - You have checked the Data for multiple companies: section and have selected all the companies for which you are looking to get the data .
(For more details, please see Common Features: Data for Multiple Companies article.) - Filters and Additional Filters are set.
(To set the Filters and Additional Filters follow the steps described in Filter by and Additional Filters.)
Note | As an Org Admin, a Company Admin, or a User, your access to modules depends on your permissions which are defined per company, thus make sure you use the right account. (For more details, please see User Management article.) |
Tip | Save the filter configurations as a template in case you use the same filter configurations repeatedly, or use existing templates if any. |
Once
Once all filters are set, generate a report and use report table features to view and analyze the report online or use the provided options to download or save it to preferred file formats.
(For more details on report table features, please see Common Features: Report Table article.)
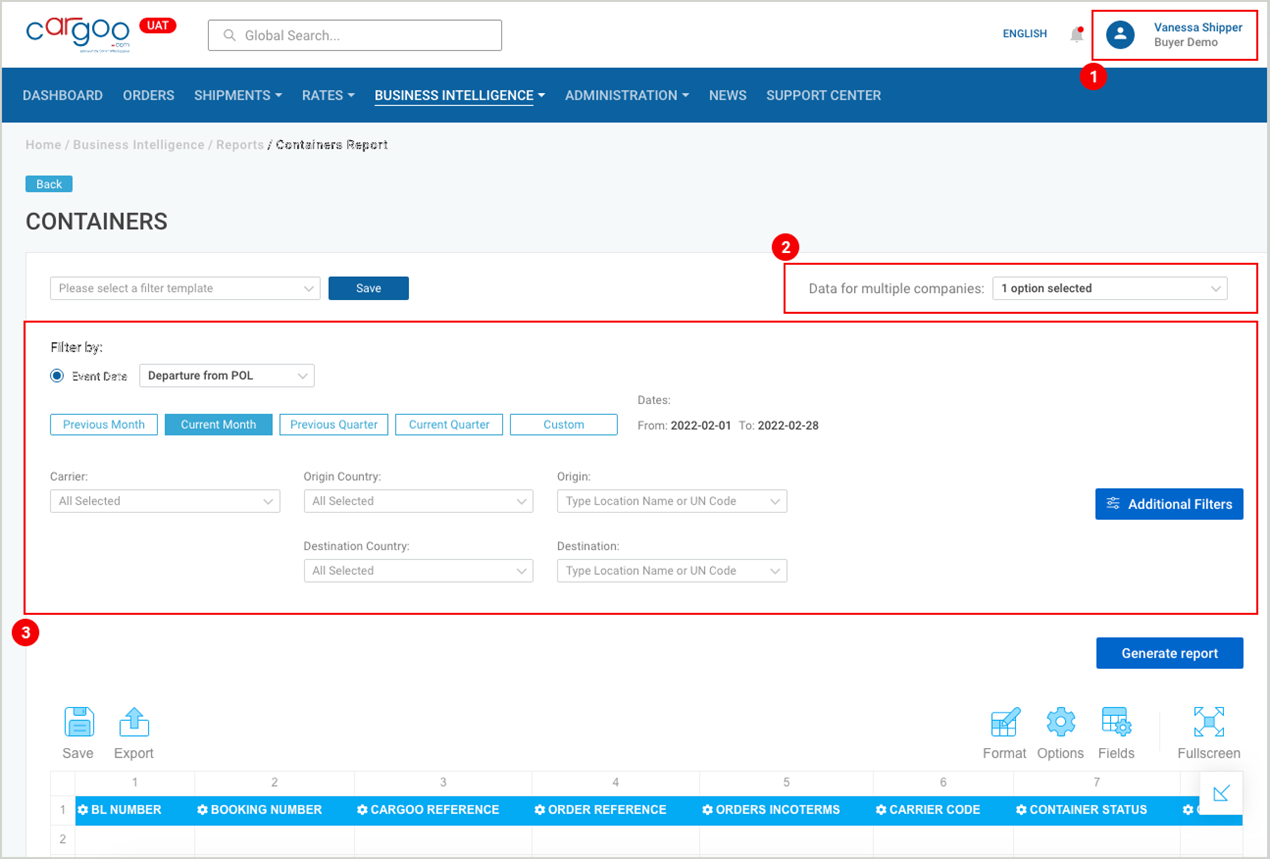
Figure 2
Create Schedule
This feature allows you to automate your reporting process, saving time and effort. With the Report Scheduler, you can schedule the generation and delivery of reports at the preferred intervals (even multiple schedules per day) and the preferred format (CSV or Excel) having the required information at hand. You can find he details on the creation of the schedule in Create Schedule, in Special Features: Shipments Report Category.
Filter by
To filter the data according to the Event type
- From the Event Date drop-down menu select the Event type according to which you want to filter the data.
In the generated report only those containers will be reflected, in which the selected Event is present, i.e., those with no record of the selected Event will be excluded. - Choose the date range from the provided options, or select Custom and use the calendars to select From and To dates.
The report will show all the data where the selected Event type (Step 1) matches the selected date range. - To filter the data per Carrier, Country of Origin, or Destination Country, use the drop-down menus of the respective fields.
By default, all carriers are selected. If you want to get the data per specific carrier(s) use the drop-down menu to unselect all and select the one(s) you need. - Type in the Location Names or the UN Codes (UN/LOCODE) for the Origin and the Destination if you want to get the data filtered accordingly.
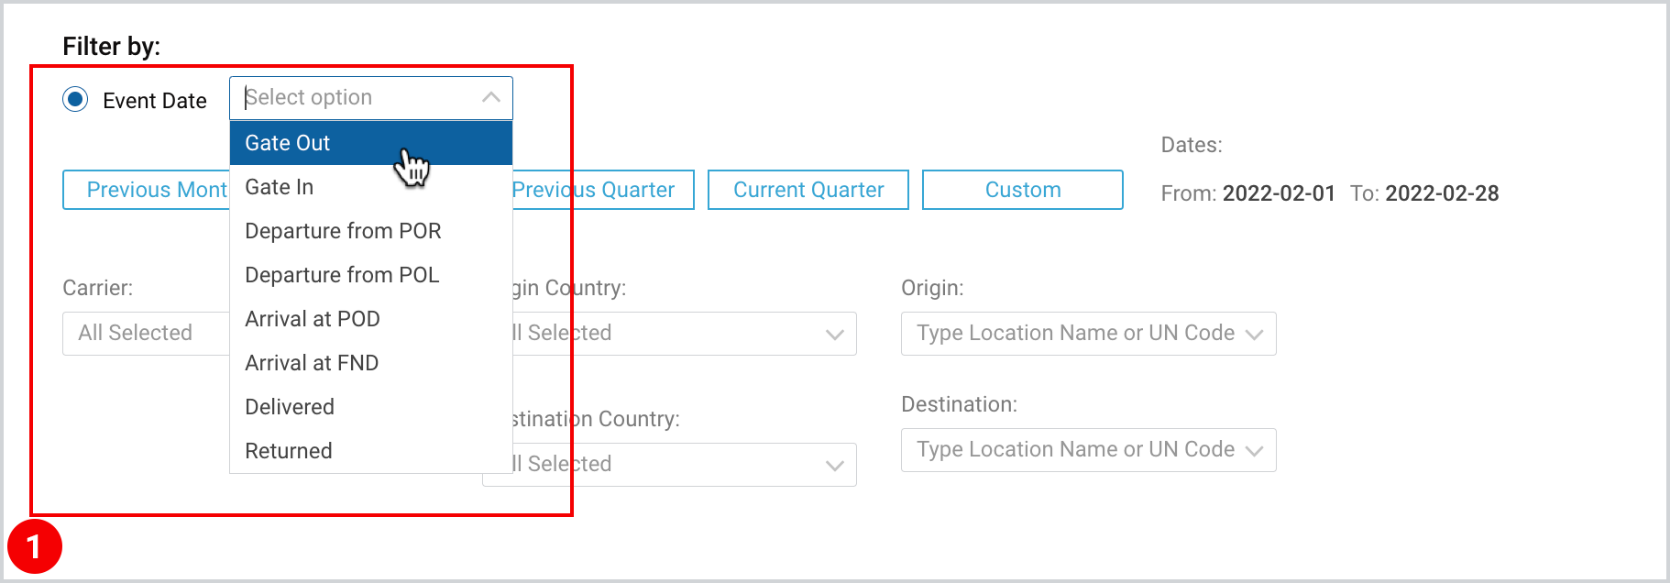
Figure 3
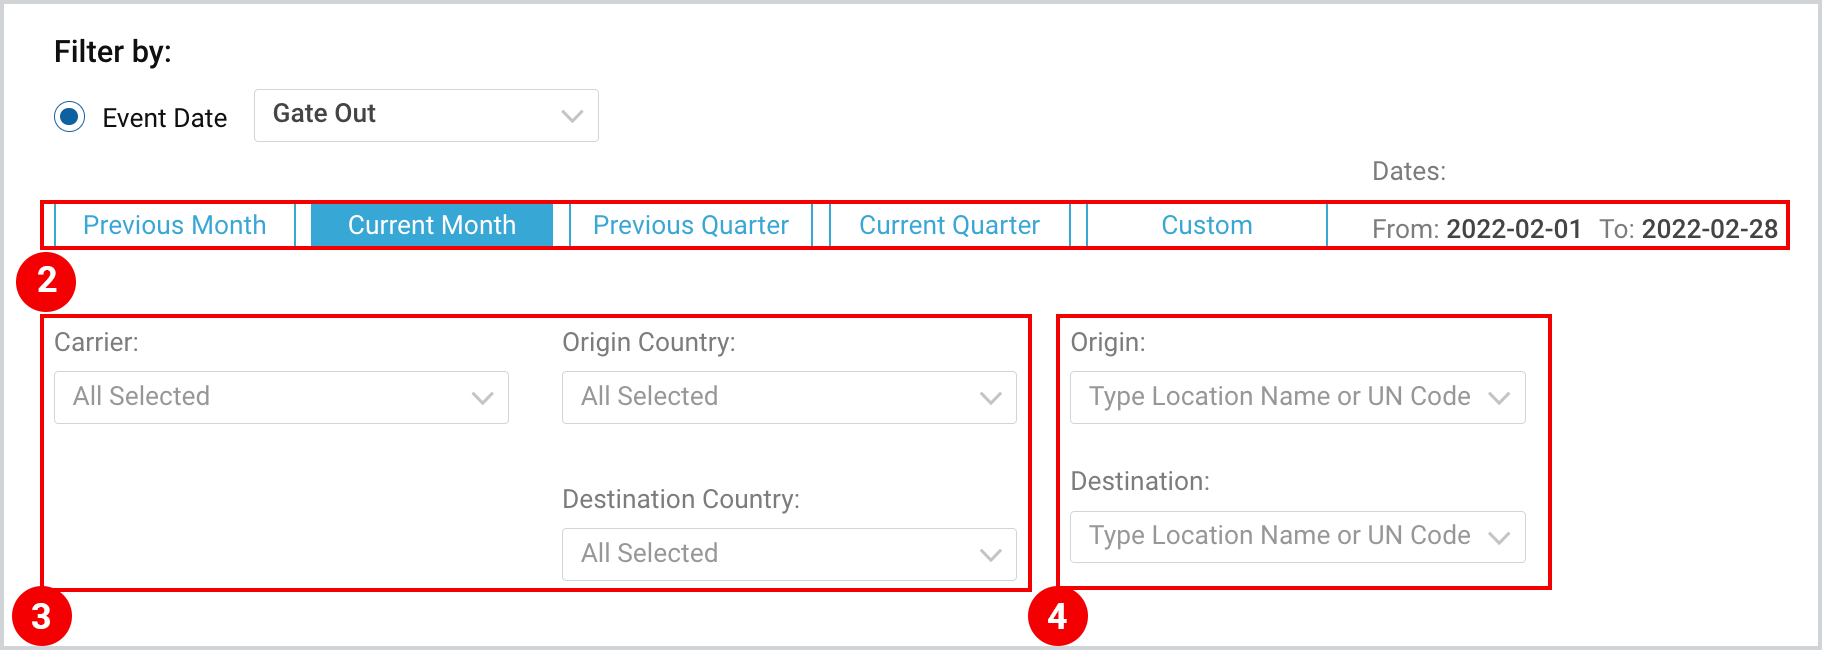
Figure 4
Additional Filters
Additional Filters allow you to filter the data by
- Your role in the shipment
- Companies
- Business Partners
as well as add the following fields to the report:
- Parties (Business Partners)
- Container Parties (checkbox) - parties that deal with containers and are mentioned in the Shipment, e.g., Destination Handling Agents, Delivery Location, etc.
- Custom Fields (checkbox)
- Linked Order Party Refs (checkbox)
- Shipment TP Legs (checkbox)
- Stuffing Items (checkbox)
- Emissions
Select Your Role in Shipment
- Select Additional Filters.
- Select one of the three filter options:
- My Shipments — Shipments created by you or by companies selected in Data for Multiple Companies.
- Observer — Shipments where you or the companies selected in Data for Multiple Companies are added as Further Parties.
- All — This option includes the above-mentioned two filter options and is selected by default.
- Click Apply.
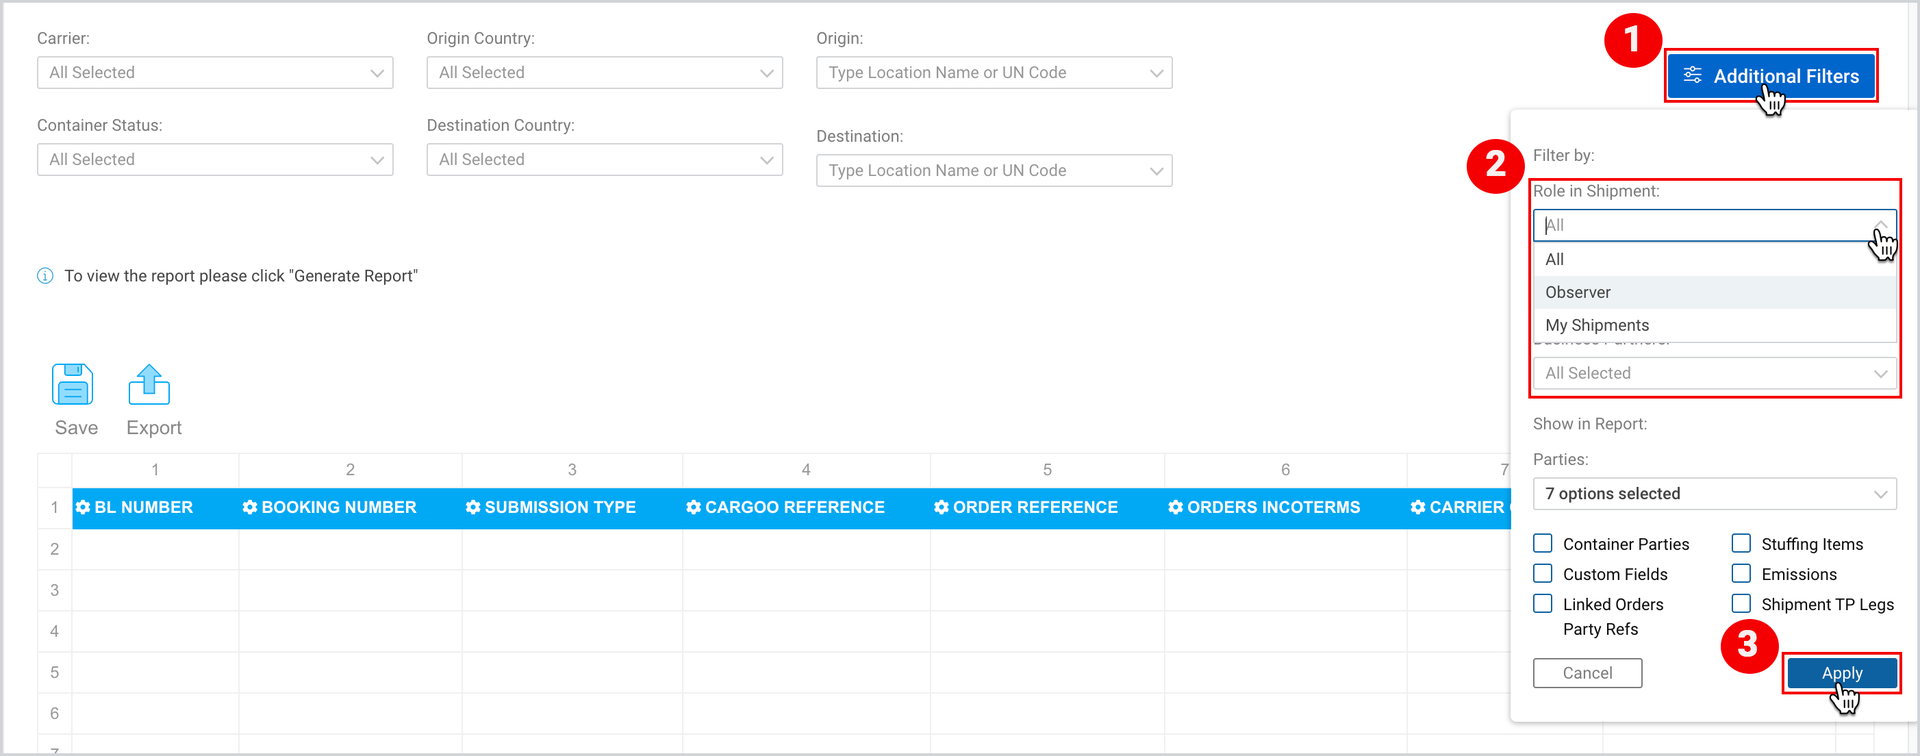
Figure 5
Select Companies
- Select Additional Filters.
- Under Companies, select all required ones from the searchable drop down (current company is selected by default).
- Click Apply.
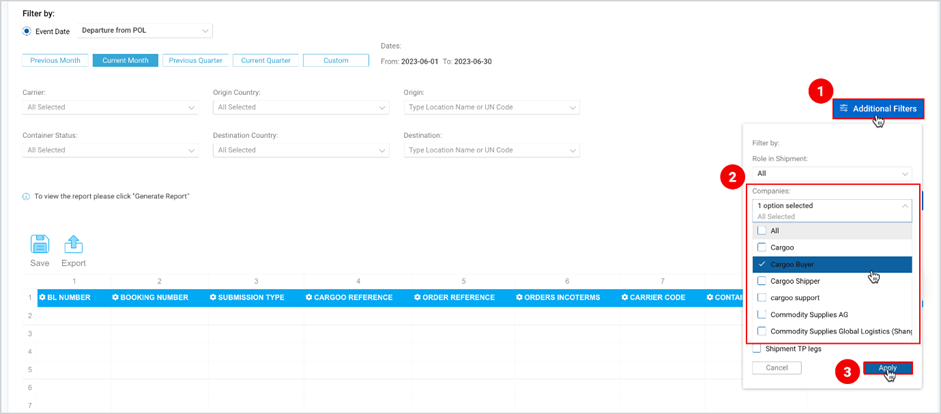
Figure 6
Select Business Partners
In Additional Filters you will notice Business Partners Field. Here when you select certain companies from the drop-down, the report will display only the shipments/containers that have at least 1 party from the list of selected companies.
The list contains BPs of the selected Company or multiple companies (from the “Data for multiple companies” dropdown list) and companies selected from “Companies” additional filter.
- Select Additional Filters.
- Under Business Partners, select all required ones from the searchable drop down (all BPs are selected by default).
- Click Apply.
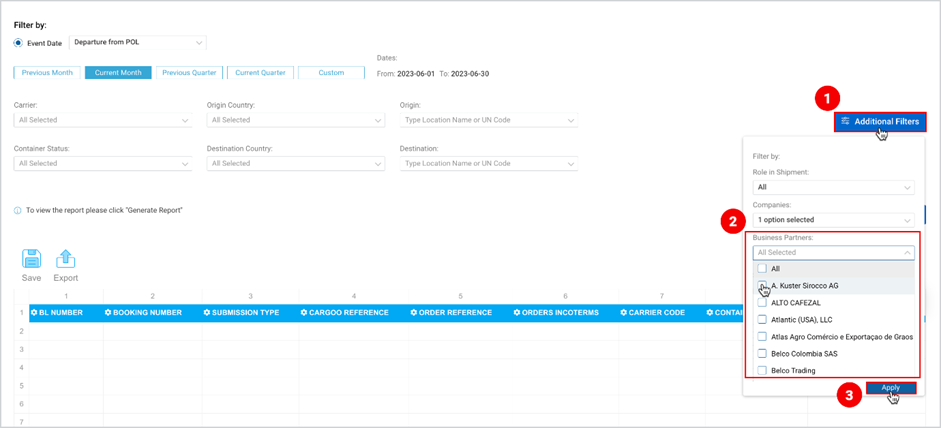
Figure 7
Show in Report: Parties
Under Show in Report you will notice a drop-down list for Parties (Business Partners).
By default, the below-mentioned 7 (seven) Parties (Business Partners) are selected and will be reflected in the report only if there is any information about them.
- Buyer
- Supplier
- Shipper
- Consignee
- Booking Agent;
- Origin Handling Agent
- Destination Handling Agent
To modify the default selection or to add more Parties
- Select Additional Filters.
- Open the Parties drop-down menu and select more Parties or deselect the default selected options.
- Click Apply.
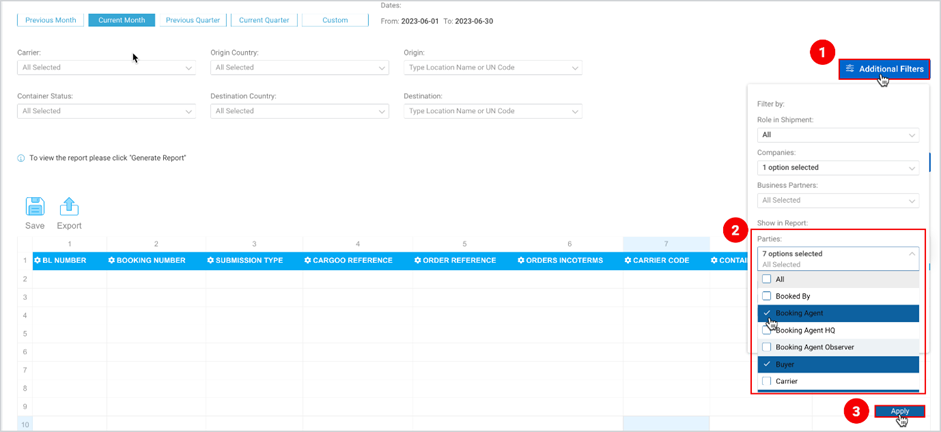
Figure 8
Container Parties
- Select the Container Parties checkbox, if you want the report to reflect the relevant information (see Figure 9).
The field(s) will be added per Party only if there is any data about the Container Parties.
Custom Fields
- Select the Custom fields checkbox, if you want the report to reflect the relevant attribute name.
Note |
|
Linked Orders Party Refs
- Select the Linked Orders Party Refs to see all Buyer and Supplier references from Orders linked to the shipment (see Figure 9).
Stuffing Items
- Select the Stuffing Items checkbox, if you want the report to reflect the following information on stuffing items:
- item article code
- item article description
- item order reference
- item commodity
- item package count
- item gross weight
- item net weight
- item volume
- item description
- custom stuffing attributes
- status
- container seal number
- container tracker number
Every stuffing item is displayed in a separate row.
Item components data are concatenated on an item level, while the rest of container data is just duplicated.
The field(s) will be added only if there is any data about the container stuffing
Emissions
- Select the Emissions checkbox, if you want the report to reflect the following information on CO2 emissions (see Figure 9)
- Data Provider (currently ECOTRANSIT and CLEAN CARGO) (data from the provider is displayed only if at least one container has respective data)
- Travelled distance (km) and the amount of emissions (tons) for each shipping stage (sum of all legs of the stage)
If at least one container for the data provider exists in generated report, all stages are displayed regardless of the availability of the data.
Shipment TP Legs
- Select the Shipment TP Legs checkbox, if you want the report to reflect the relevant information.
- The field(s) will be added only if there is any data about the Shipment TP Legs.
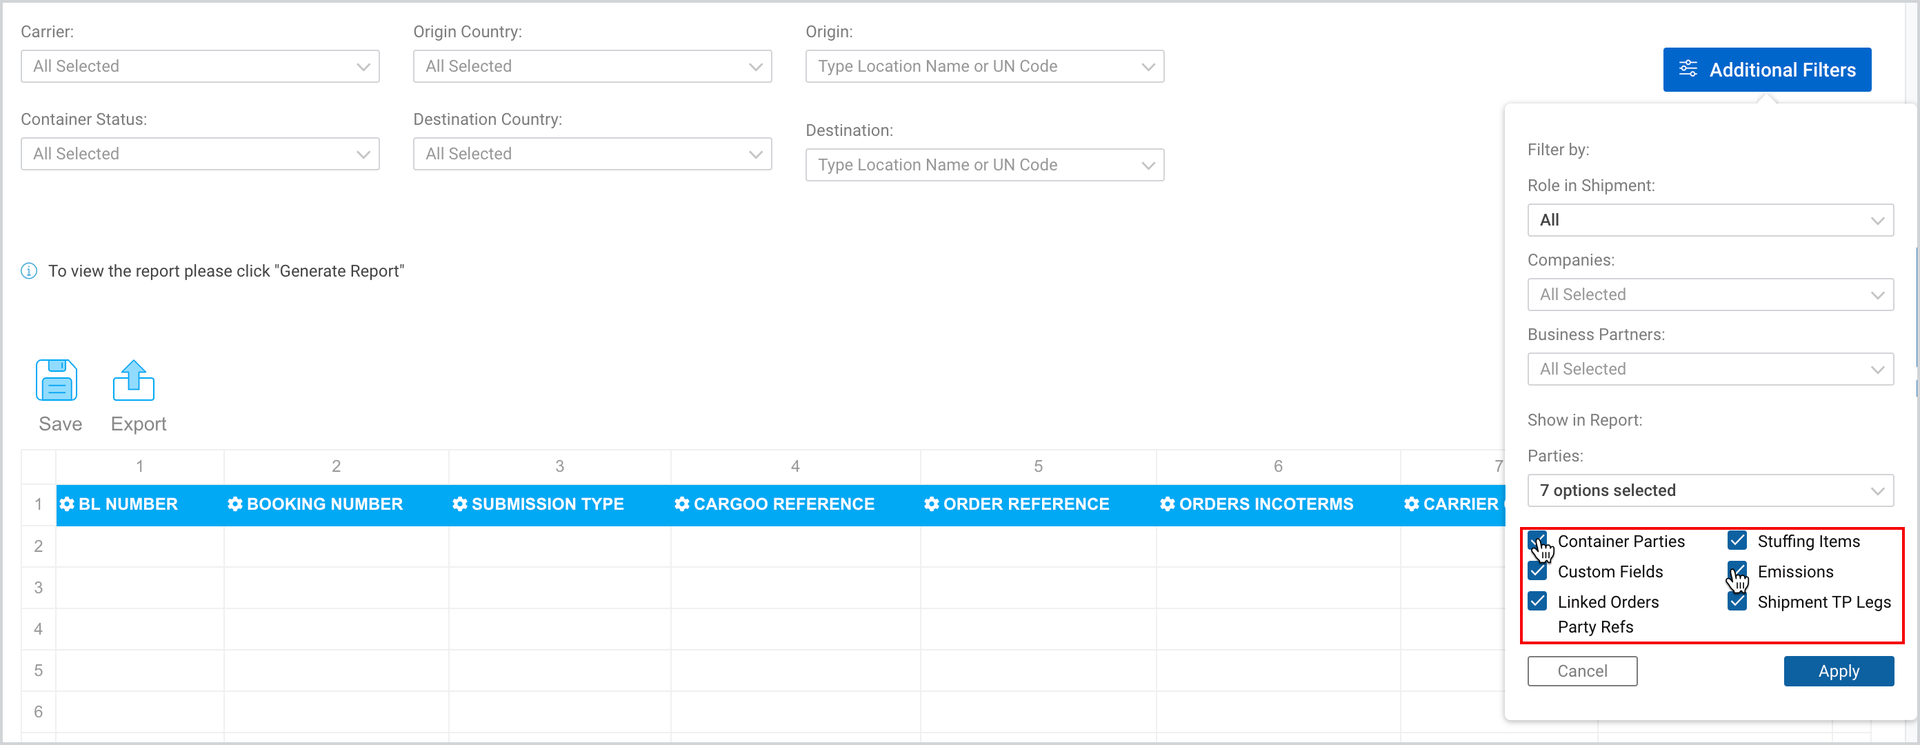
Figure 9
To download the print version of this article, click the PDF icon: