 CSA Support
Special Features: Shipments Report Category
Here you can view all the data on Shipments created or being monitored by you.
To view the Shipments report category
- Click Business Intelligence>Reports.
- Select Shipments report category.
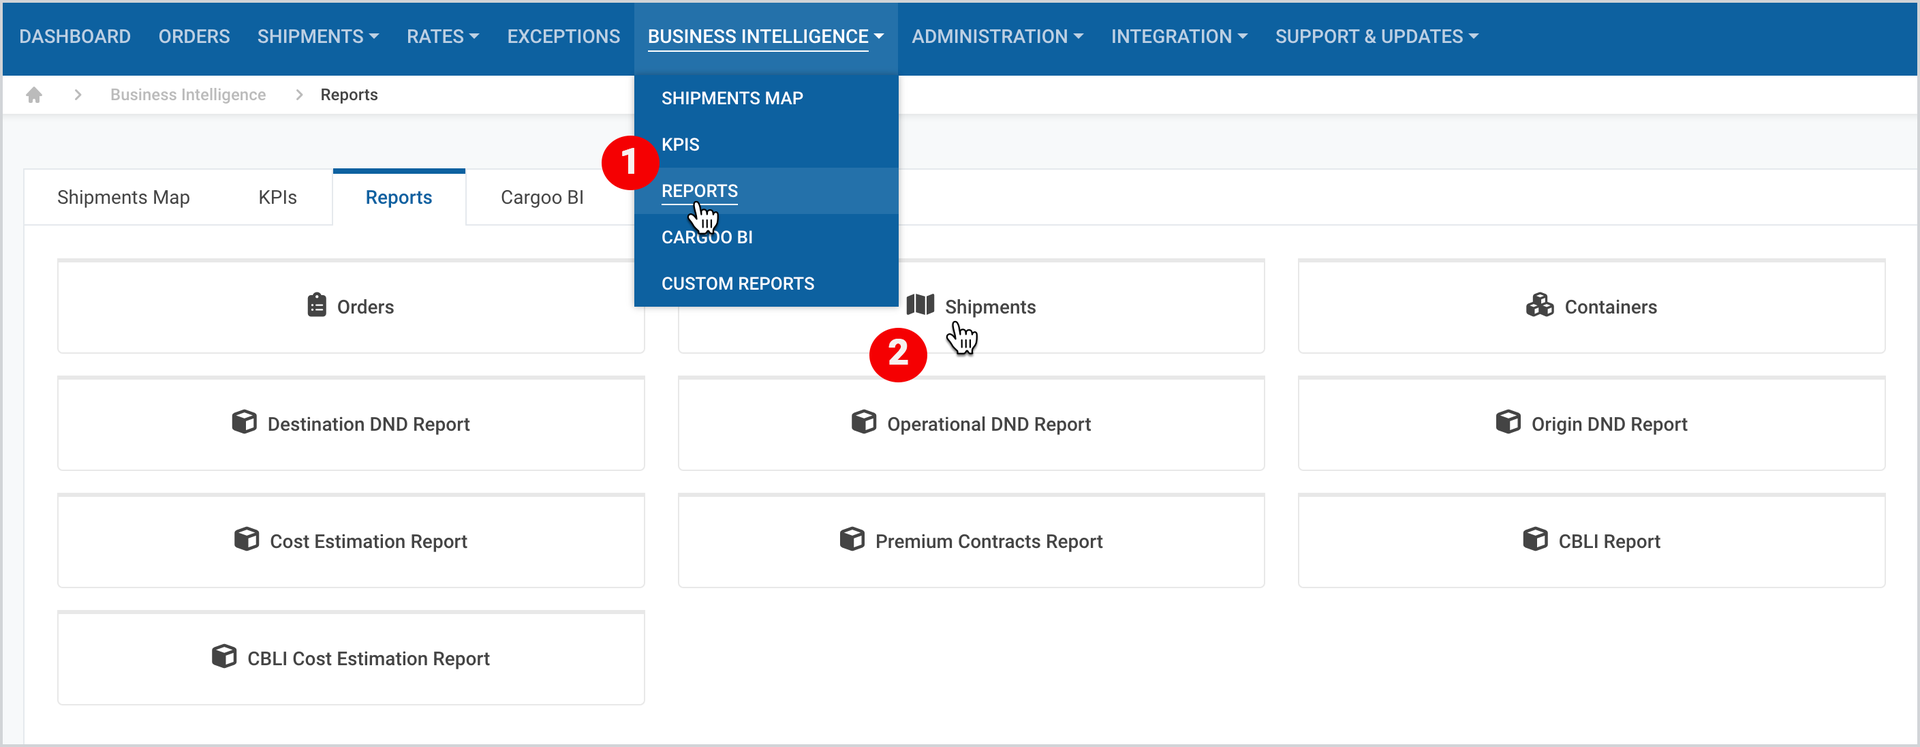
Figure 1
When you open Shipments Report you will see 3 (three) tabs.
- Select Shipment Details if you aim to filter and analyze the data from the perspective of a Shipment as a whole.
- Select Shipments per Order if you want orders to be shown in separate rows.
- Select Shipments Documents if you aim to get more details on shipment related documents.
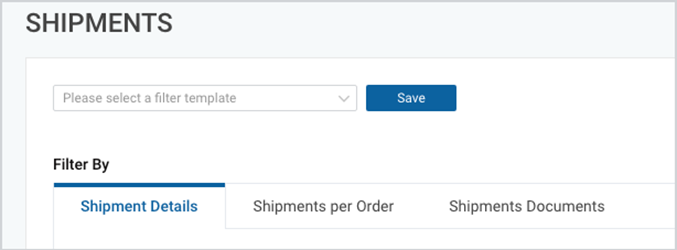
Figure 2
Before generating a report, make sure that
- You’re using the right Company account.
(For more details, please see Business Intelligence: Reports Section article.) - You have checked the Data for multiple companies: section and have selected all the companies for which you are looking to get the data .
(For more details, please see Common Features: Data for Multiple Companies article.) - All Filters and Additional Filters are set. To set the Filters and Additional Filters follow the steps described in Filter by and Additional Filters.
Tip | Save the filter configurations as a template in case you use the same filter configurations repeatedly, or use existing templates if any. (For more details, please see Common Features: Save Your Filter Configurations as a Template article.) |
Once all filters are set, generate a report and use report table features to view and analyze the report online or use the provided options to download or save it to preferred file formats.
(For more details on report table features, please see Common Features: Report Table article.)
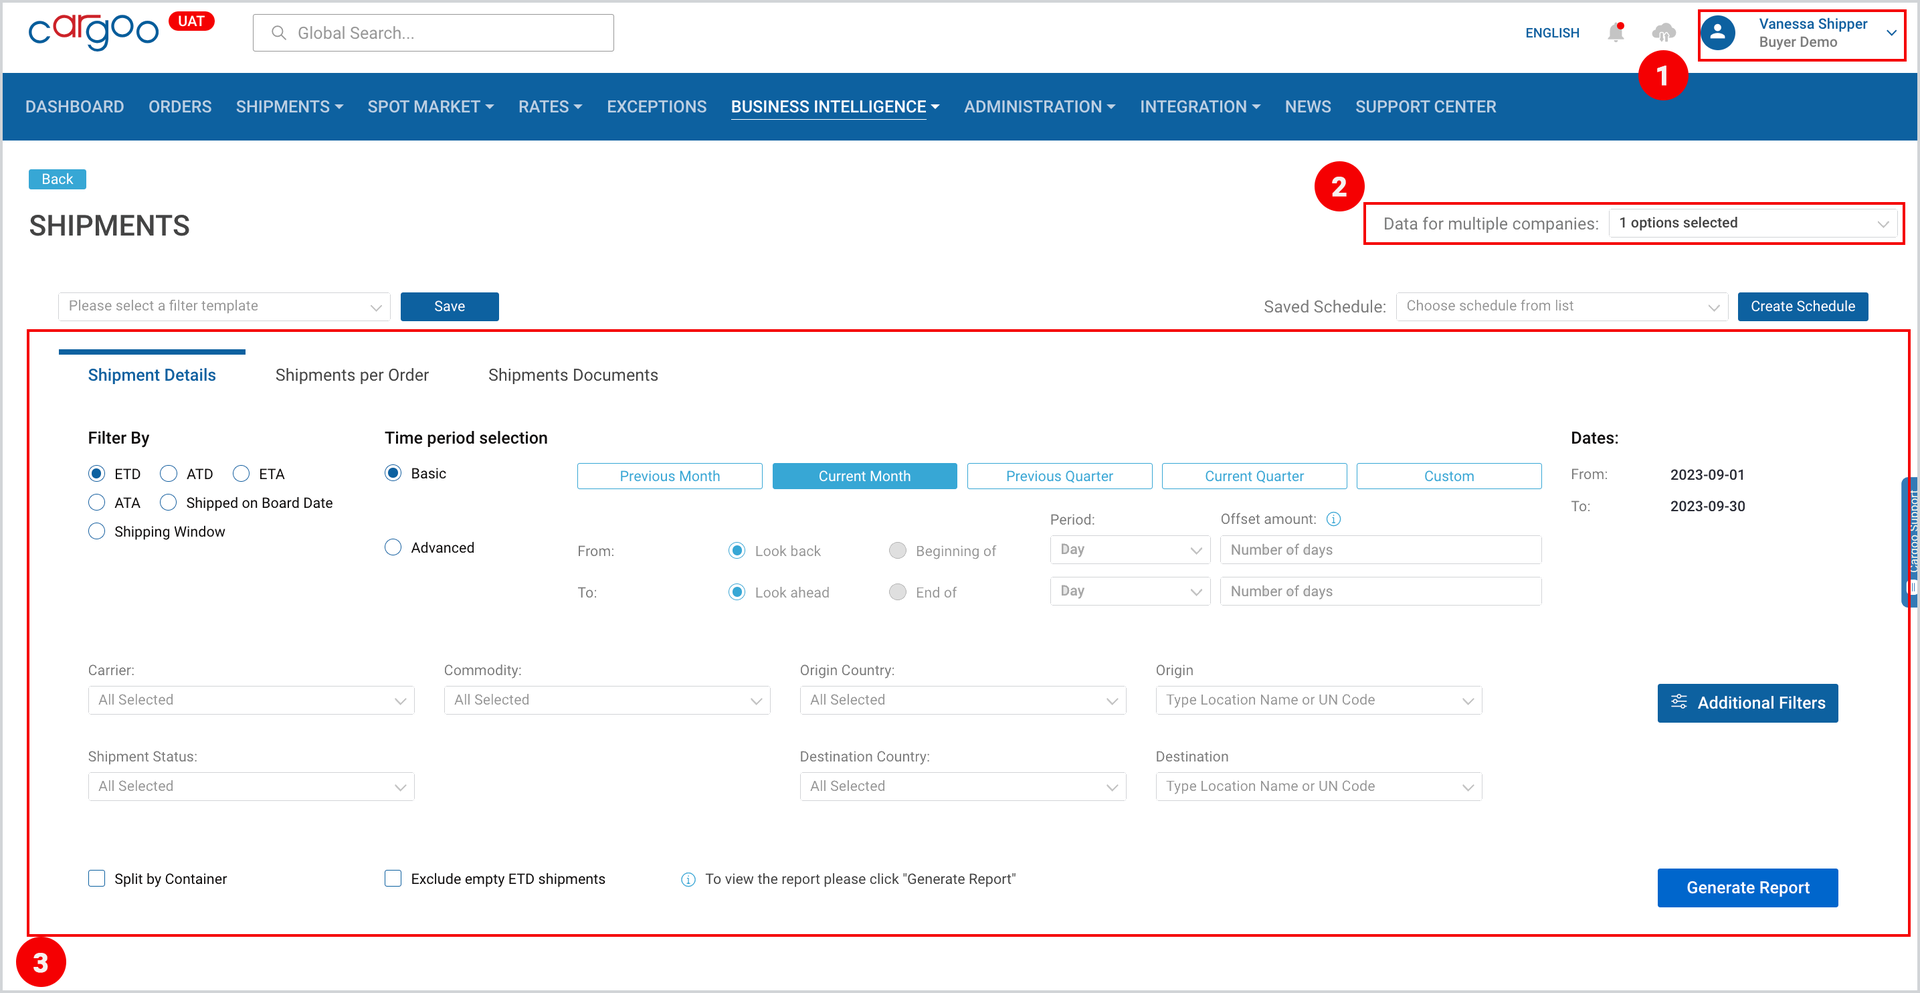
Figure 3
Aside from the Common features, the Shipment report category offers the following special features:
- Create Schedule (Report Scheduler)
- Filter by
- Additional Filters
Create Schedule
This feature allows you to automate your reporting process, saving time and effort. With the Report Scheduler, you can schedule the generation and delivery of reports at the preferred intervals (even multiple schedules per day) and the preferred format (CSV or Excel) having the required information at hand.
To set a schedule
- At the right part of the Shipments Report page, click Create Schedule.
- In the appeared pop-up window, fill in the Schedule Name or select from the previously created template.
- Select Report Template.
- Select the schedule's start datetime and time zone (this will be the time of the first schedule execution).
- Activate the Recurrence toggle, if the schedule should run more than once,
- For the weekly interval, it is possible to choose on which weekdays to run the schedule.
- For the monthly interval, it is possible to choose the days of the month on which the schedule will run (if the scheduler should run exactly on the last day of the month, activate the Run on last day of the month toggle. If other days of the month are also selected, the scheduler will run on those days as well).
- There is no possibility to run the same schedule multiple times per day. However, if this is required, as a workaround, multiple schedules can be created for different running times.
6. Activate Set Expiration toggle, if required. There is a choice between specifying an
exact expiration date or the number of occurrences before it expires.
7. To define email settings, choose schedule from the drop-down list (if the saved email
settings need to be reused)
8. Insert the email(s) where the generated report should be sent.
9. Fill in an Email Subject, Content, and Attachment Name. (It is possible to use drag
and drop variables (highlighted in blue) in all three fields, which will resolve to
actual values each time the schedule is executed.)
10. Select the desired report format.
11. Click Save and Enable.
The first execution of the report will be at the datetime set in step 4.
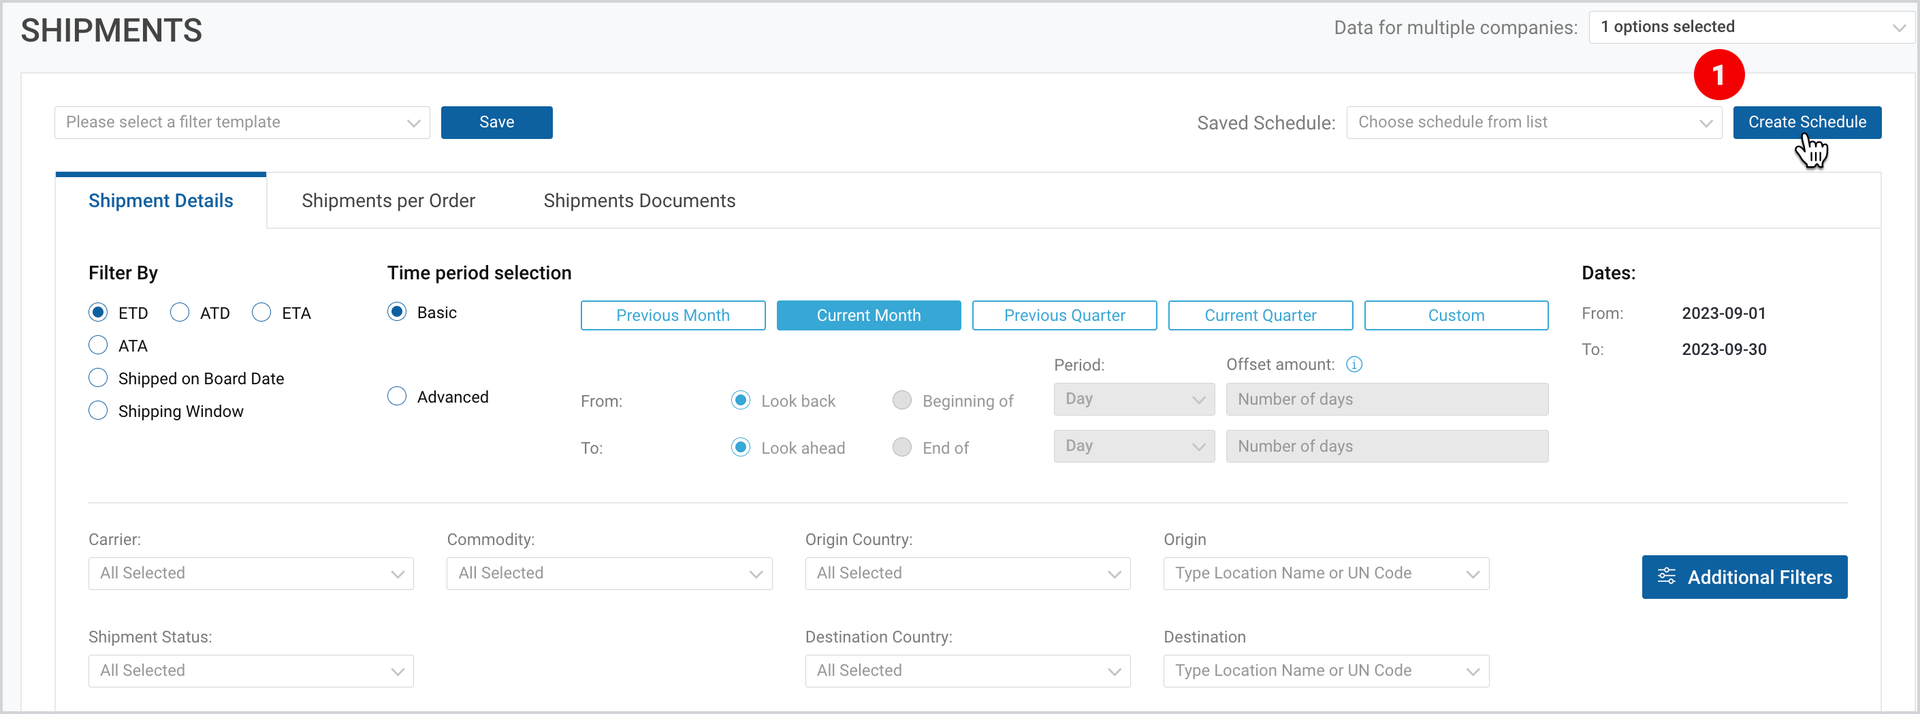
Figure 4
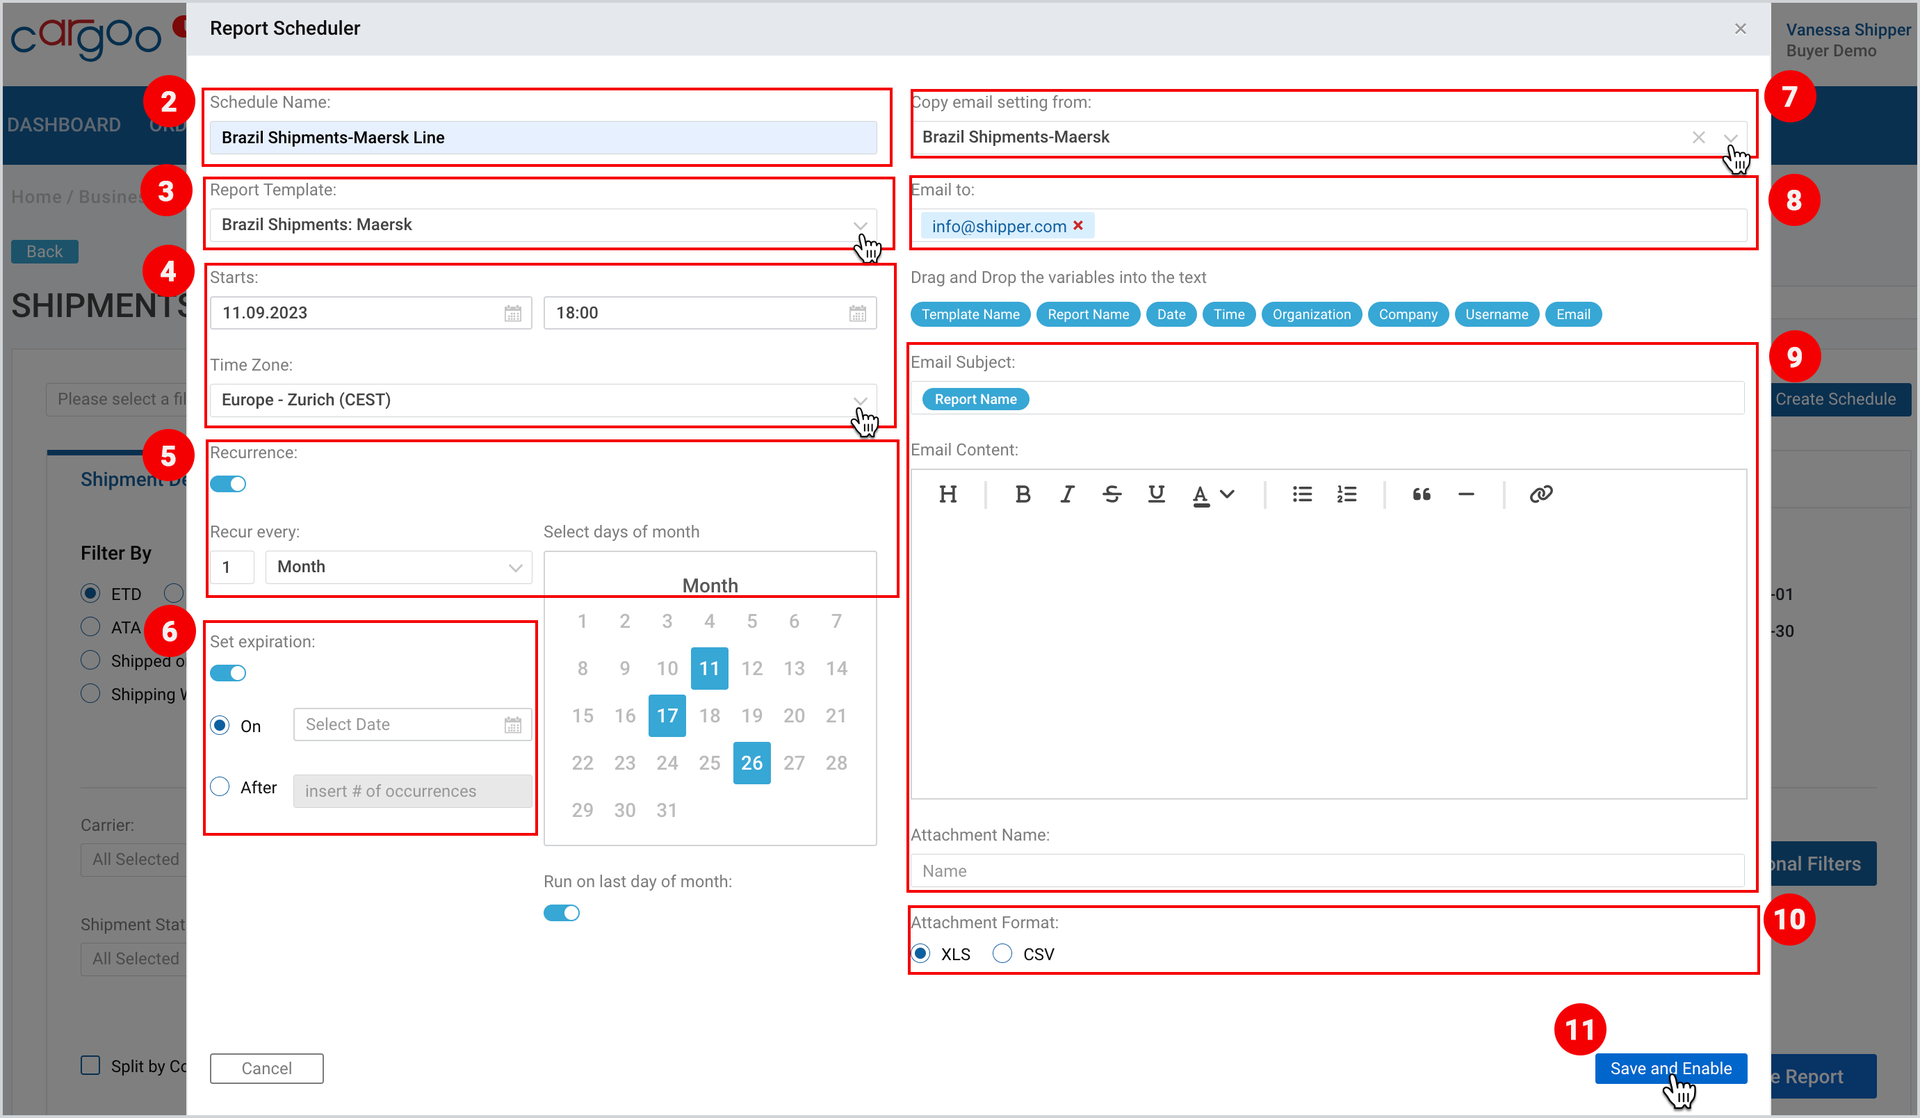
Figure 5
Modify Existing Schedule
The list of all created schedules is accessible from the drop-down selection at the top right corner of the Shipments Report.
To modify the settings of the existing schedule:
- Select the desired one from the drop-down list.
- Click View/Edit and follow the steps described in Create Schedule steps above.
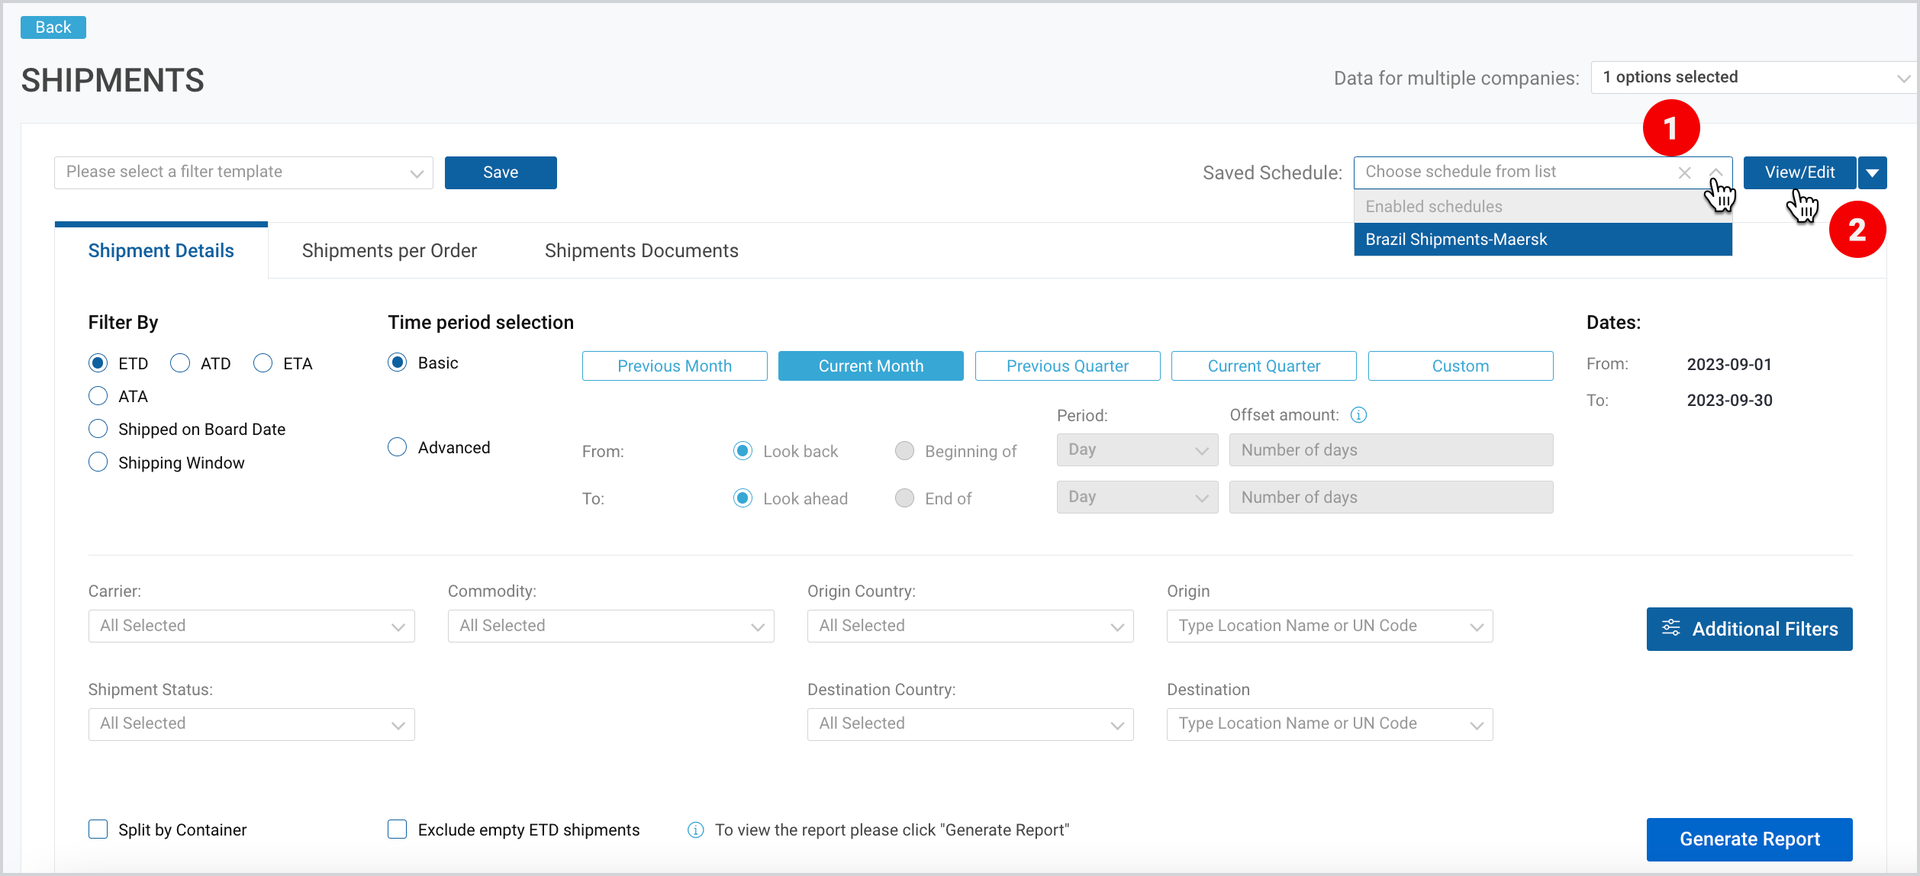
Figure 6
To disable/enable the existing schedule:
- Follow the 1st step, shown in Figure 7 above.
- Click the drop-down arrow next to View/Edit.
- Select Disable or Enable.
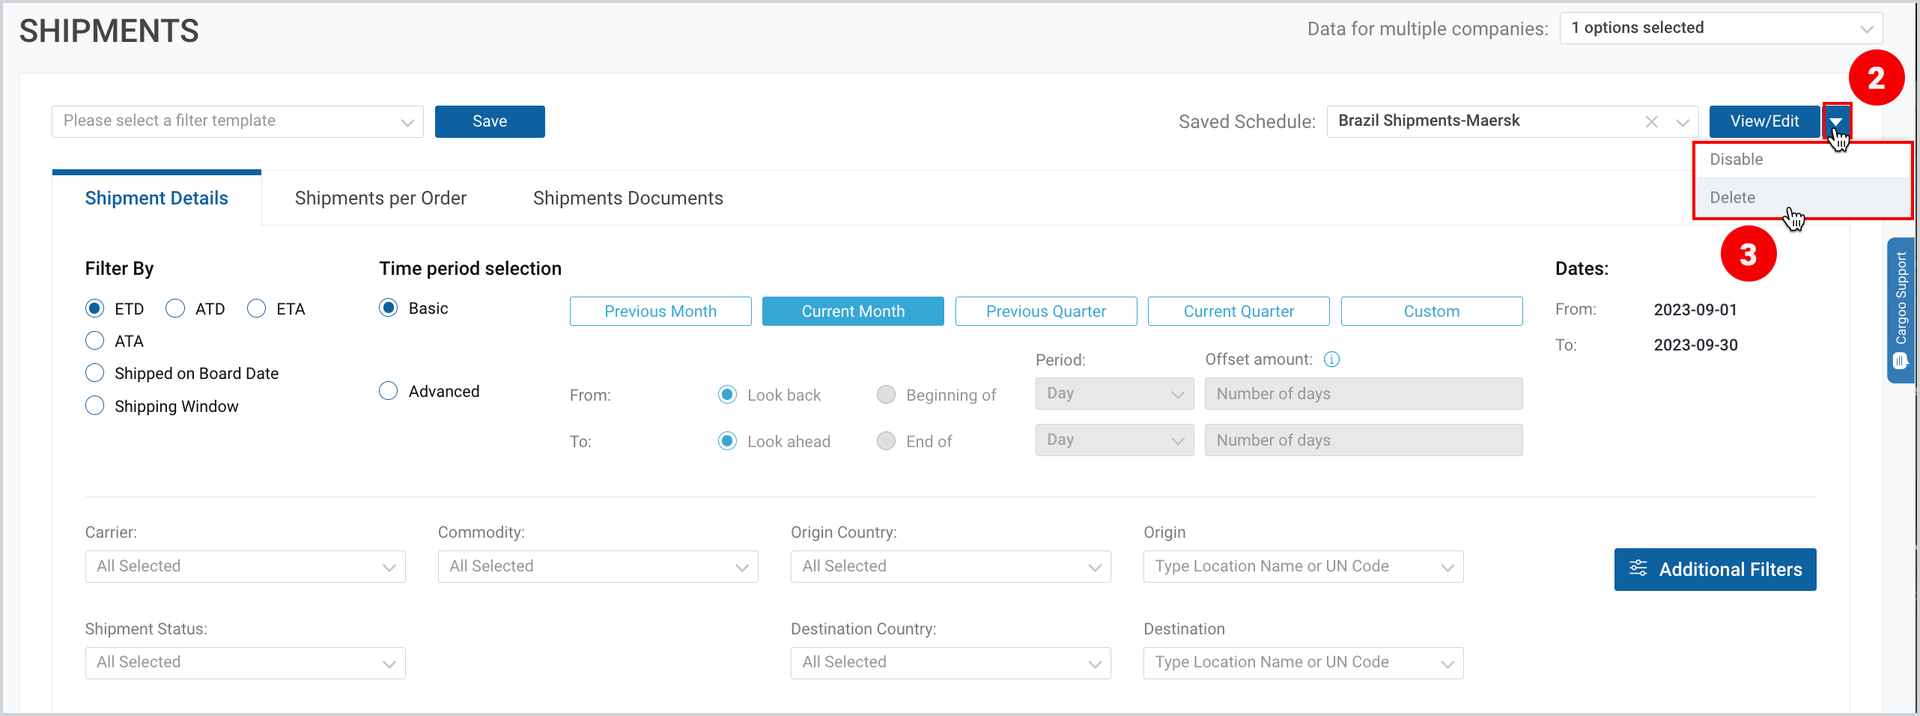
Figure 7
Note | Schedules are created at the Company level and are accessible by all Company users, admins, and organization admins. Users can only edit schedules created by themselves, while admins can edit all Company schedules. |
Filter by
To set the filters
- Select the date criteria (see Table 1: Date Criteria) (see Figure 8)
- Select the time period from the provided options (see Table 1: Date Criteria) (see Figure 8)
- Basic – Previous Month, Current Month, Previous Quarter, Current Quarter, or Custom (use the calendars to select From and To dates) (see Figure 8).
- Advanced - set advanced settings for the start and end dates relative to the current date.
- The Look back (Look ahead for the end date) option subtracts (adds) the selected number of Days/Weeks, Months, or Years (selected from the Period dropdown list) from the current date. Negative values add units of time in the opposite direction.
- The Beginning of (End of for the end date) option sets the start (end) date to the beginning of the selected unit of time, chosen from the Period dropdown list, after adding the specified number of selected periods to the current date. Negative values add units of time in the opposite direction.
All date range selections (except Custom date selection) are relative to current date. This functionality is fully supported by reporting templates. Every time a template with advanced date filtering is chosen, reporting window is set relative to the current date.
3. Use the drop-down menus of the following filters to narrow down the search results and filter the data accordingly (see Figure 8):
- Carrier,
- Commodity,
- Shipment Status,
- Origin Country,
- Destination Country.
4. Type in the Location Names or the UN Codes (UN/LOCODE) for the Origin and the Destination (see Figure 8).
5. (Only in Shipment Details) Select Split by Container if you want each container number to be displayed in separate rows (see Figure 8).
6. Select Exclude empty ETD shipments, if you do not want to see the shipments with missing ETD (see Figure 8).
7. (Only in Shipment per Order) Select Split by Order Reference if you want Order References to be shown in separate rows (see Figure 9).
8. (Only in Shipments Documents) Use the drop-down menus of the following filters to narrow down the search results and filter the data accordingly (see Figure 9):
- Documents;
- Document Deadline;
- Document upload required.
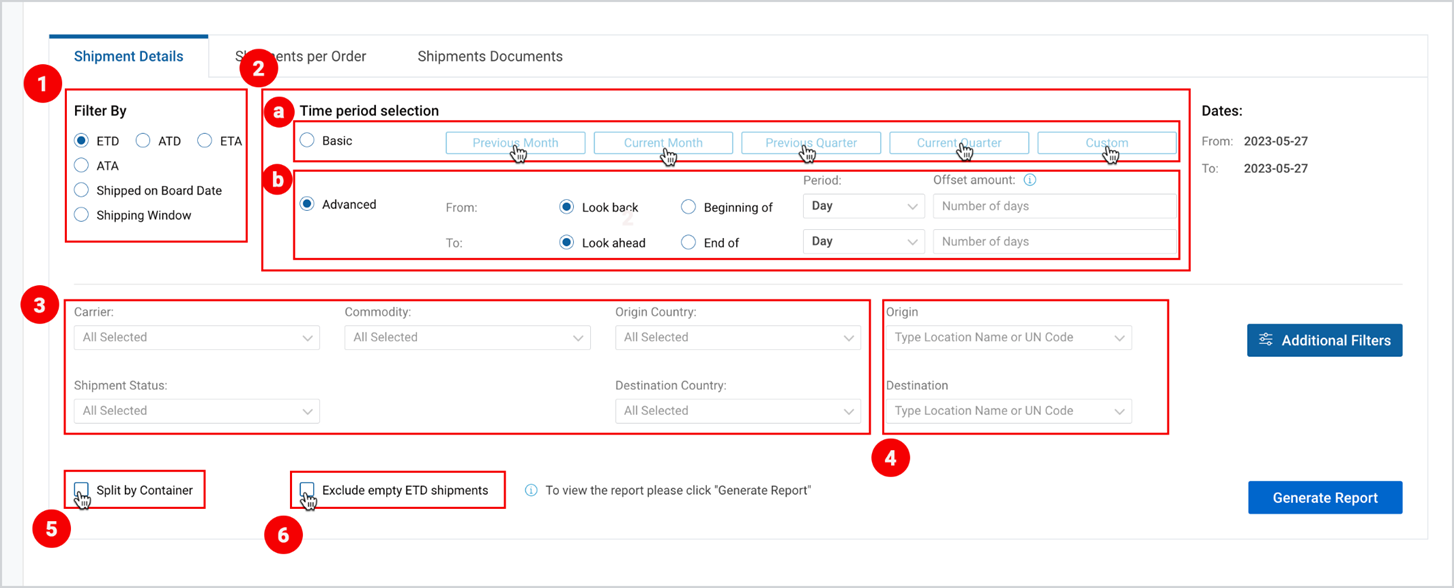
Figure 8
Note | All is the default selected option for the filters mentioned in Steps 3 and 4. If you skip Steps 3 and 4 the generated report will include all the shipments available. |
(Only in Shipment per Order tab)
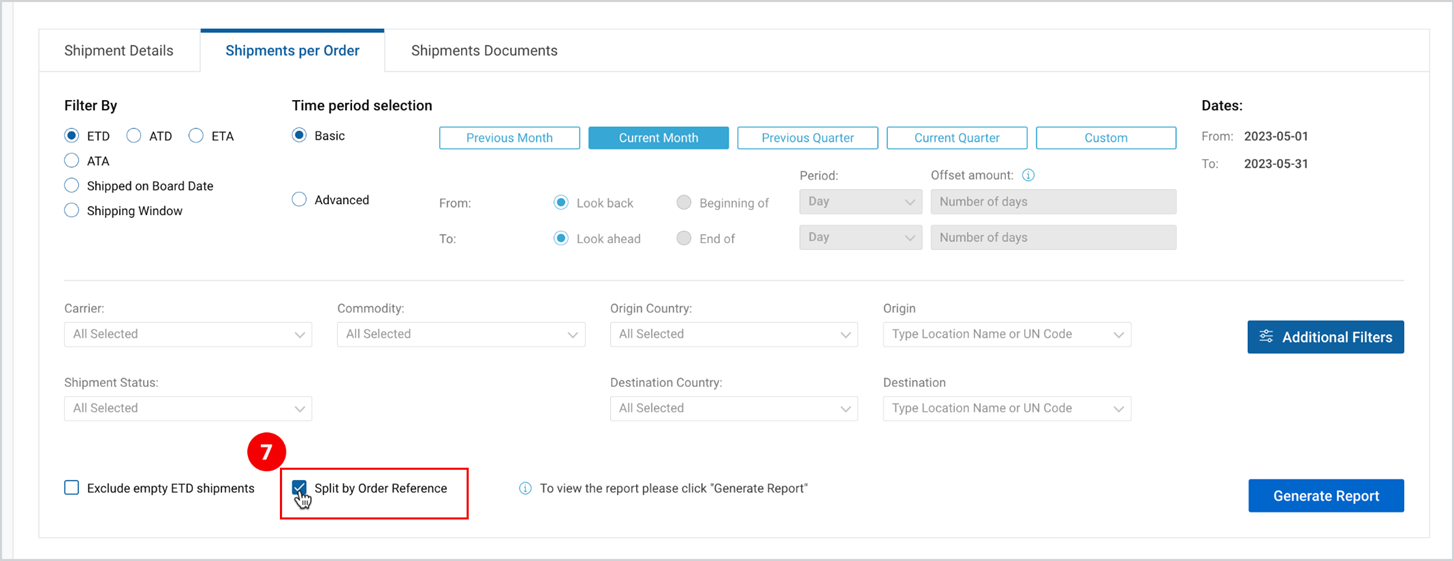
Figure 9
(Only in Shipments Documents tab)
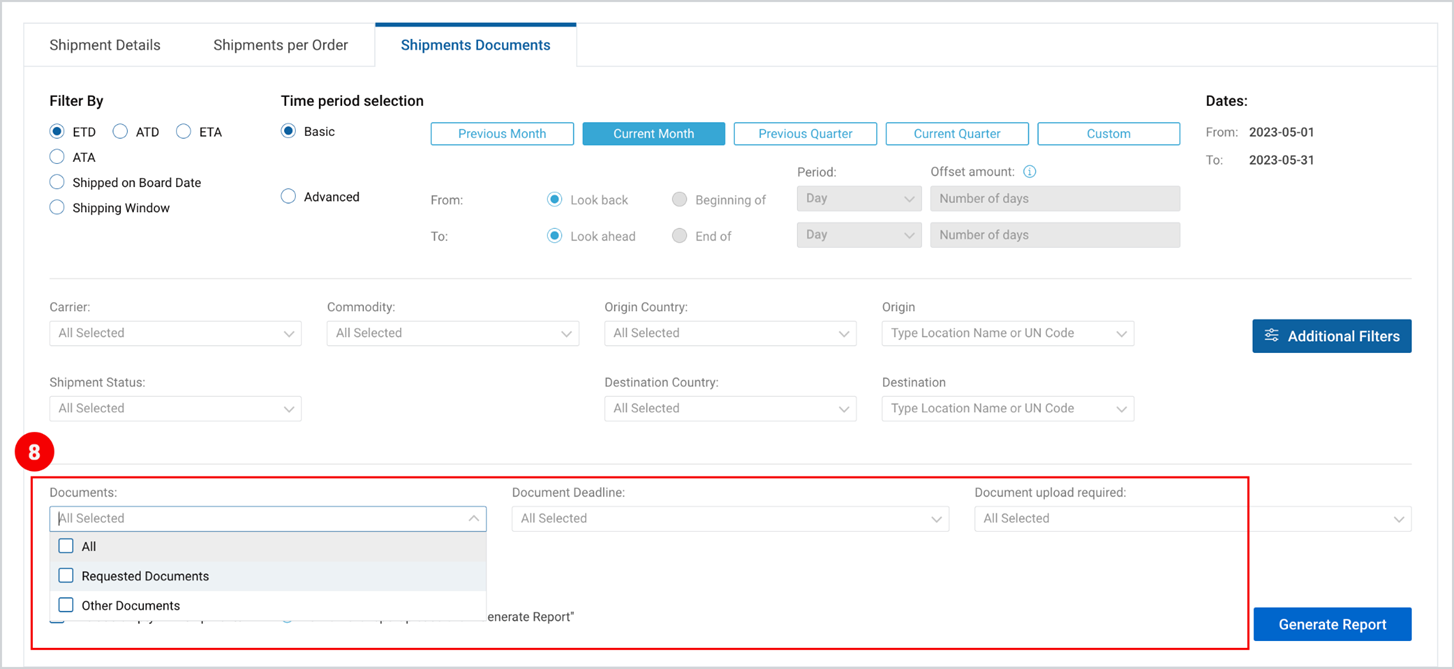
Figure 10
Table 1: Date Criteria
DATE CRITERIA | DESCRIPTION |
ETD | Estimated Time of Departure When selected Exclude empty ETD shipments filter appears (see Figure 8). |
ATD | Actual Time of Departure |
ETA | Estimated Time of Arrival |
ATA | Actual Time of Arrival |
Shipped on Board Date | Date the cargo was loaded on the board of the vessel and the POL departure date |
Shipping Window | When selected Search Criteria filter appears. Select one of the two options (see Figure 9). (For detailed information on how Exact search and Range search filters work, please see Special Features: Orders Report Category article.) |
Additional Filters
Additional Filters allow you to
- Filter the data per your role in the shipments.
- Select specific companies to be displayed in the report.
- Select specific Business Partners to be displayed in the report.
- Add additional fields to the report.
Select Your Role in Shipment
- Click Additional Filters.
- Select one of the three filter options:
- My Shipments — Shipments created by you or by companies selected in Data for Multiple Companies.
- Observer — Shipments where you or the companies selected in Data for Multiple Companies are added as Further Parties.
- All — This option includes the above-mentioned two filter options and is selected by default.
- Click Apply.
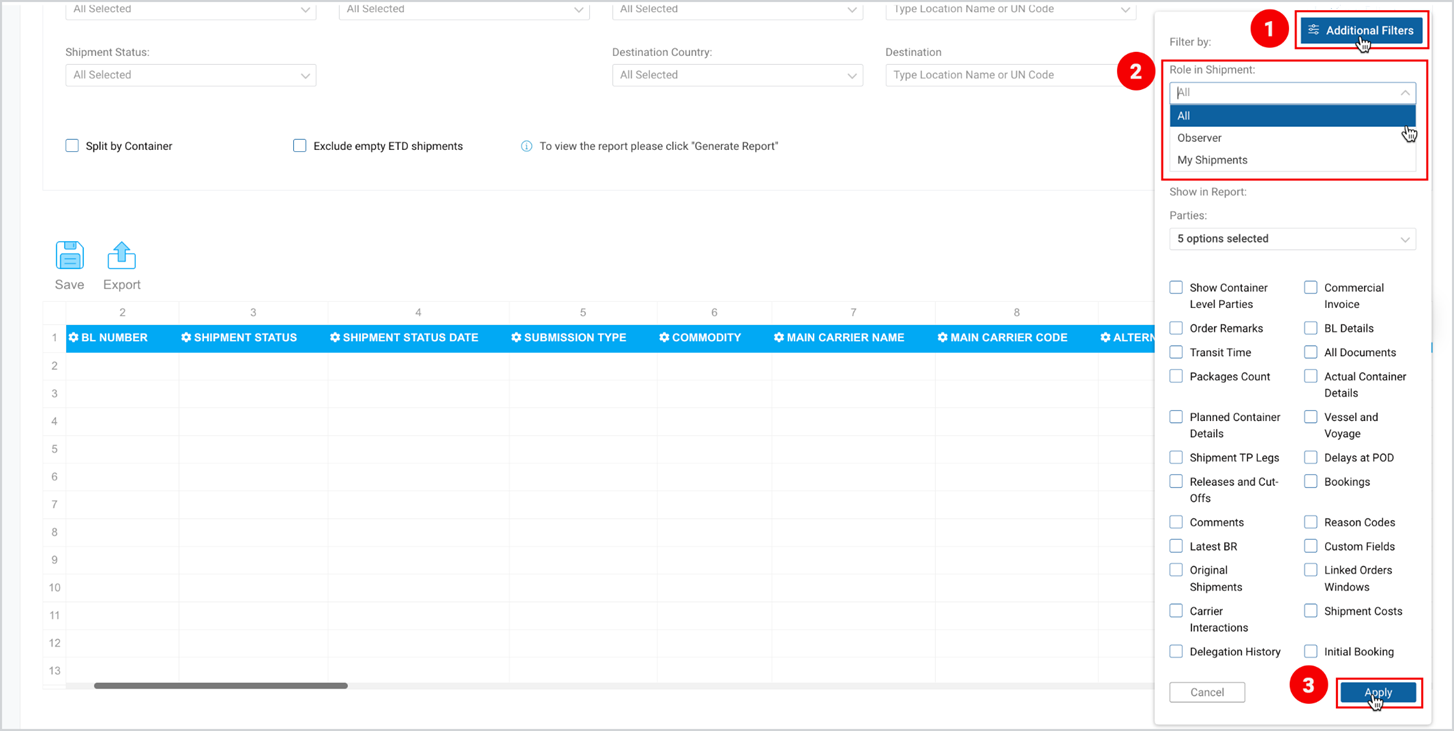
Figure 11
Companies
To add specific companies to the report:
- Click Additional Filters.
- Select the desired companies from the Companies drop-down menu.
- Click Apply.
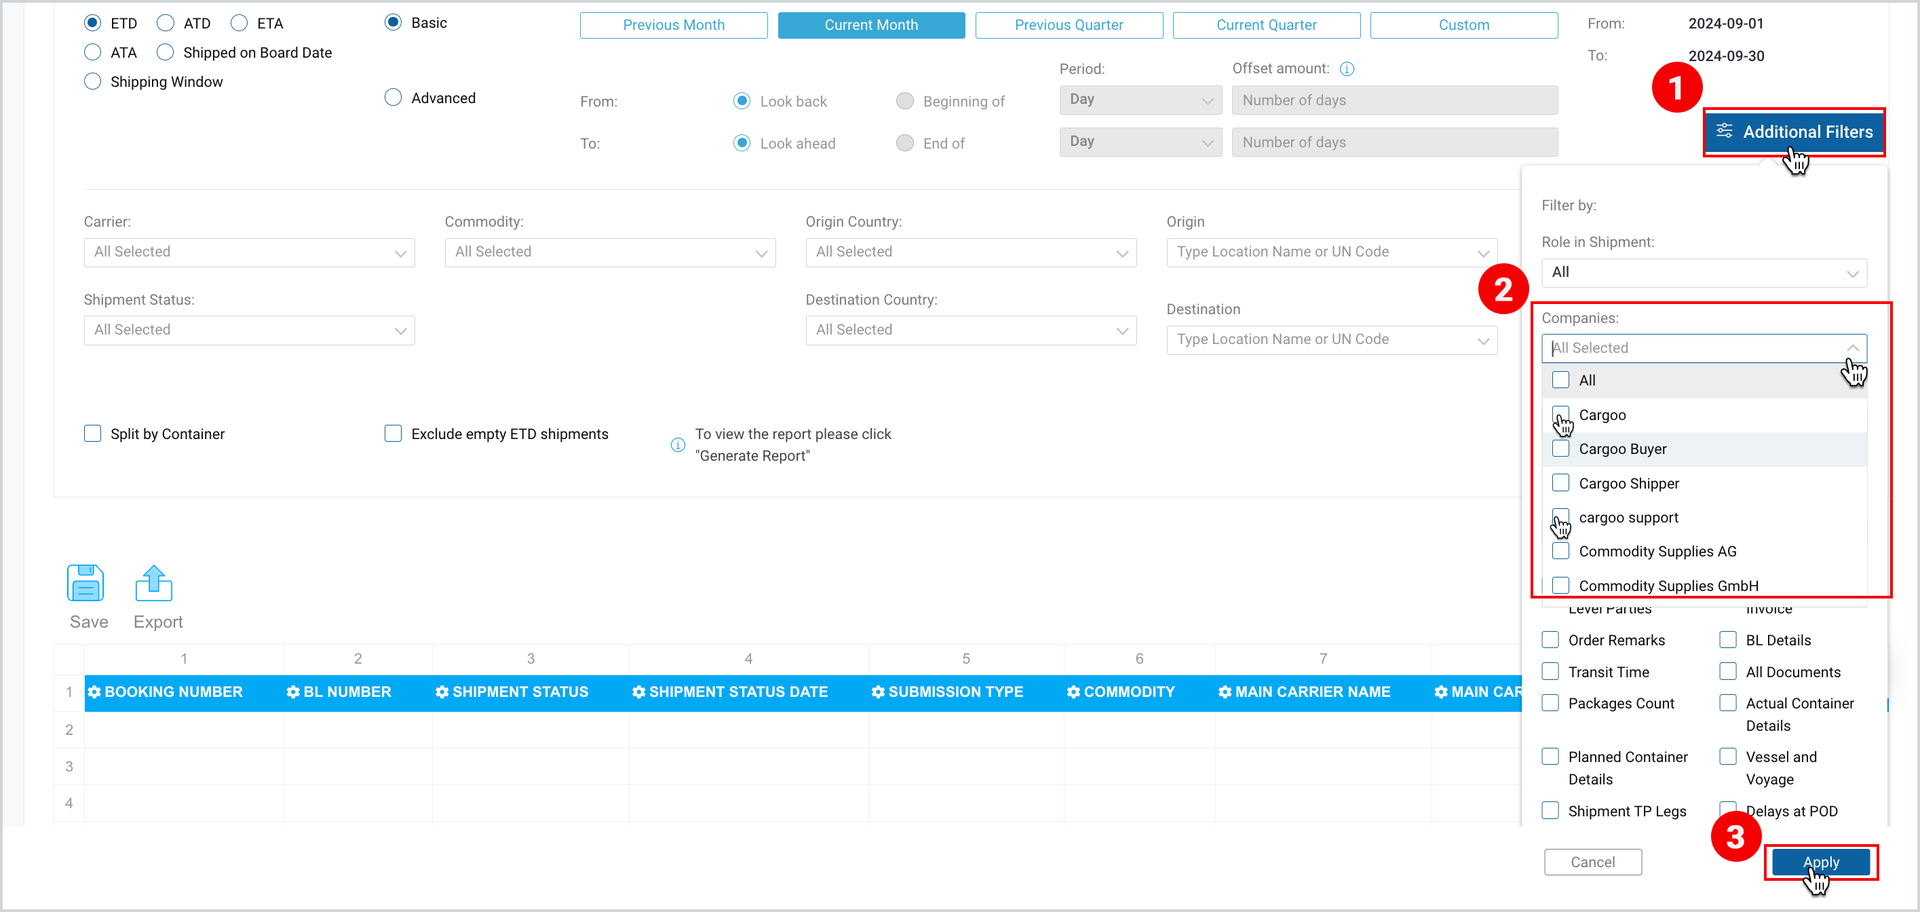
Figure 12
Business Partners
To add business partners to the report
- Click Additional Filters.
- Select the desired business partners from the Business Partners drop-down menu.
- Click Apply.
By default, all BPs are selected.
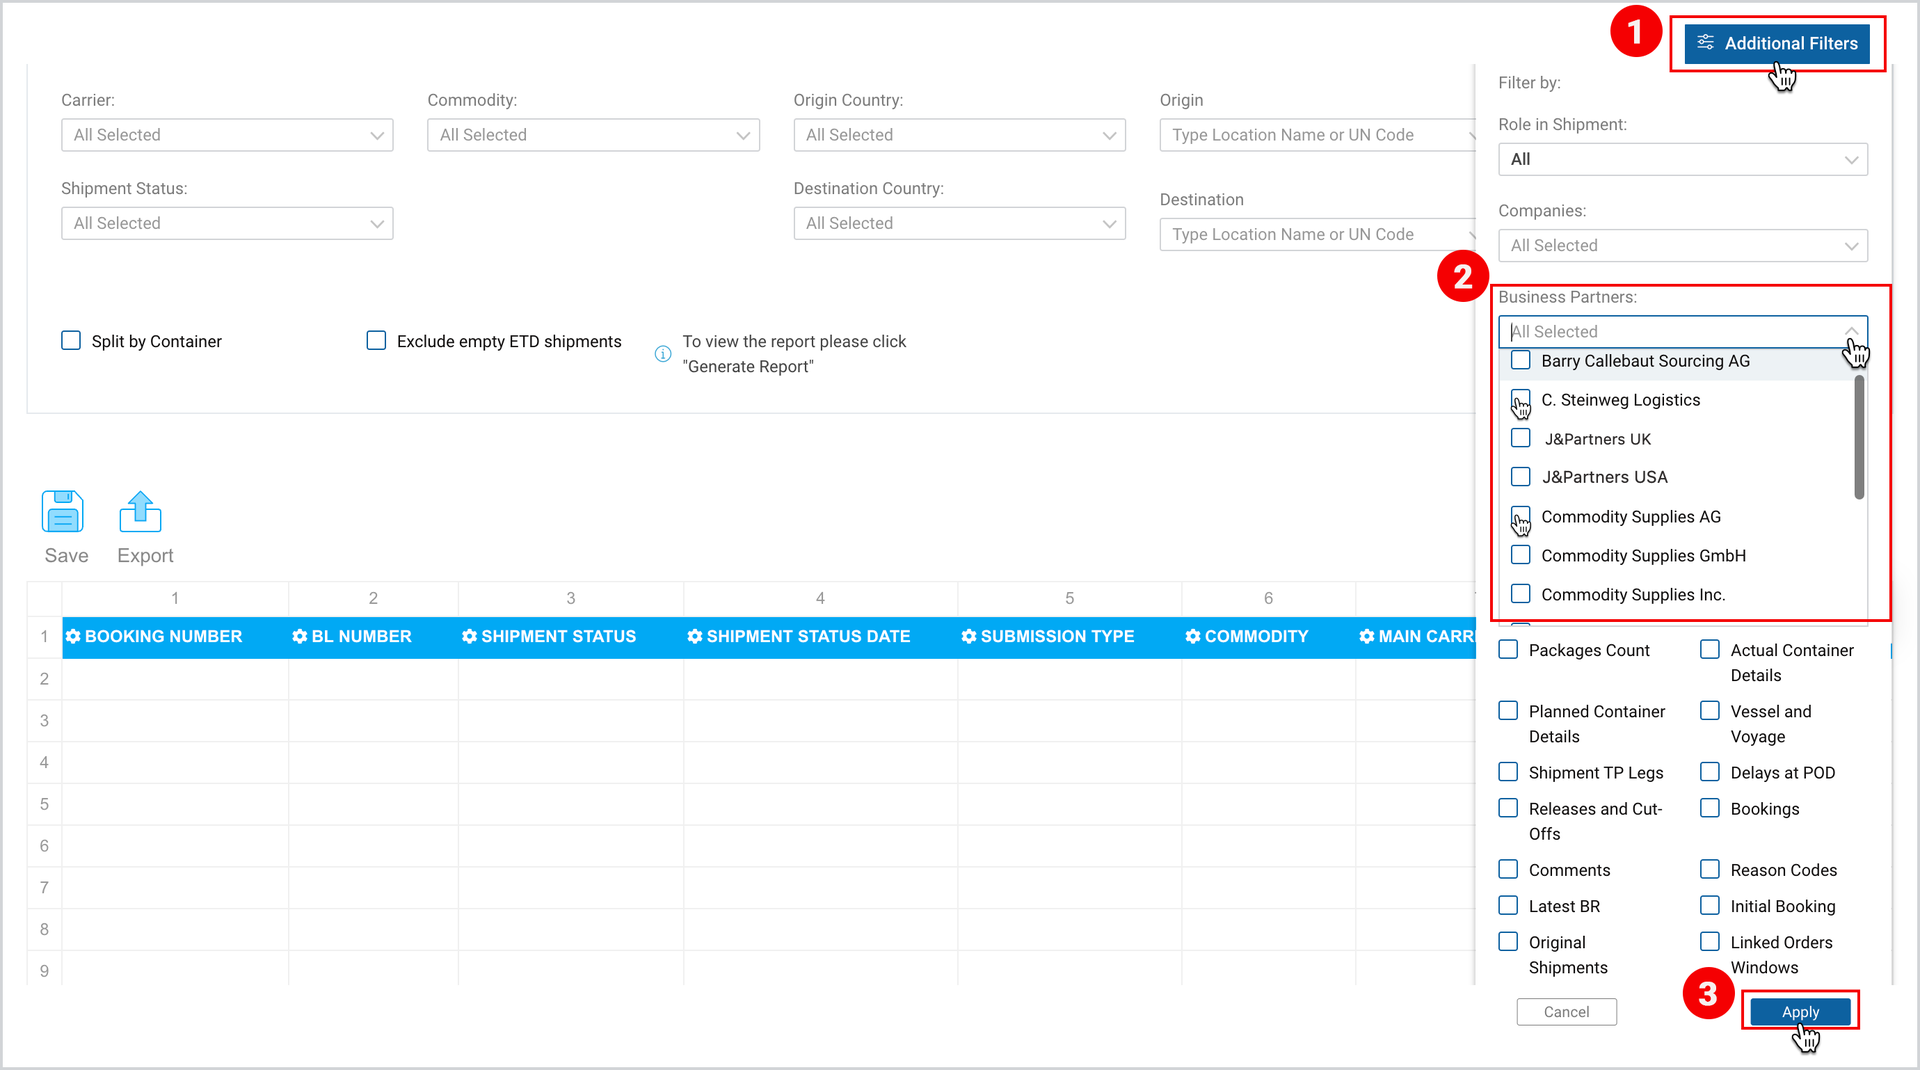
Figure 13
Note | When business partners are selected in the drop-down, the report displays only shipments that have at least 1 Party from the list of selected companies. |
Note | The Business Partners dropdown shows the business partners of the selected Company or multiple companies (from the “Data for multiple companies” dropdown list). |
Parties
To add more Parties to the report
- Click Additional Filters.
- Open the drop-down menu for Parties and select more Parties or deselect the default selected options.
By default, the below-mentioned 5 (five) Parties (Business Partners) are selected and will be reflected in the report only if there is any information about them.- Buyer;
- Supplier;
- Carrier;
- Owner;
- Shipper;
- Consignee.
- Click Apply.
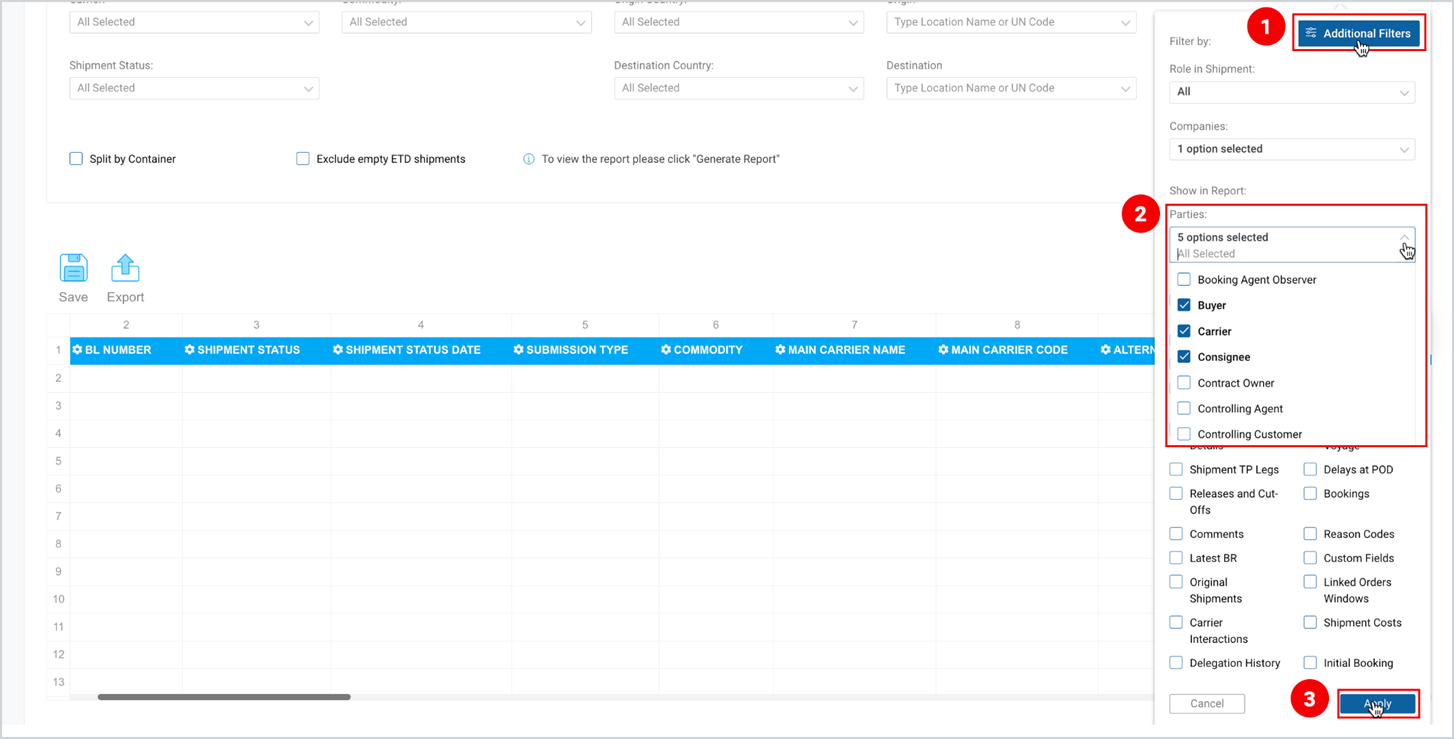
Figure 14
Show in Report: Fields (Available Only in Shipment per Order and Shipment Details)
To add more fields to the report
- Select Additional Filters.
- Select the checkboxes of the fields you want to be shown in the report.
Information on the list of columns added per field is given in Table 2: List of Columns Added per Field. - Click Apply.
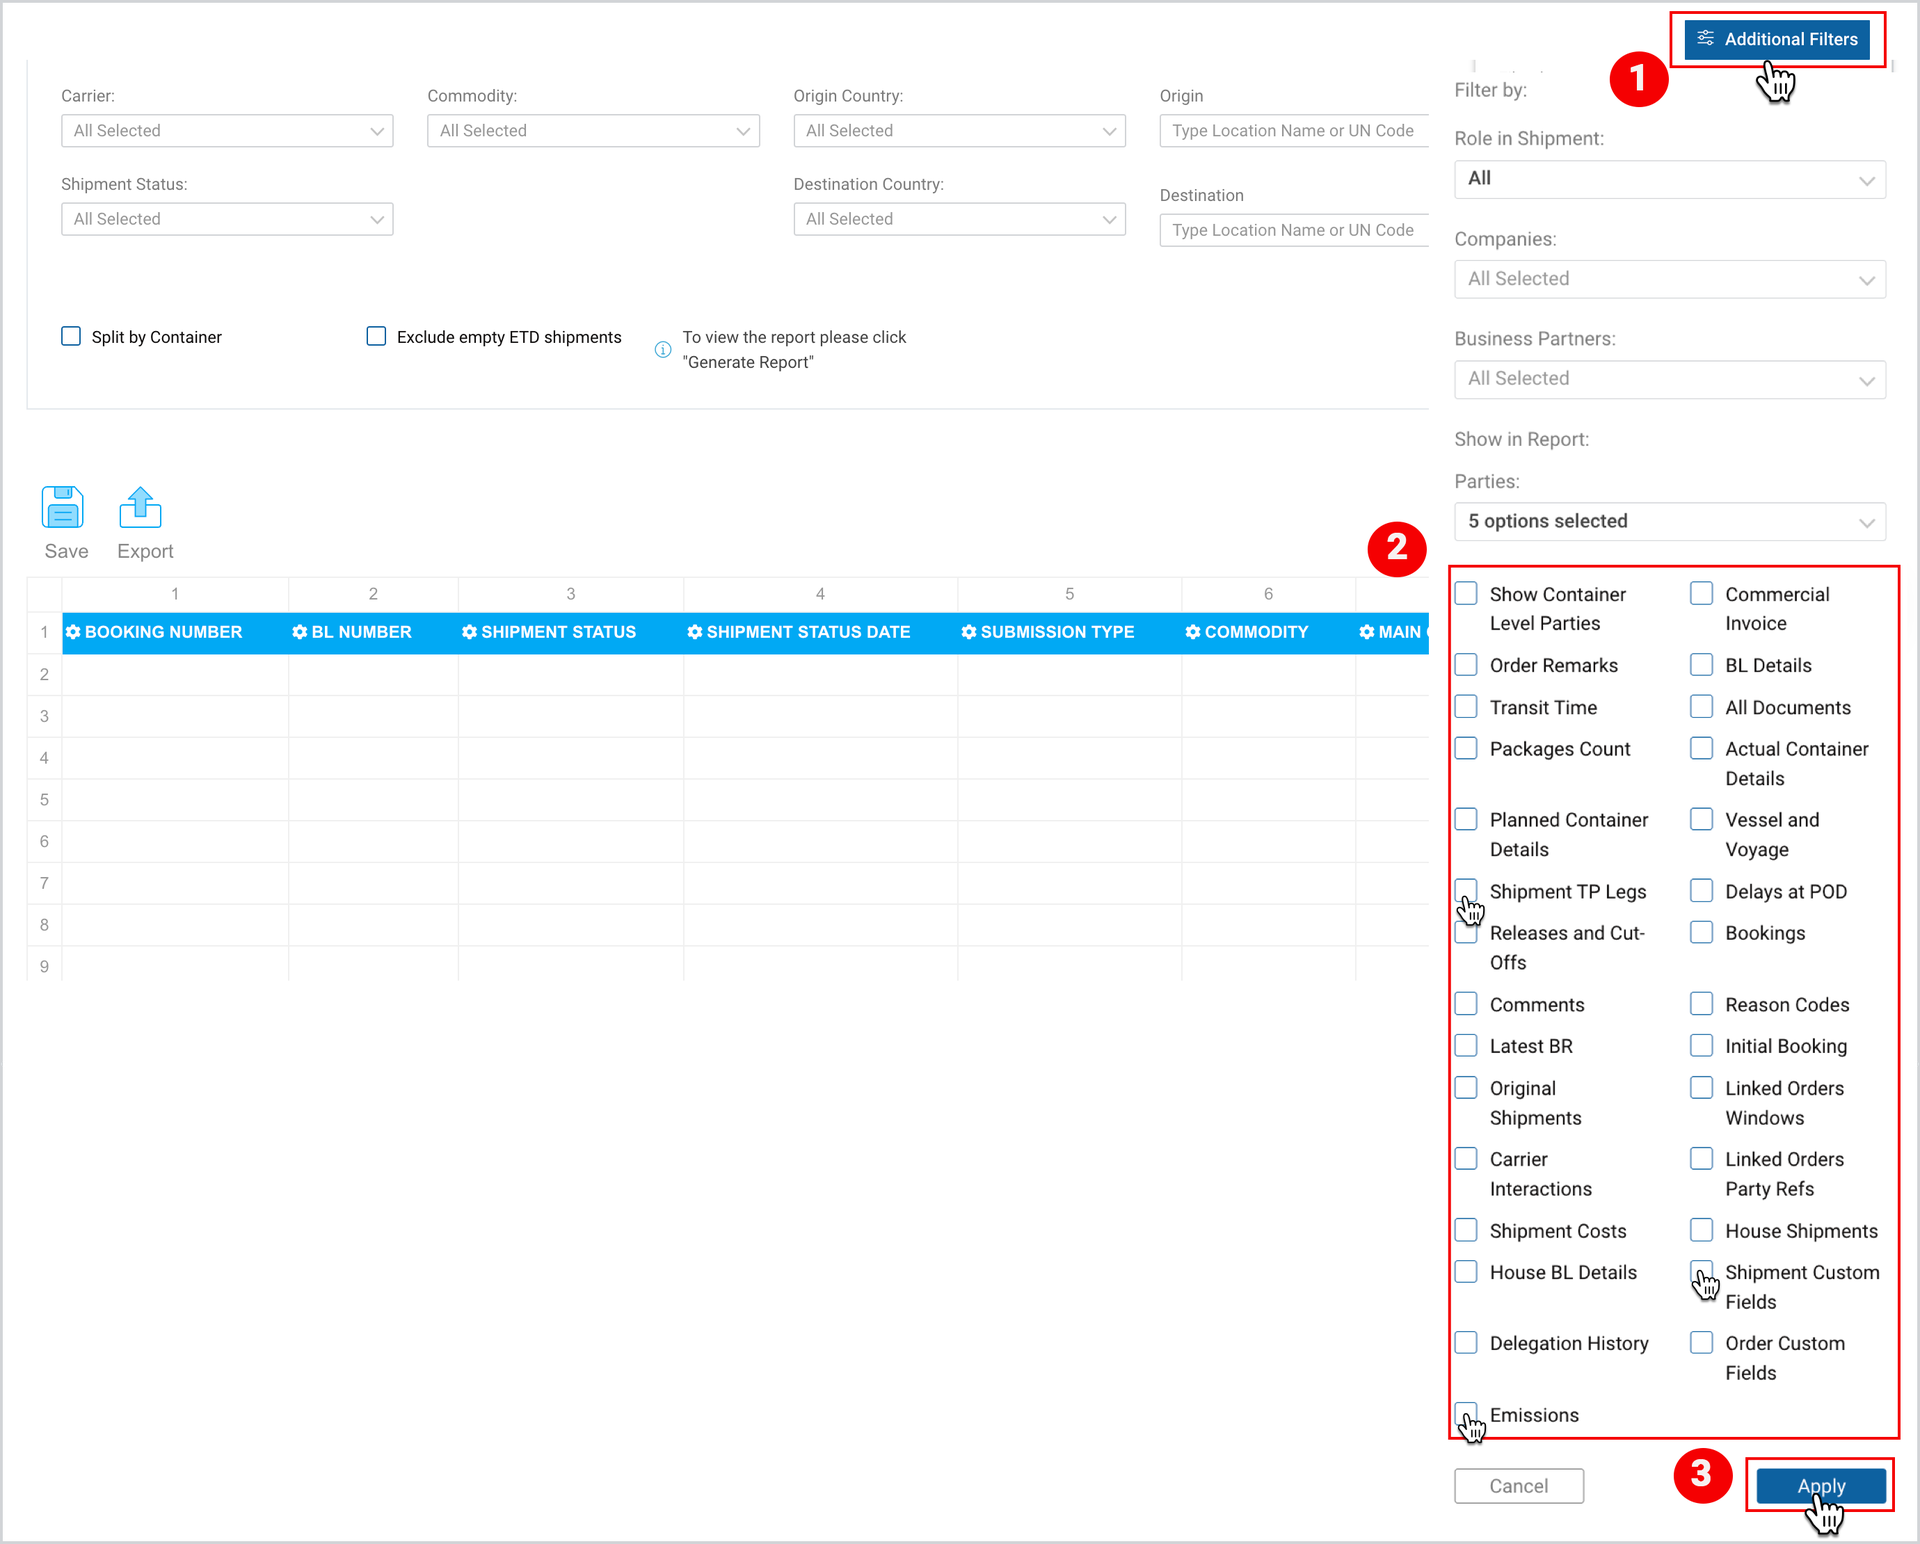
Figure 15
Note | Information on the list of columns added per field is given in Table 2: List of Columns Added per Field on page 19. |
Table 2: List of Columns Added per Field
Fields | Columns |
Show Container Level Parties |
If the same party is selected for the different containers, then this party will be displayed only once. |
Order Remarks |
|
Transit Time |
|
Packages Count |
|
Planned Container Details |
These containers are selected by default. You may select others manually from the report table fields. |
Shipment TP Legs |
LEG5: ETA to POD |
Releases and Cut-Offs |
|
Comments |
|
Latest BR |
*The system takes only the latest Booking Request information from the Carrier Interactions. **The number of added columns matches the number of transshipments, i.e., the greater the number of transshipments, the more fields will be added to the report.
|
Original Shipments |
Data Source: Original Shipment>Carrier Interactions first requested/ first confirmed dates.
If there are more than one Original Shipments, the data of the very initial (i.e., rejected) shipment is displayed.
|
Carrier Interactions |
If the First Booking Confirmation ETA is missing, then the report field remains empty. |
Shipment costs |
|
House BL Details | Each HBL document is displayed in a separate row with the following data:
|
Delegation History | Captures & reports the date, ETD, carrier, vessel and business partner in the different stages in the shipment plan delegation process.
* <N> is delegation number (earliest delegation first) A business partner name of a Delegator and Delegatee are shown in the column. If Delegator (or Delegatee) is not a business partner of a current company then check also companies selected in “Data for multiple companies” drop-down. Nomination number is not shown if only one carrier or transport plan is nominated. |
Emissions | For every emissions data provider (currently ECOTRANSIT and CLEAN CARGO), travelled distance (km) and the amount of emissions (tons) for each shipping stage (sum of all legs of the stage) is displayed.
The data from a provider is displayed only if at least one shipment in the report has respective data.
If at least one shipment for the data provider available in the generated report, all stages are displayed regardless data exists for them or not. |
Commercial Invoice |
|
BL Details |
|
All Documents |
|
Actual Container Details |
These containers are selected by default. You may select others manually from the report table fields. |
Vessel and Voyage |
|
Delays at POD |
|
Bookings |
|
Reason Codes |
*The system takes only the latest Reason Code from the pool of all three categories. |
Initial Booking |
The system will take only the first Booking Request information from the Carrier Interactions (no matter manual or automated).
Initial BC is the first booking confirmation after first booking request sent. |
Linked Orders Windows |
Linked Orders: Arrival Window To |
Linked Orders Party Refs |
|
House Shipments |
|
Shipment Custom Fields (attributes) (added by the Workflow to cover Customer specific requirements.) |
|
Order Custom Fields (attributes) (added by the Workflow to cover Customer specific requirements). |
|
To download the print version of this article, click the PDF icon: