 Cargoo Support
Shipments
The Shipments tab is displayed on the main menu as soon as the organization/company is registered in the Cargoo system. At first, only the Schedules feature of the Shipments page is visible. However, once you activate the Track&Trace module, the user can have access to Shipments view (all the fields are non-editable) or manage (fields are editable) modes. The Track&Trace module can be assigned to a user(s) by the Org/Company Admins.
To access your shipments,
- Under Main Menu, click Shipments->Shipments.
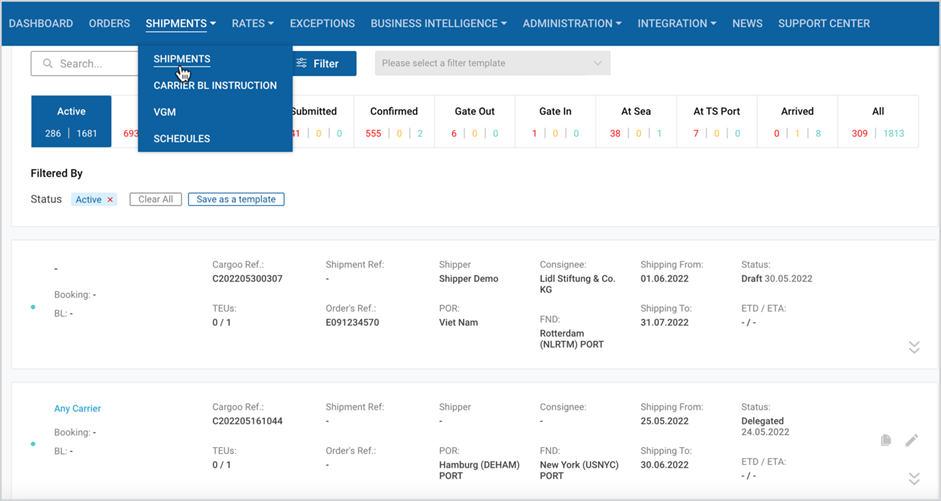
Shipments List
As you click on the Shipments tab, you can see the list of all your shipments (including their statuses) in the card view. You can switch them to the table view by clicking the table view icon at the upper-right corner of the page.
Card view |
Table view |
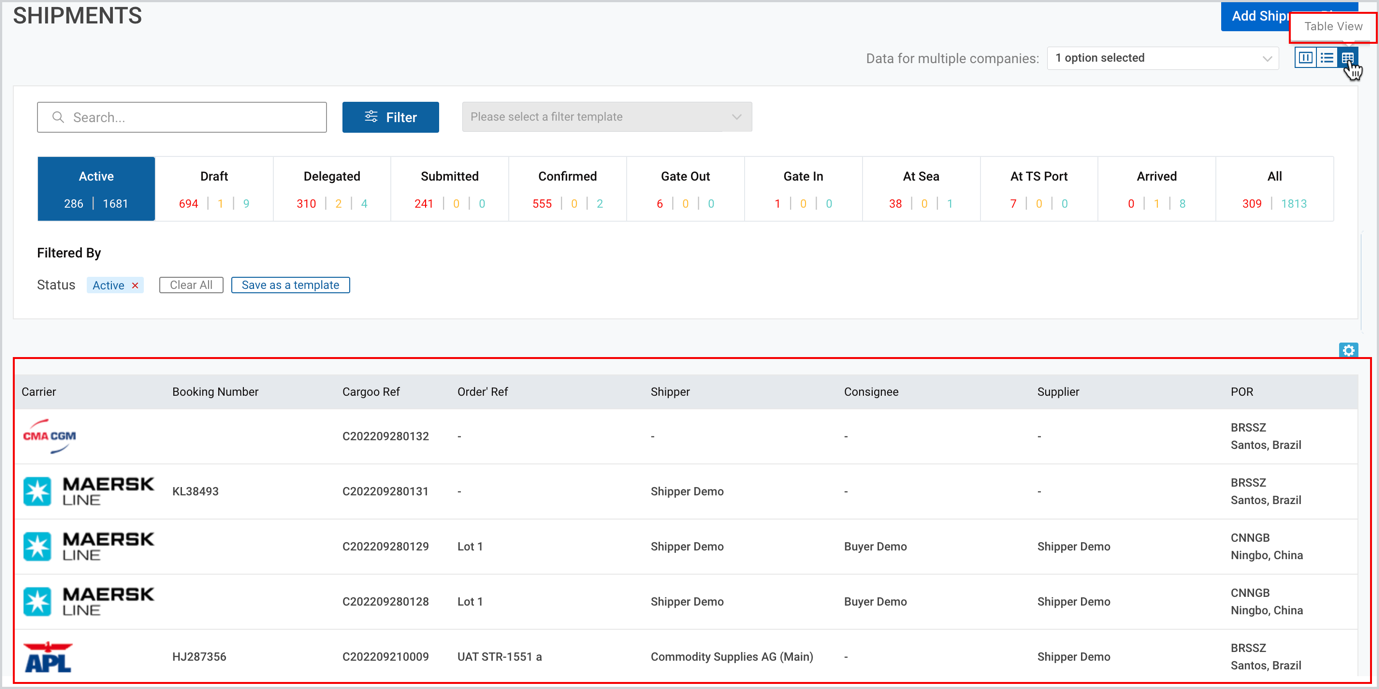 |
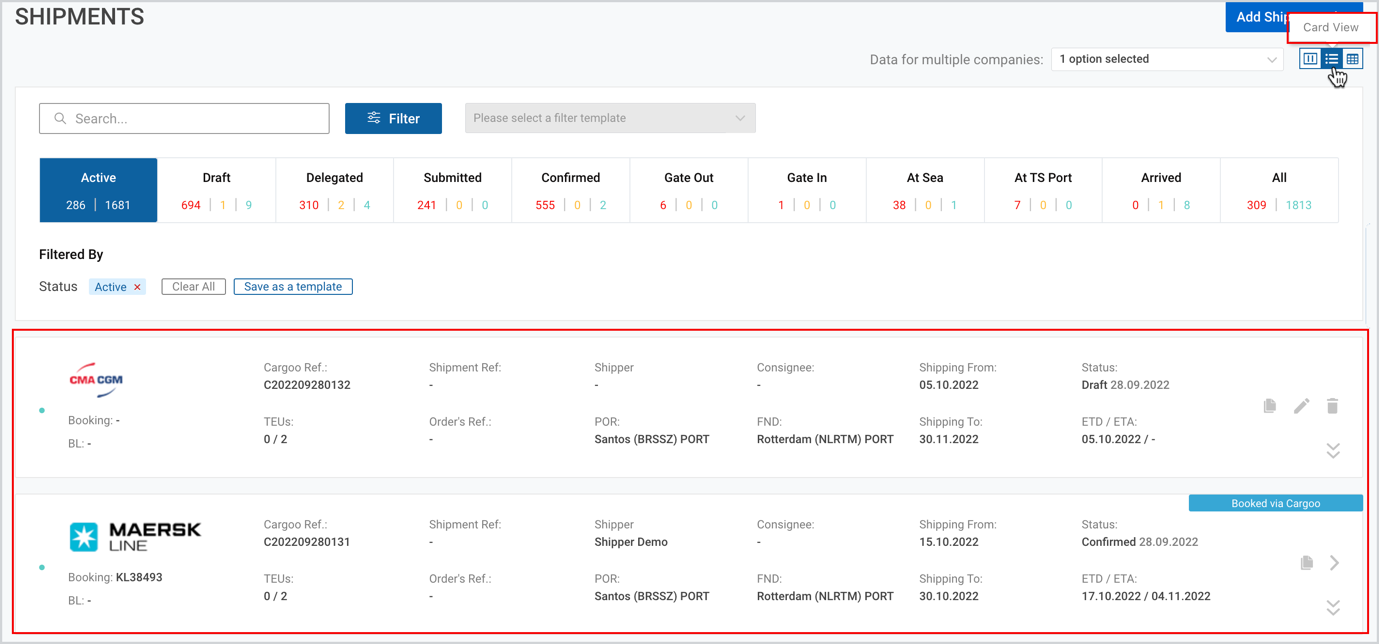
Access Your Shipments
The Shipments page displays the following features through which you can access specific shipments:
- Data for Multiple Companies
- Search
- Filter
Data for Multiple Companies
By default, the Shipments page displays shipments data for one company. However, depending on your account accesses, you can see data for multiple companies.
To see the data from multiple companies,
- Click Shipments ->Shipments.
- At the upper-right corner, click on the dropdown list of Data for multiple companies and select the desired company(ies).
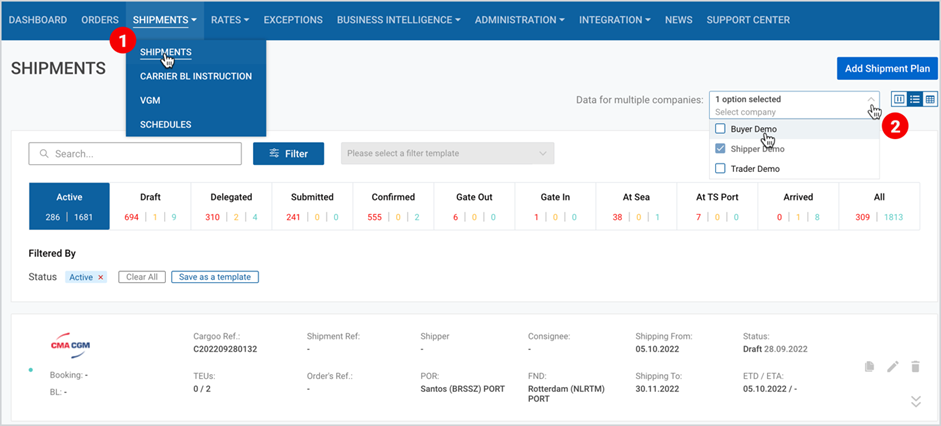
Note | As you select more than one company, the shipments list will be displayed only with view mode without any editing options. |
Note | You cannot unselect the company from which you are logged in. |
Search Your Shipment
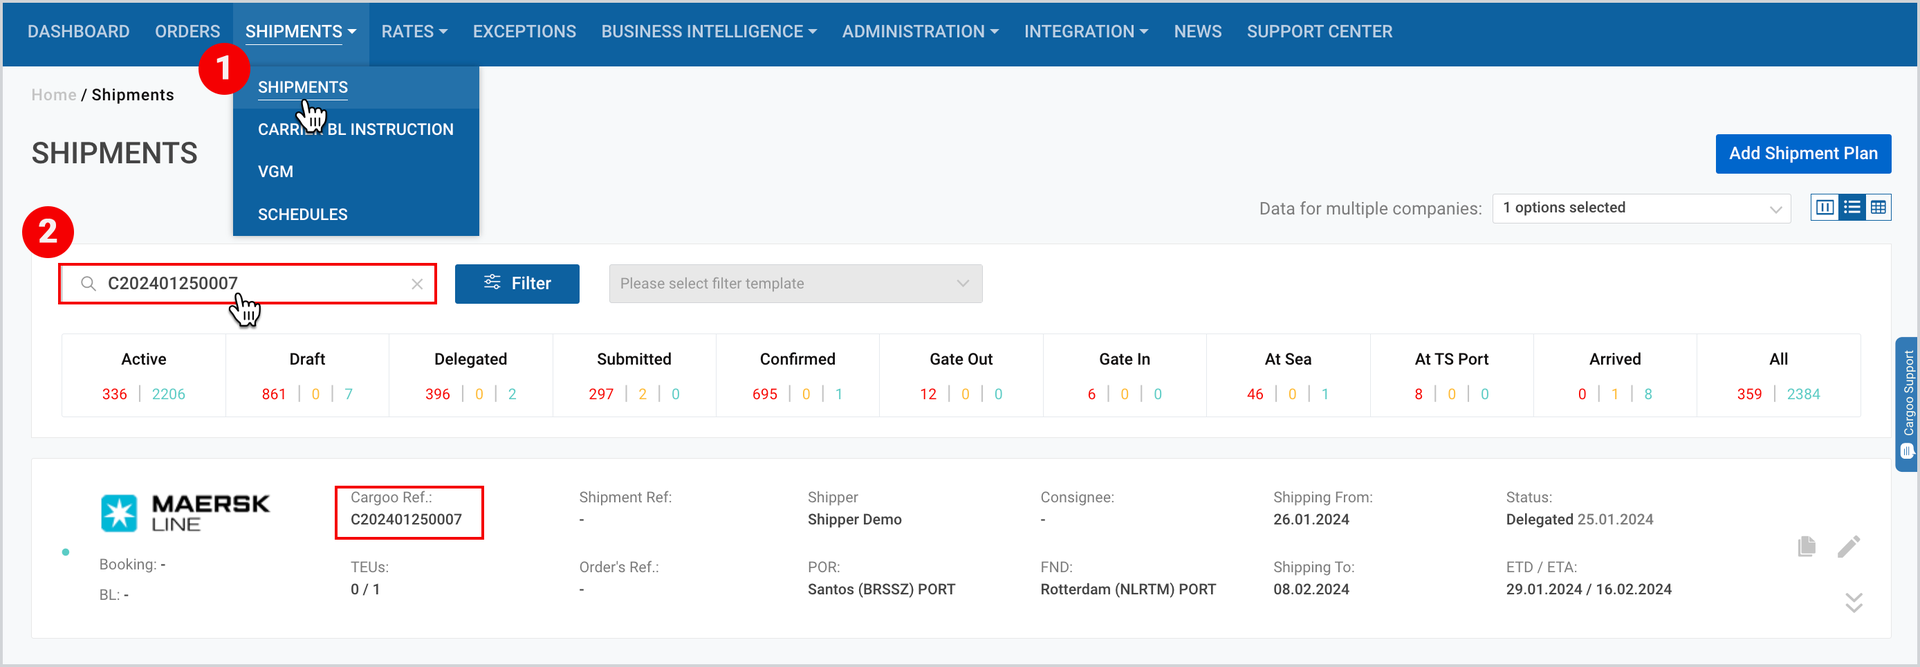
Search can be done with the Booking, BL, Cargoo, Shipment or Order Reference numbers. As soon as you start typing, the search functionality will be activated, and the shipment list will be updated automatically.
To search for your desired shipment,
- Click Shipments->Shipments.
- At the upper-left corner of the appeared page, on the search tab, fill in the Cargoo Reference (or, Booking BL, Cargoo, Shipments, or Order Reference) number.
Filter Your Shipment
You can filter your order as per the following categorizations:
- Carriers
- Status
- Status Update Date
- ETD Range
- ETA Range
- Locations
- POL
- POD
- FND
- Country (Origin and Destination)
- Role
- Parties
- Exception Type
- Submission Type
- Incoterm
- Commodity
To filter the desired shipment,
- Click Shipments ->Shipments.
- At the upper-left corner of the appeared page, click Filter and fill in the required criteria.
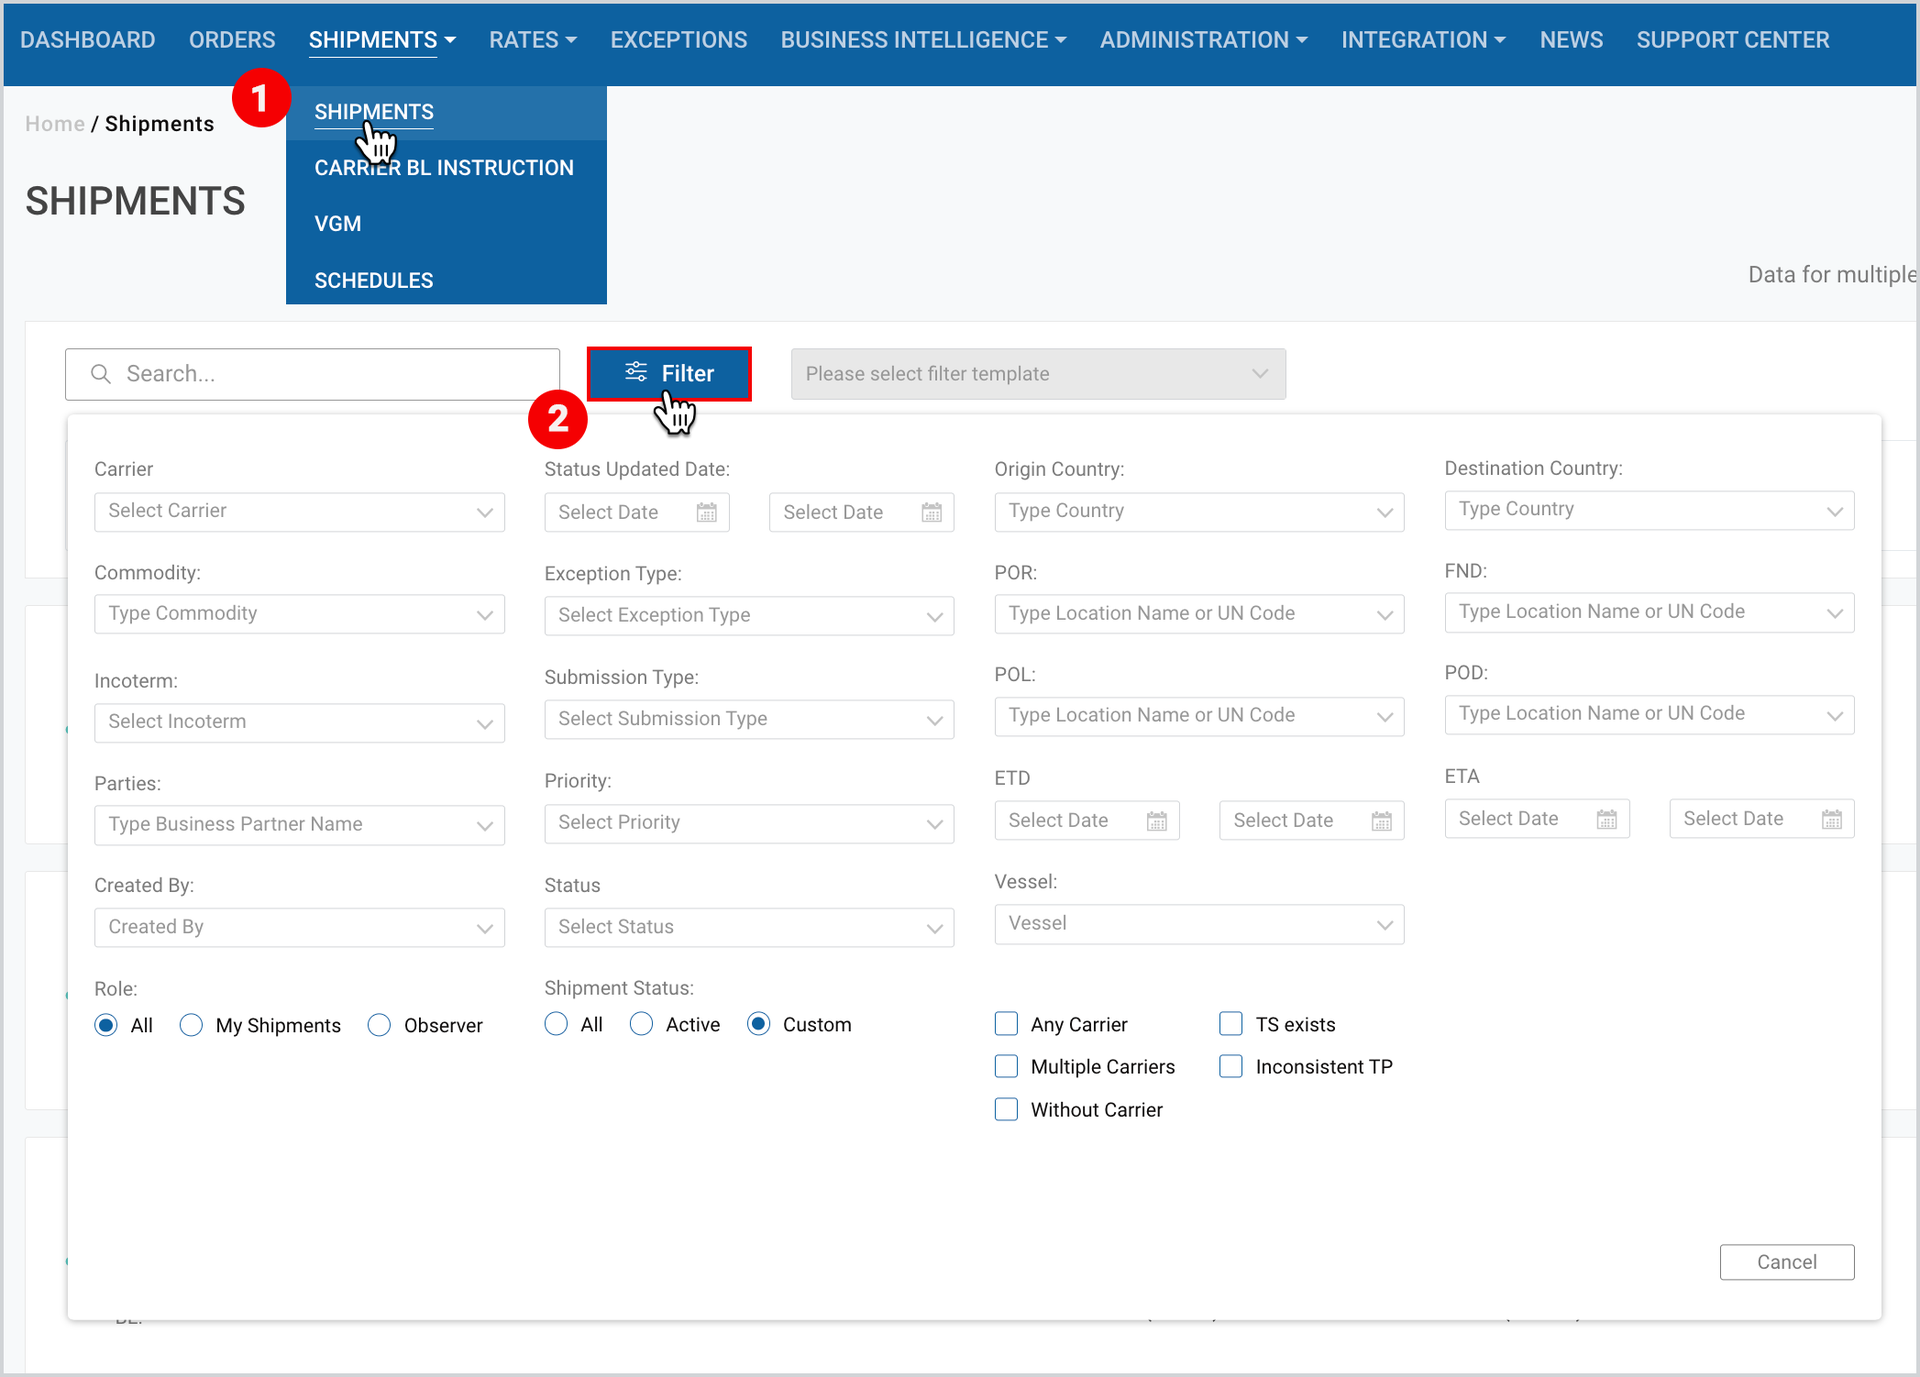
To exit, click anywhere outside the filter window.
Note | By default, “My Shipments” criteria are pre-selected, showcasing only the shipments where your company is Shipper and/or Consignee. |
Clear Filter Criteria
You can clear the filter for an individual selected criteria by clicking on ‘X’ icon.
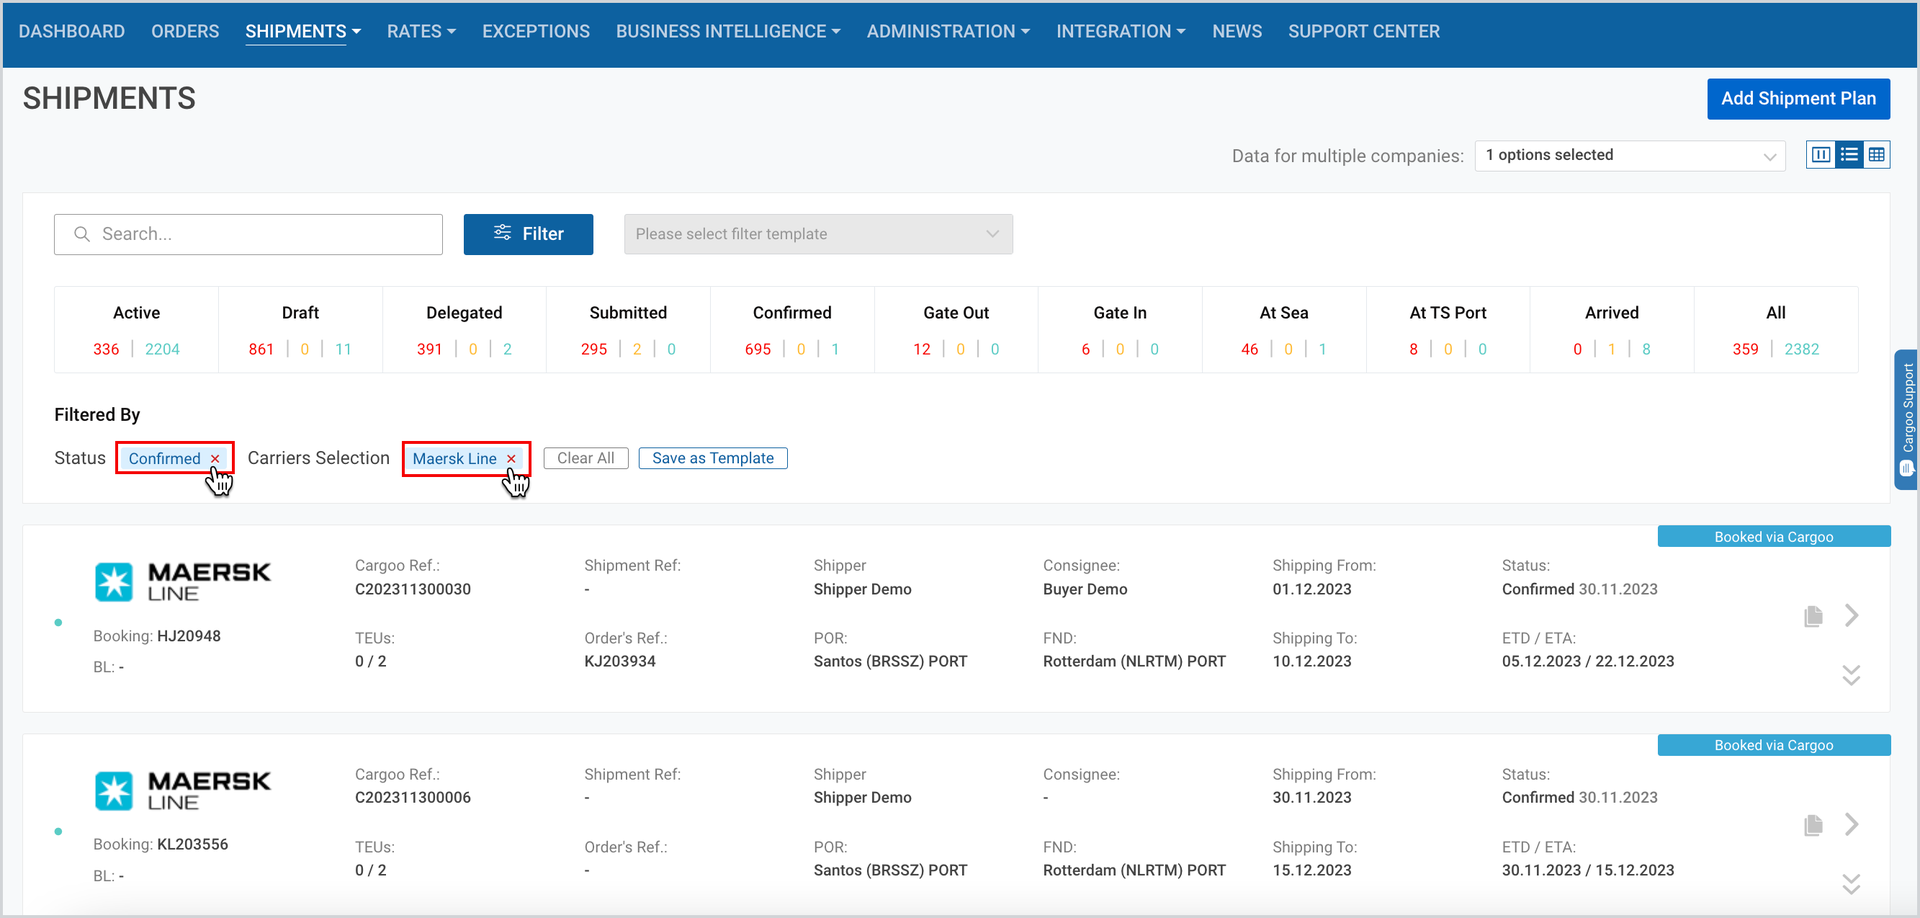
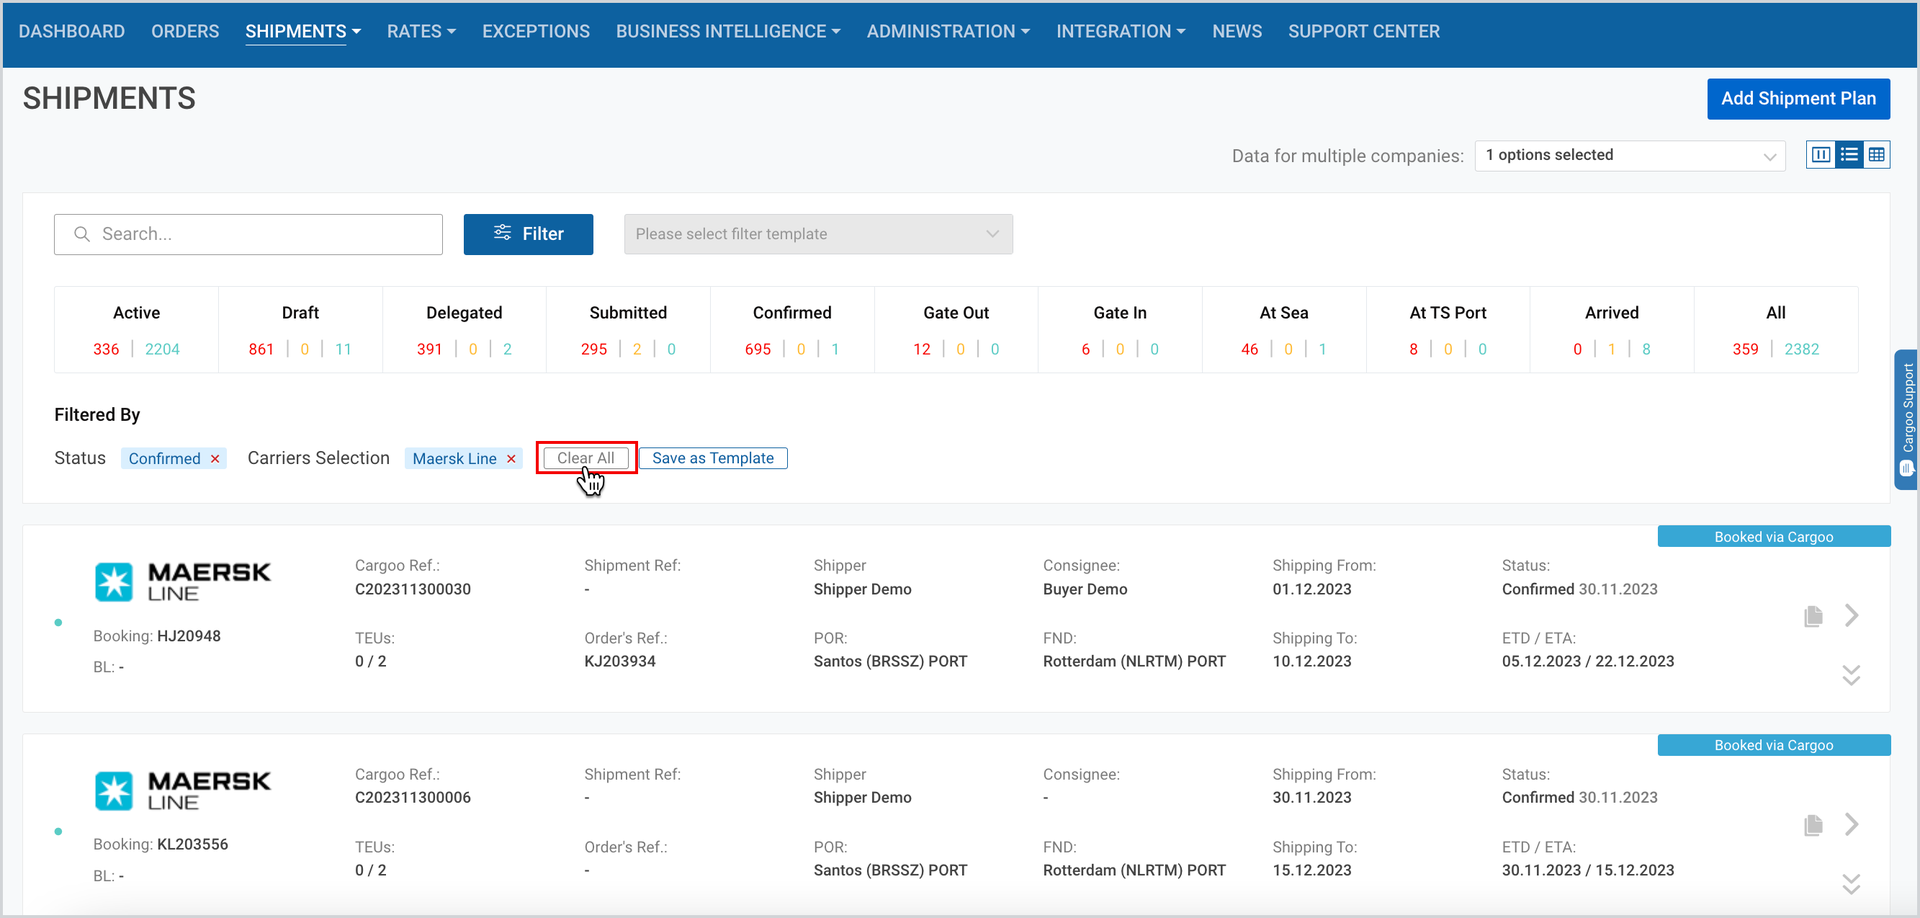
You can clear all filters by clicking on ‘Clear All’ icon.
Select a Filter Template
In order to group your shipment(s) as per the selected criteria (whether using search, filter, or clicking on the lifecycle widgets), you can save a filter template to have these shipment(s) at hand and easily accessible.
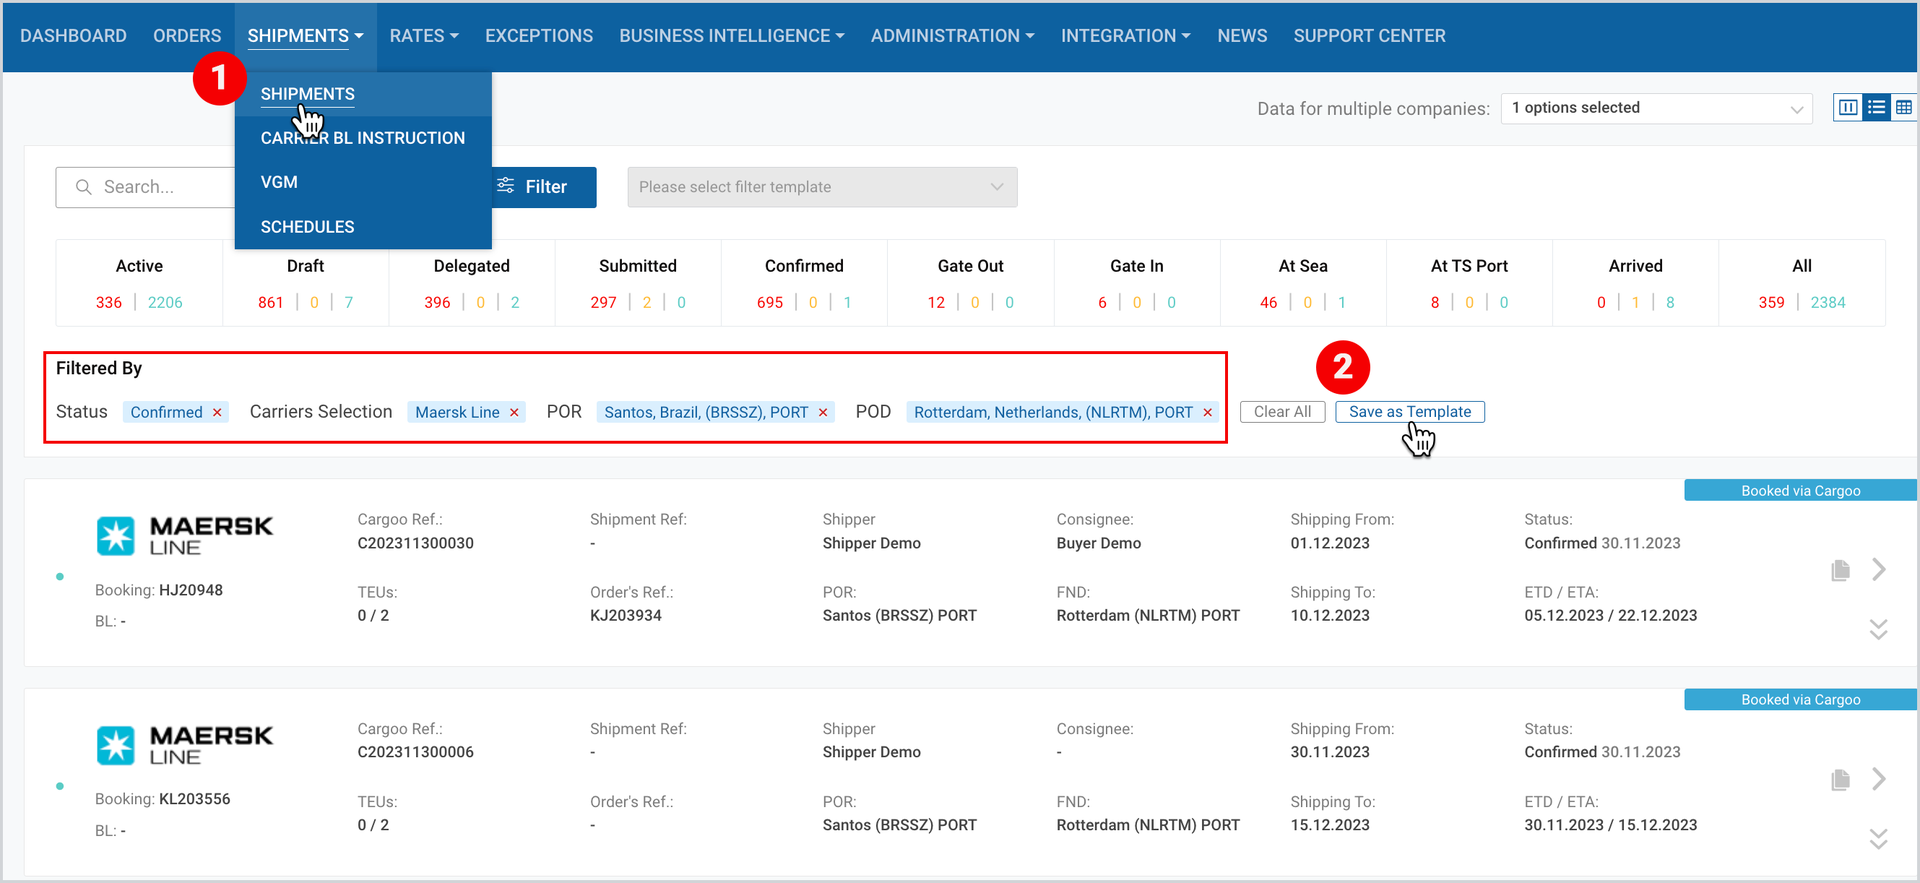
To save the shipment(s) as a template:
- Click Shipments ->Shipments.
- As you find your shipment(s) via filter (search or clicking on the lifecycle widgets), next to the selected criteria, click Save as a Template.
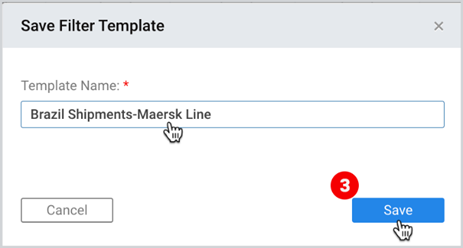
3. As the pop-up window appears, enter the template name, and click Save.
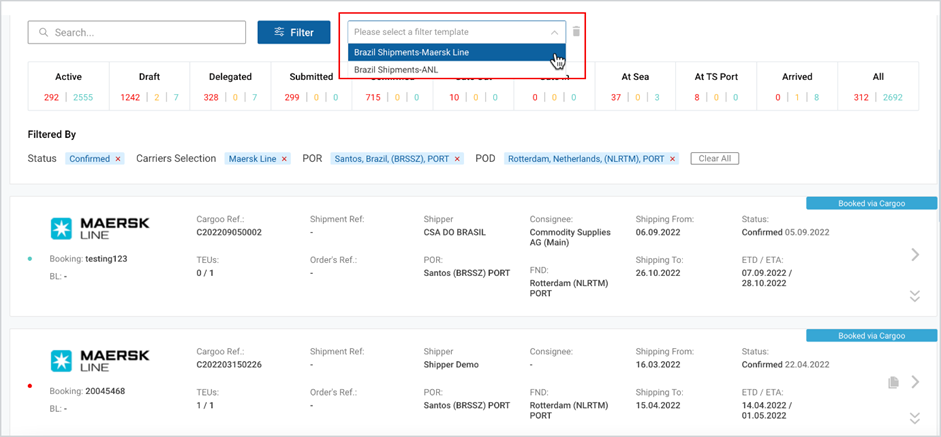
The template will be saved, and you can access it by clicking Please select a filter template next to Filter.
Note | Created templates are only accessible to specific users (not all company users). |
Shipment Lifecycle Widgets
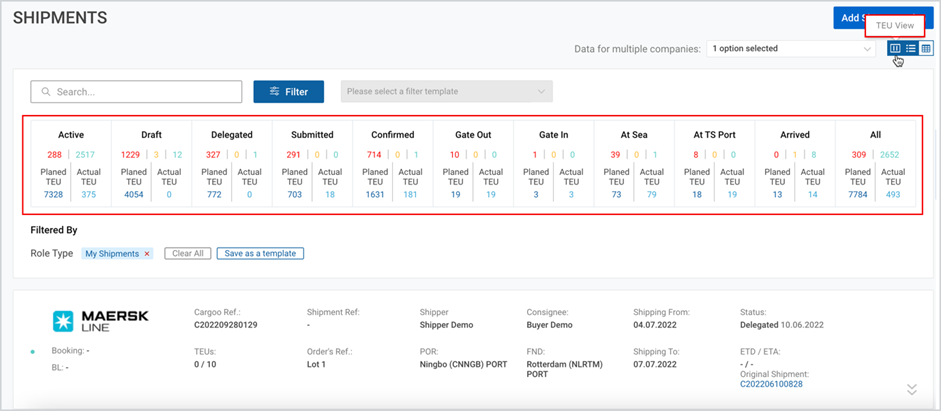
On the Shipments page, you can see shipments' milestones beneath the Search and Filter tabs, highlighted in a red box in the below Figure. You can click on each milestone or the numbers in red, yellow or green to filter the shipments list according to the respective status. A shipment acquires the statuses, given in Table 1 below.
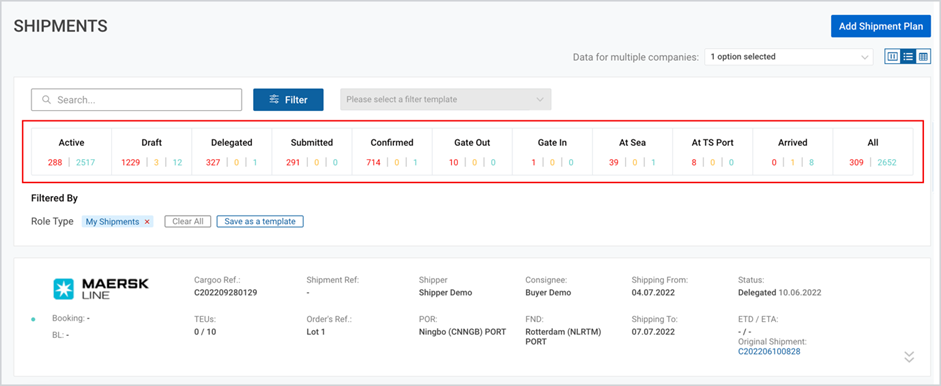
Table 1: Shipment Lifecycle Widgets
STATUS | DESCRIPTION | RED | YELLOW | GREEN |
Active | All, except Cancelled, Rejected, Completed | Shipment exceptions | Document exceptions | No exceptions |
Draft | The Shipment is created and not yet booked ETD - today | ETD or Departure To <= 7 days
| ETD or Departure To <= 14 days | ETD or Departure To >14 days |
Delegated | The shipment is delegated to the next party ETD - today | ETD or Departure To <= 7 days | ETD or Departure To <= 14 days | ETD or Departure To >14 days |
Submitted | Today - submitted date | Submission date <3 days | Submission date <=3 day | Submission date <=1 day |
Confirmed | Booking is confirmed and ETD is today | ETD <= 3 days | ETD <= 5 days | ETD >5 days |
Gate Out | The empty container is issued to be filled in with the commodity and brought back | ETD <= 3 days | ETD <= 5 days | ETD >5 days |
Gate In | The full container is brought back | ETD < 0 days | ETD <= 2 days | ETD > 2 days |
At Sea | Shipped: today - ETA to TS/FND | ETA to TS/FND >=2 days (2 or more days delay) | ETA to TS/FND 1 day delay | ETA to TS/FND <=0 days (no delay) |
At TS Port | Shipped today-ETD from TS AND AND | ETA to TS/FND >=2 days (2 or more days delay) | ETA to TS/FND 1 day delay | ETA to TS/FND <=0 days (no delay) |
Arrived | ATA-ETA (last leg of the main carriage) | >=2 days delay | 1 day delay
| <=0 (No delay or arrived earlier) |
All | All statuses | Shipment exceptions | Document exceptions | No exceptions |
Note | As you apply a filter, all widgets will be unselected. |
You can include the TEUs under the statuses, by clicking the TEU icon at the upper right corner.
Manage Your Shipment
On each shipment card, depending on the user access (if manage mode is activated under Track&Trace module) and the party type, you will find the following clickable items:
- Copy as a New Shipment Plan
- Editing Shipment
- Remove Shipment
Copy Your Shipment
In case the same shipment details are required, Cargoo offers the “copy shipment” clickable icon which is available to the shipment creator party.
In case of copying the delegated shipment plan, the system will offer the following two options:
- Copy as a Draft Shipment Plan (the delegation history will not be saved, including the delegation emails);
- Copy as a Delegated Shipment Plan (the delegation history will be saved, while the copied shipment will be in draft status and the booking type will not be copied).
To copy the shipment,
- Click Shipments ->Shipments.
- As you find your desired shipment, click Copy as a new Shipment Plan icon and select one of the two options (only for delegated shipments).
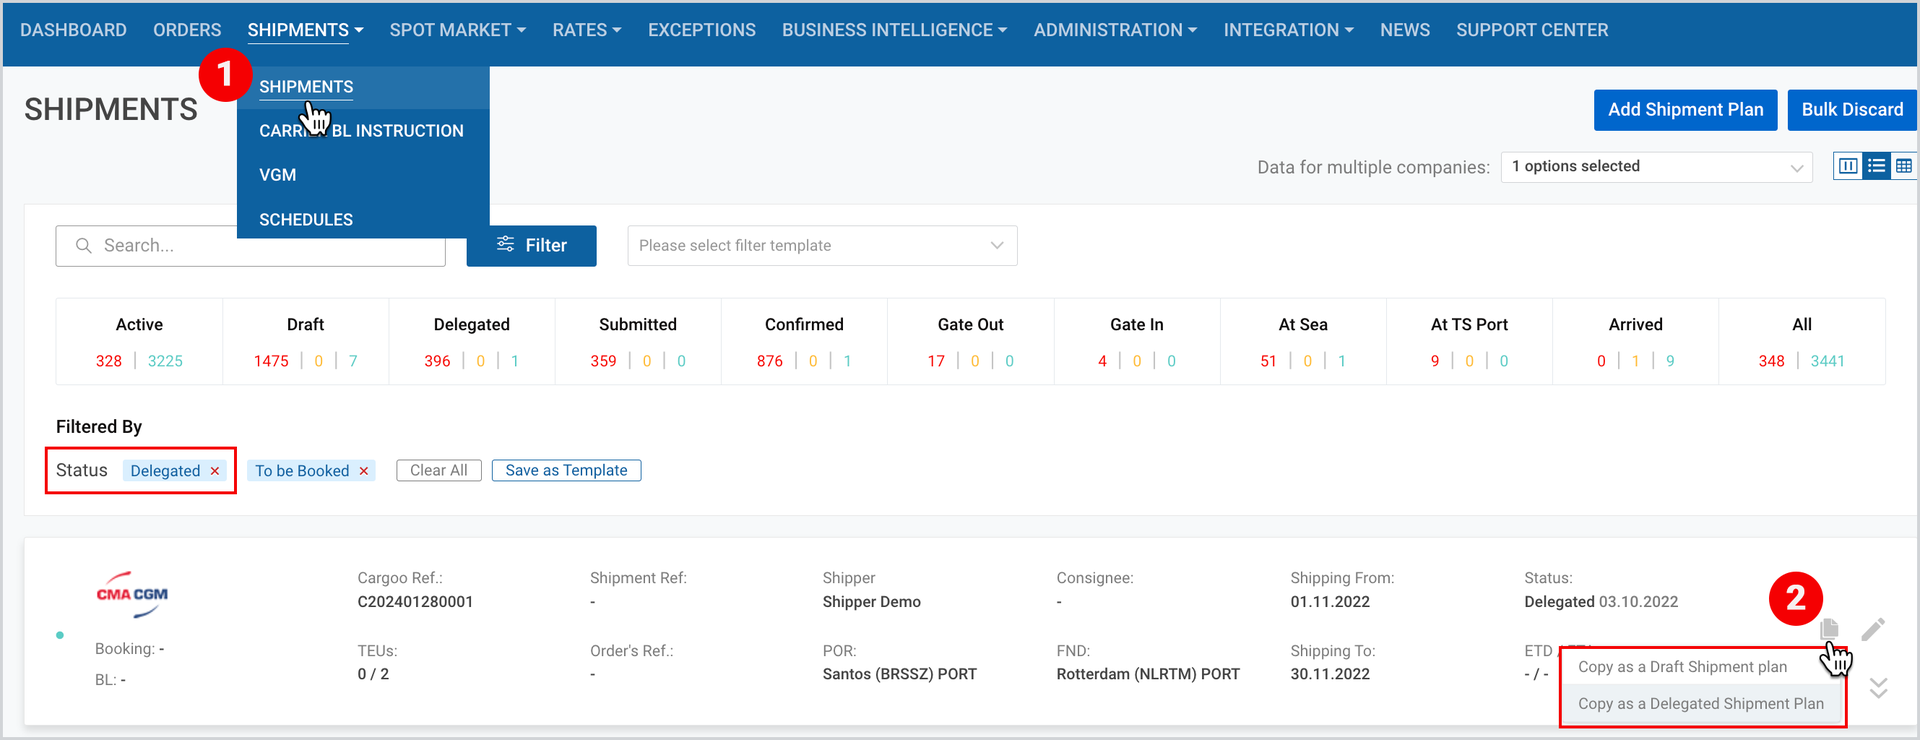
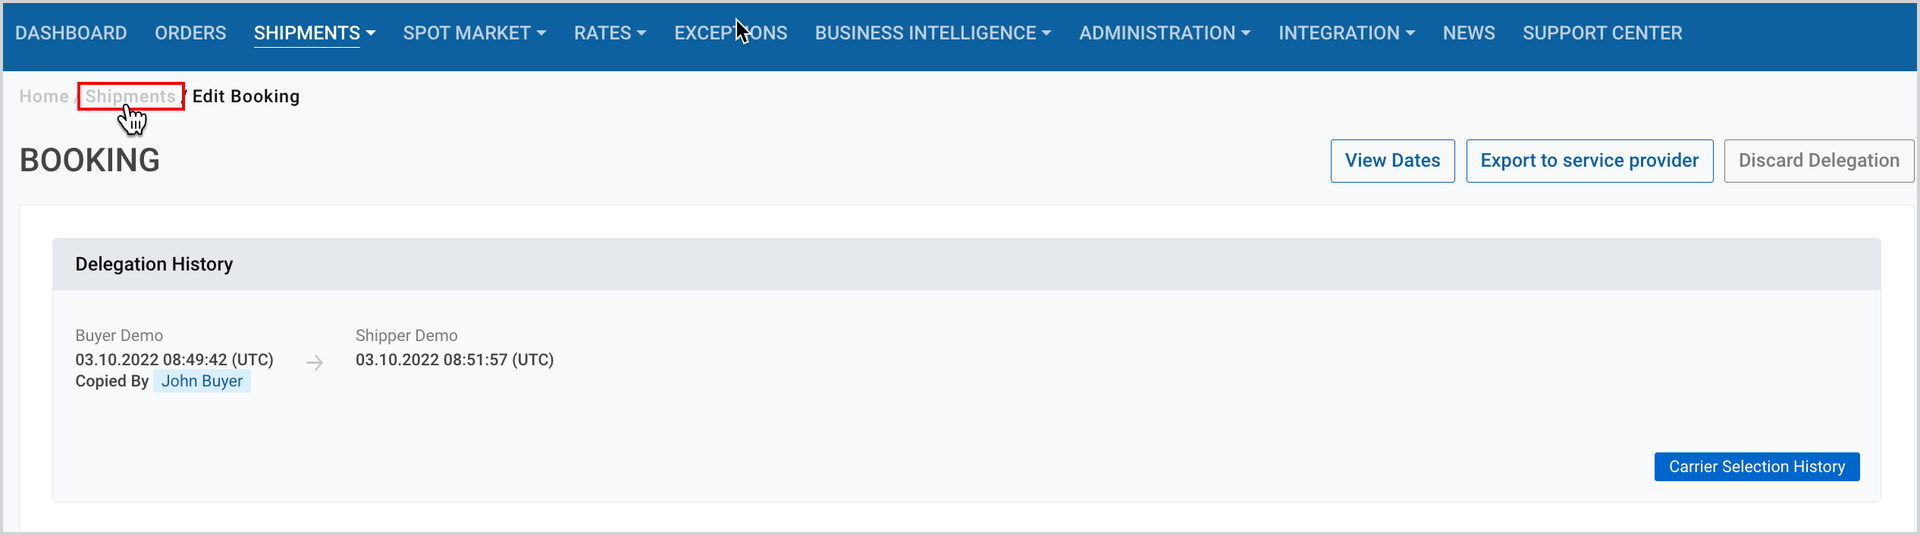
Once shipment plan is copied, you will be directed to the Booking view, where you need to follow the standard steps for shipment plan creation (see Submitting or Delegating a Booking Request manual).
Once the shipment is copied, the new shipment will appear on the shipments list in the draft status. You can access it by clicking on Shipments as per below screenshot.
Note | For some companies, the copy shipments functionality is disabled. |
Edit Your Shipment
This feature is available only to the shipment creator party for the shipments in draft status. If the shipment is in delegated status, this feature is available to all the parties in the delegation chain.
To edit the shipment,
- Click Shipments ->Shipments.
- As you find your desired shipment, click Edit Shipment icon.
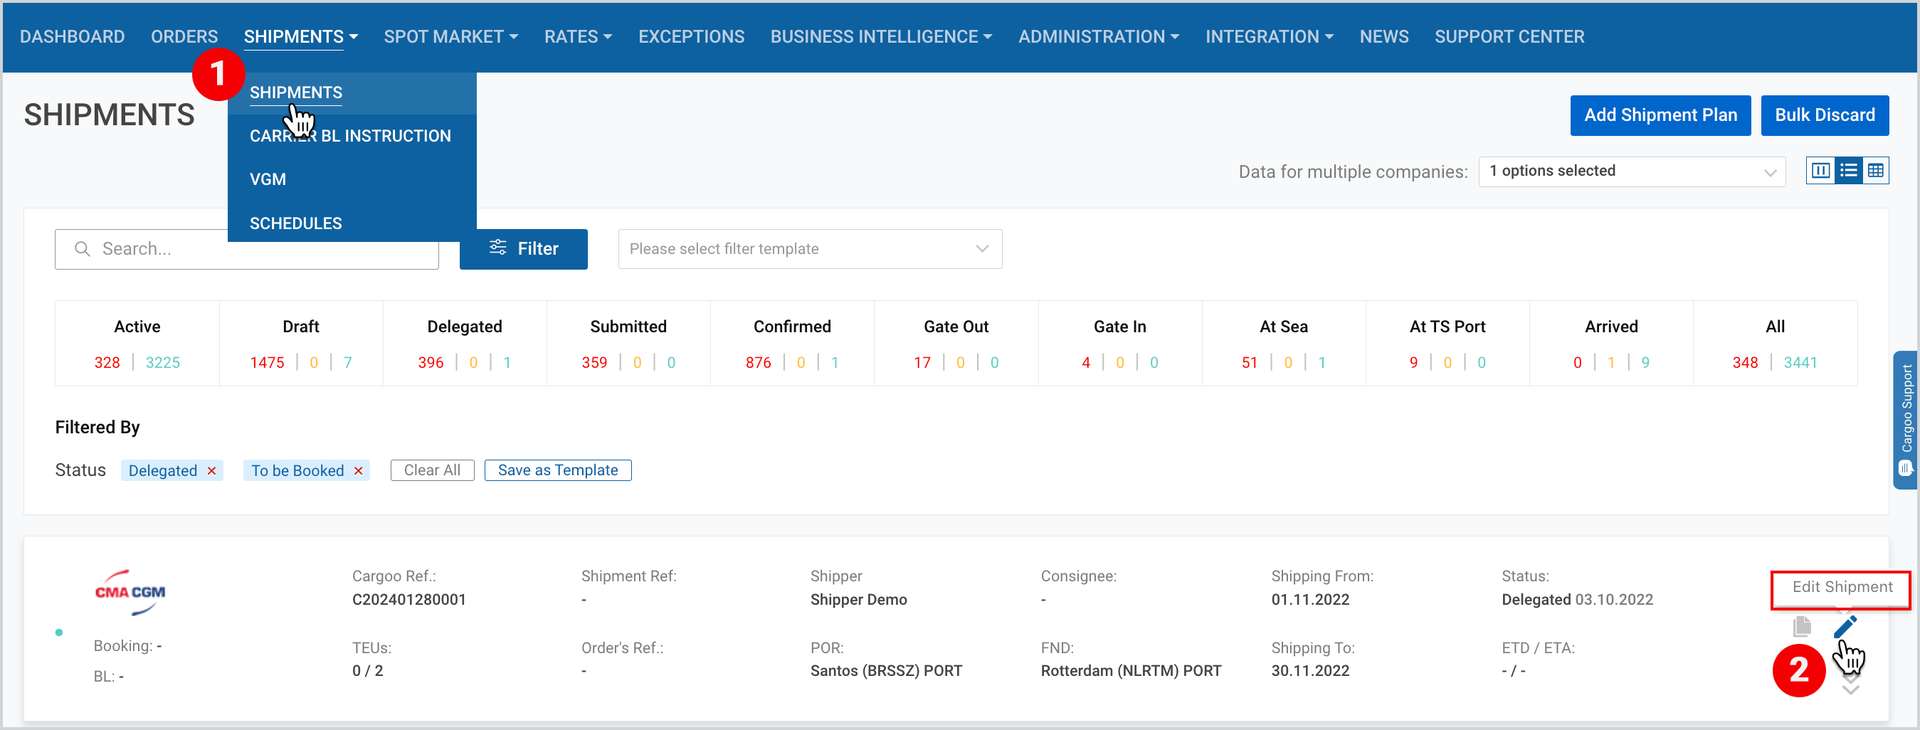
You will be redirected to the Edit Booking page, where the details to be filled are the same as in the Submitting or Delegating a Booking Request.
Remove Your Shipment
A shipment can be removed by the shipment creator party if it is in draft status.
To remove a shipment,
- Click Shipments ->Shipments.
- As you find your desired shipment, click Remove Shipment icon․
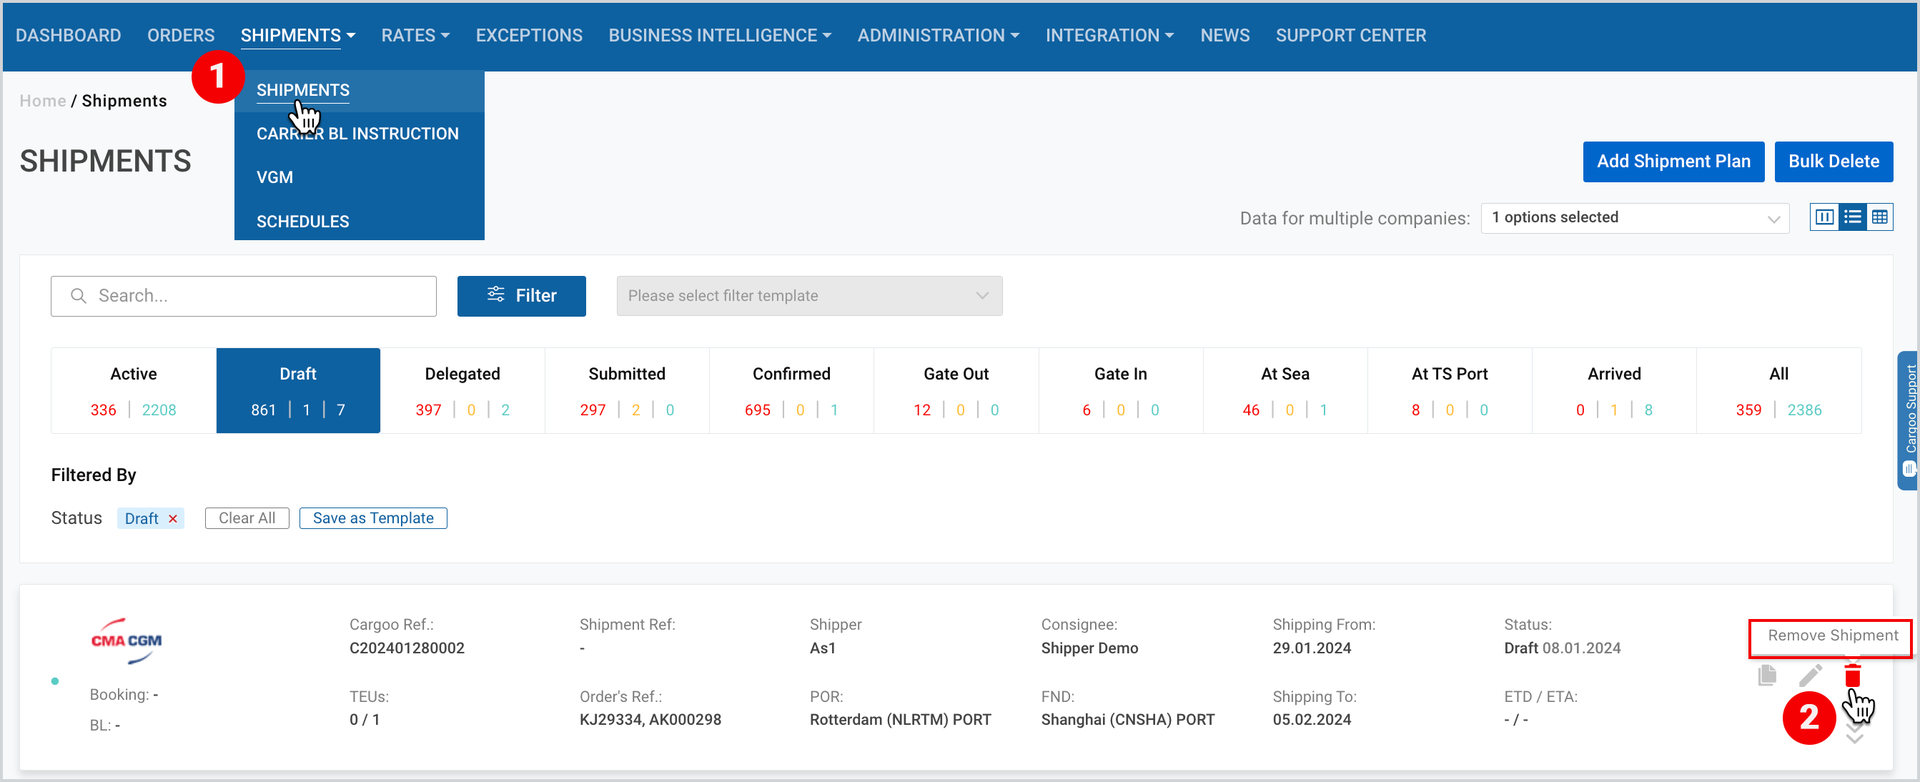
Note | Each shipment card is clickable. In case you click on a shipment with draft or delegated status, you will be redirected to the Shipment View page, the details of which are described here. If you click on a shipment with the status submitted or higher, you will be redirected to Track&Trace, described here. |
Bulk Delete
For the shipments in draft status, there is an option to perform a bulk deletion of shipments.
- Filter the shipments in draft status as described in Filter Your Shipment section or click on Draft in the Shipment Lifecyle Widgets section.
- Click on Bulk Delete on the upper-right corner.
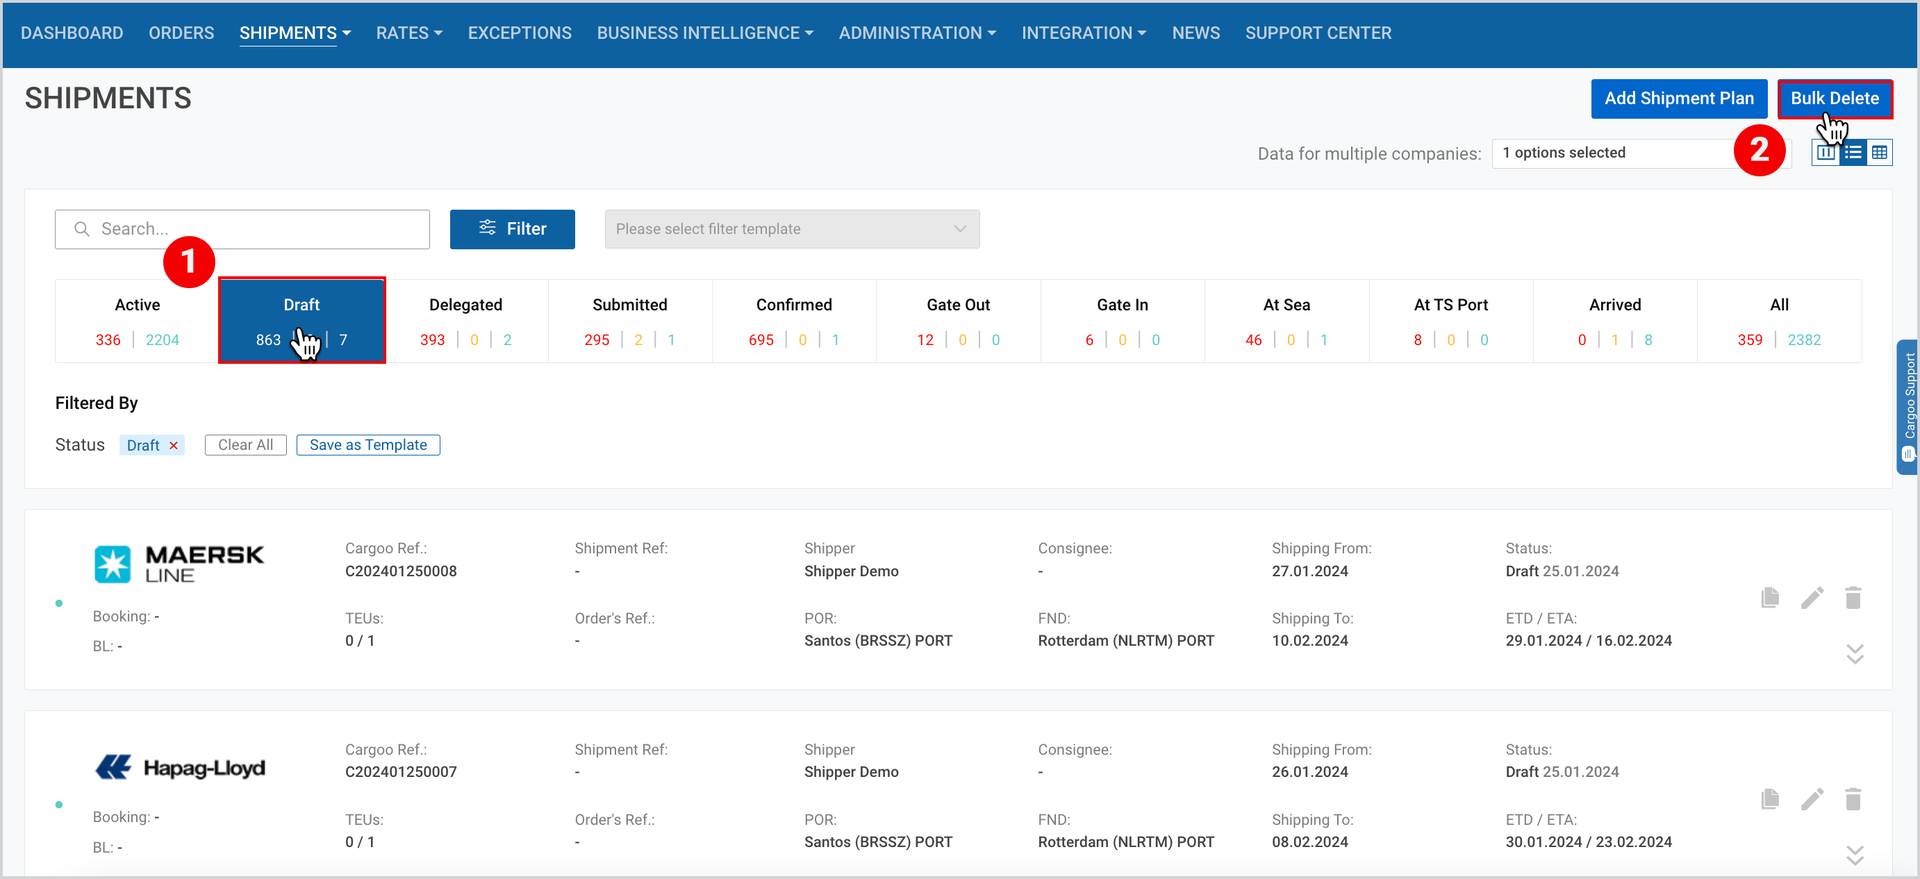
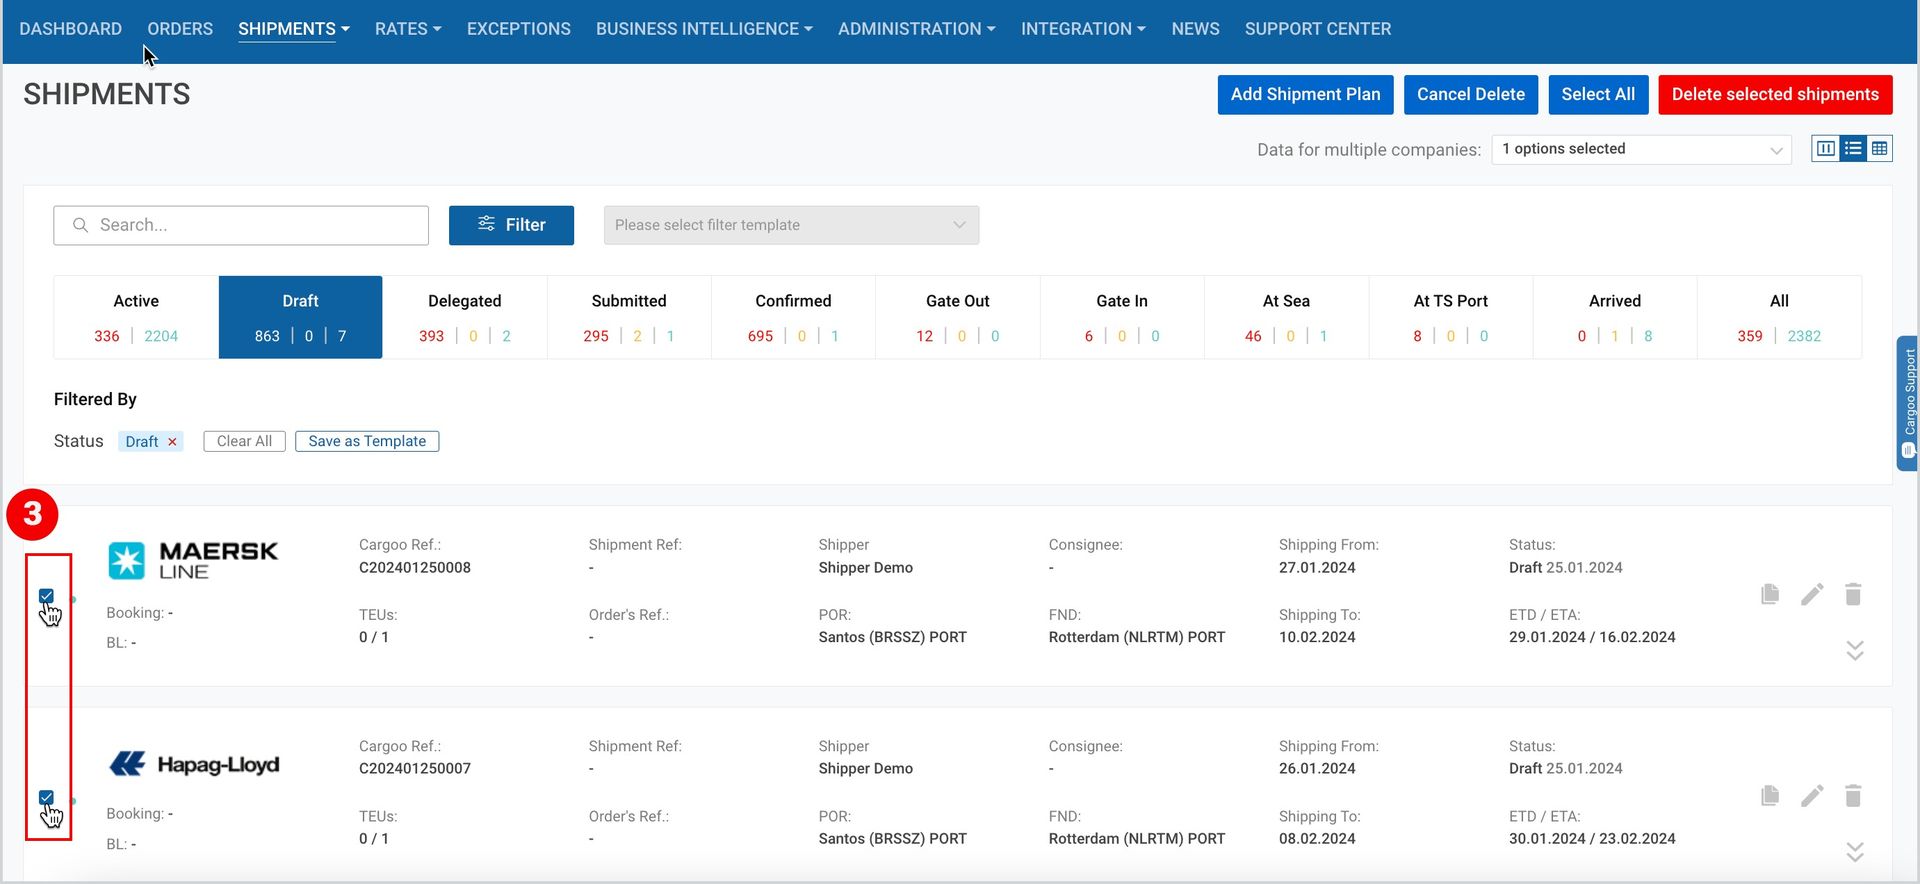
3. Select the shipments to be deleted by clicking on the checkbox on the left side of the
shipment card (see the below figure). If you would like to delete all draft shipments,
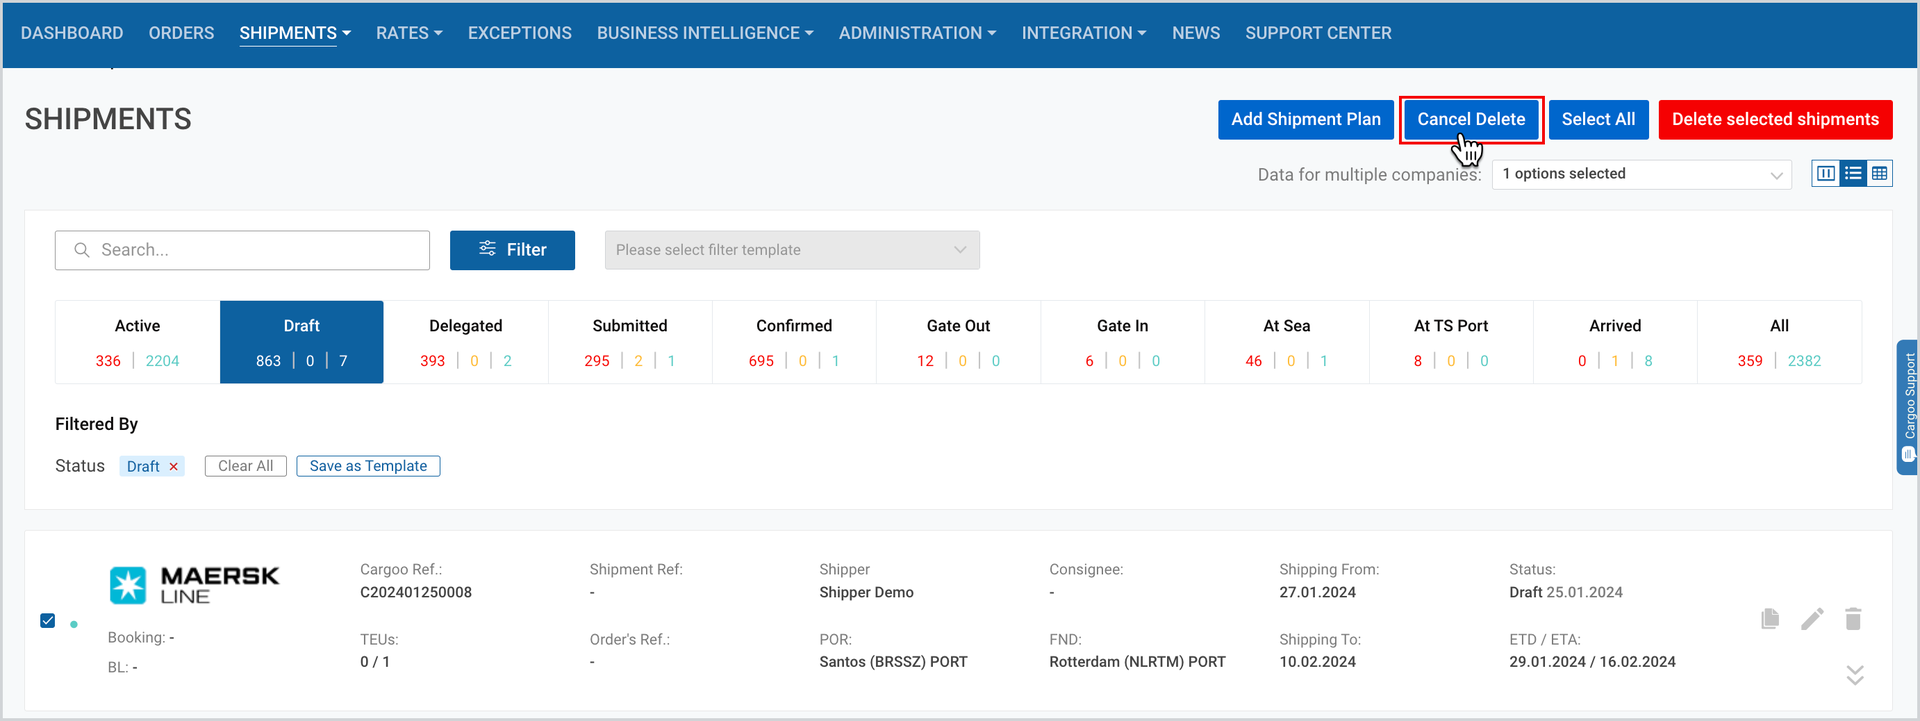
you can click on Select All on the upper-right corner (see the figure here).
4. After you complete your selection, click on Delete selected shipments on the upper-
right corner.
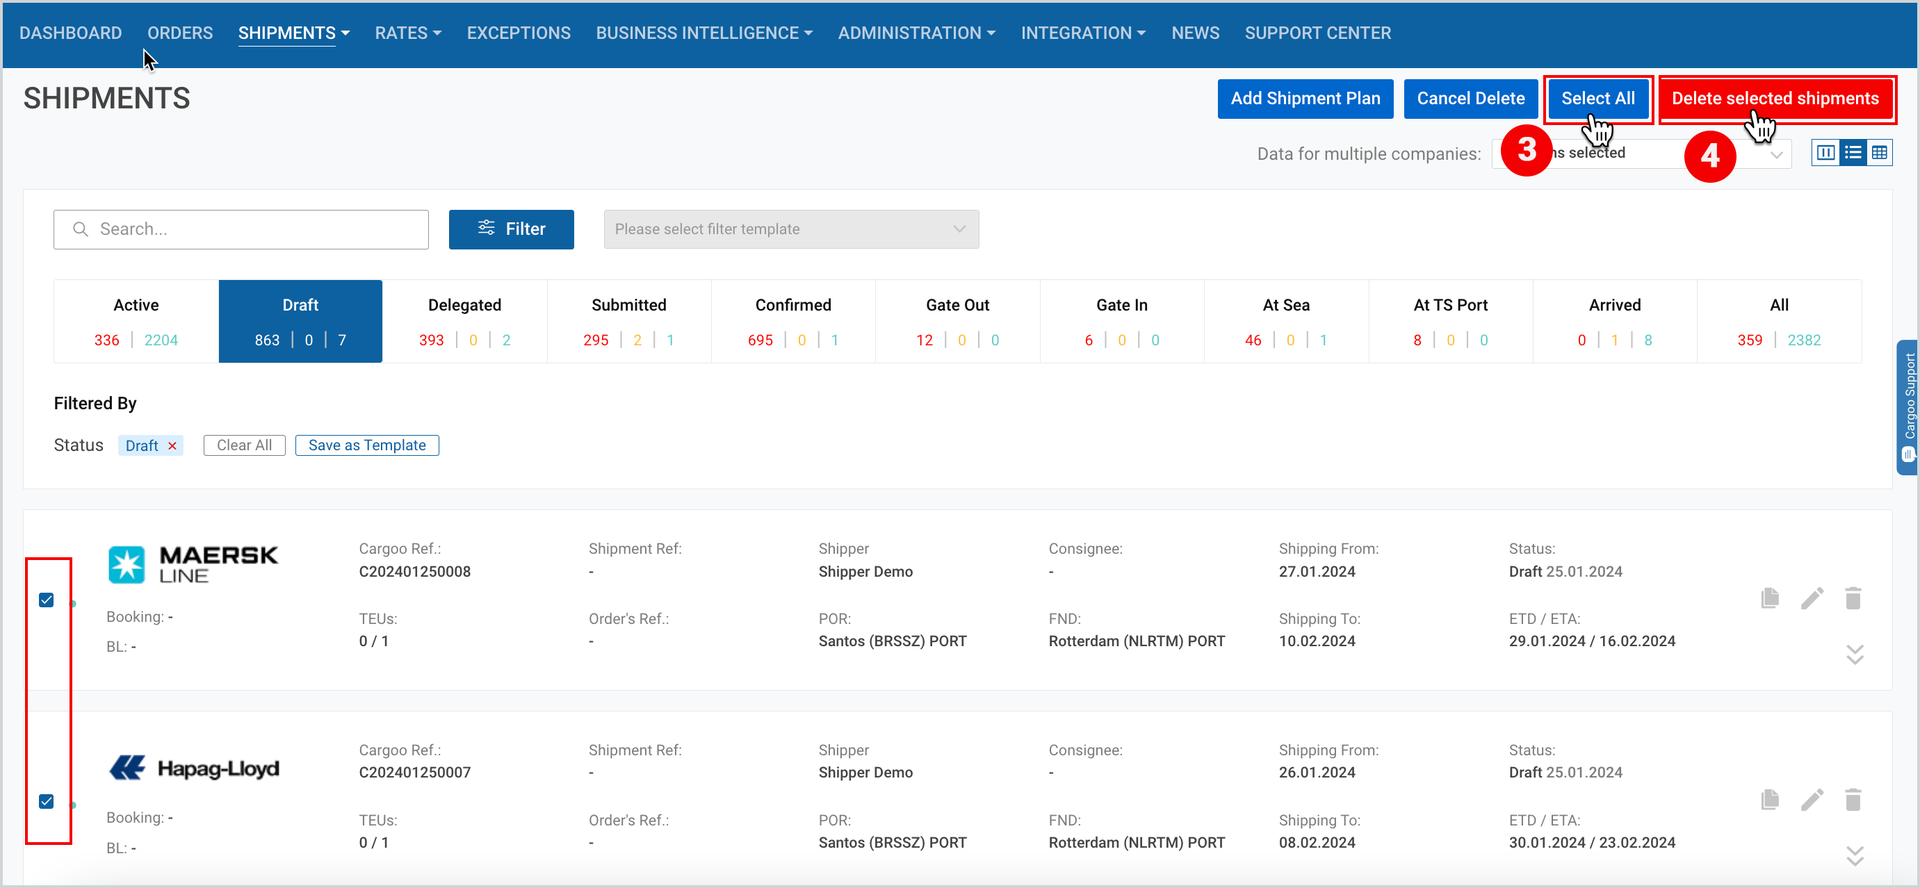
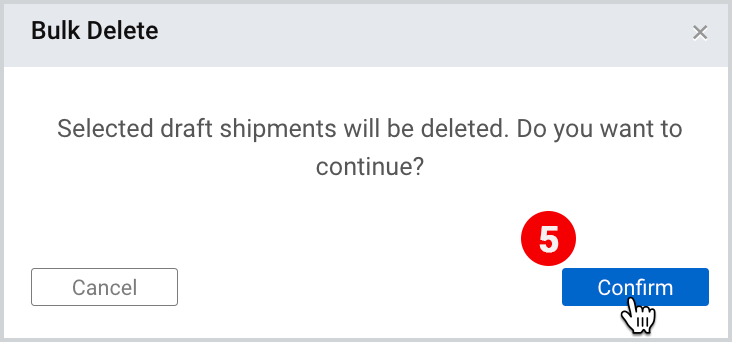
5. As the pop-up window appears, click Confirm.
If you decide not to delete any draft shipments, you can click Cancel Delete on the upper-right corner. You will then be directed to the standard shipment view.
Bulk Discard
For the shipments in delegated status, there is an option to perform a bulk discard of the delegation of the shipments.
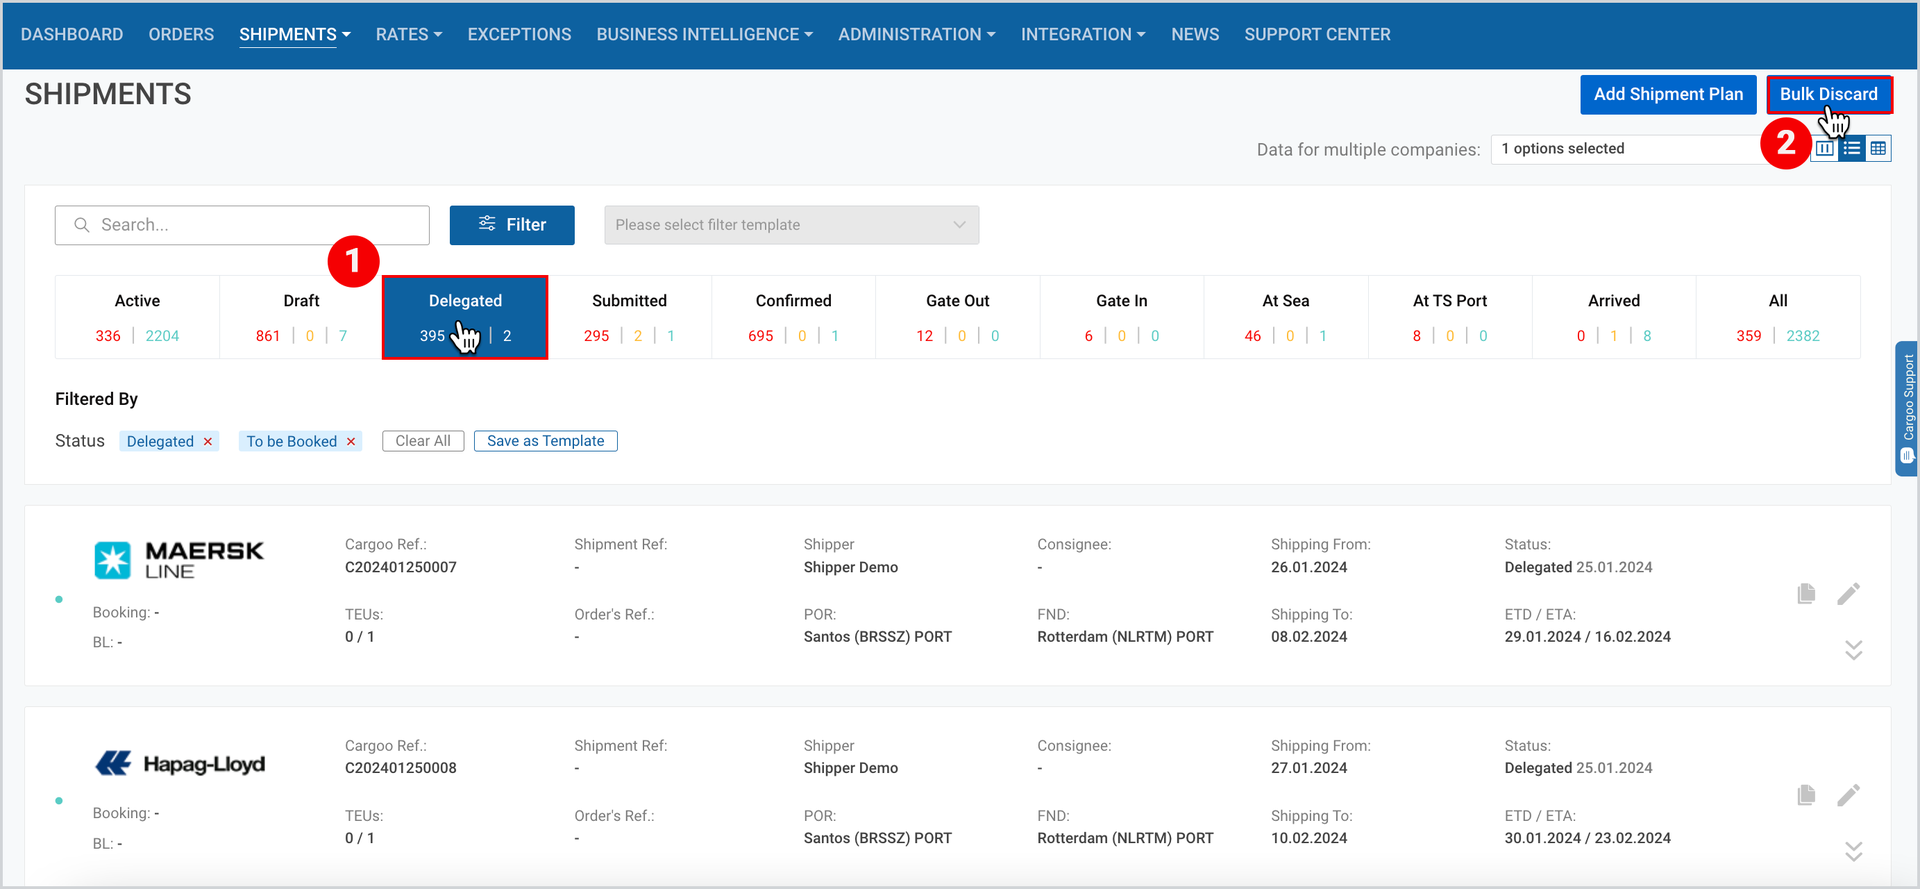
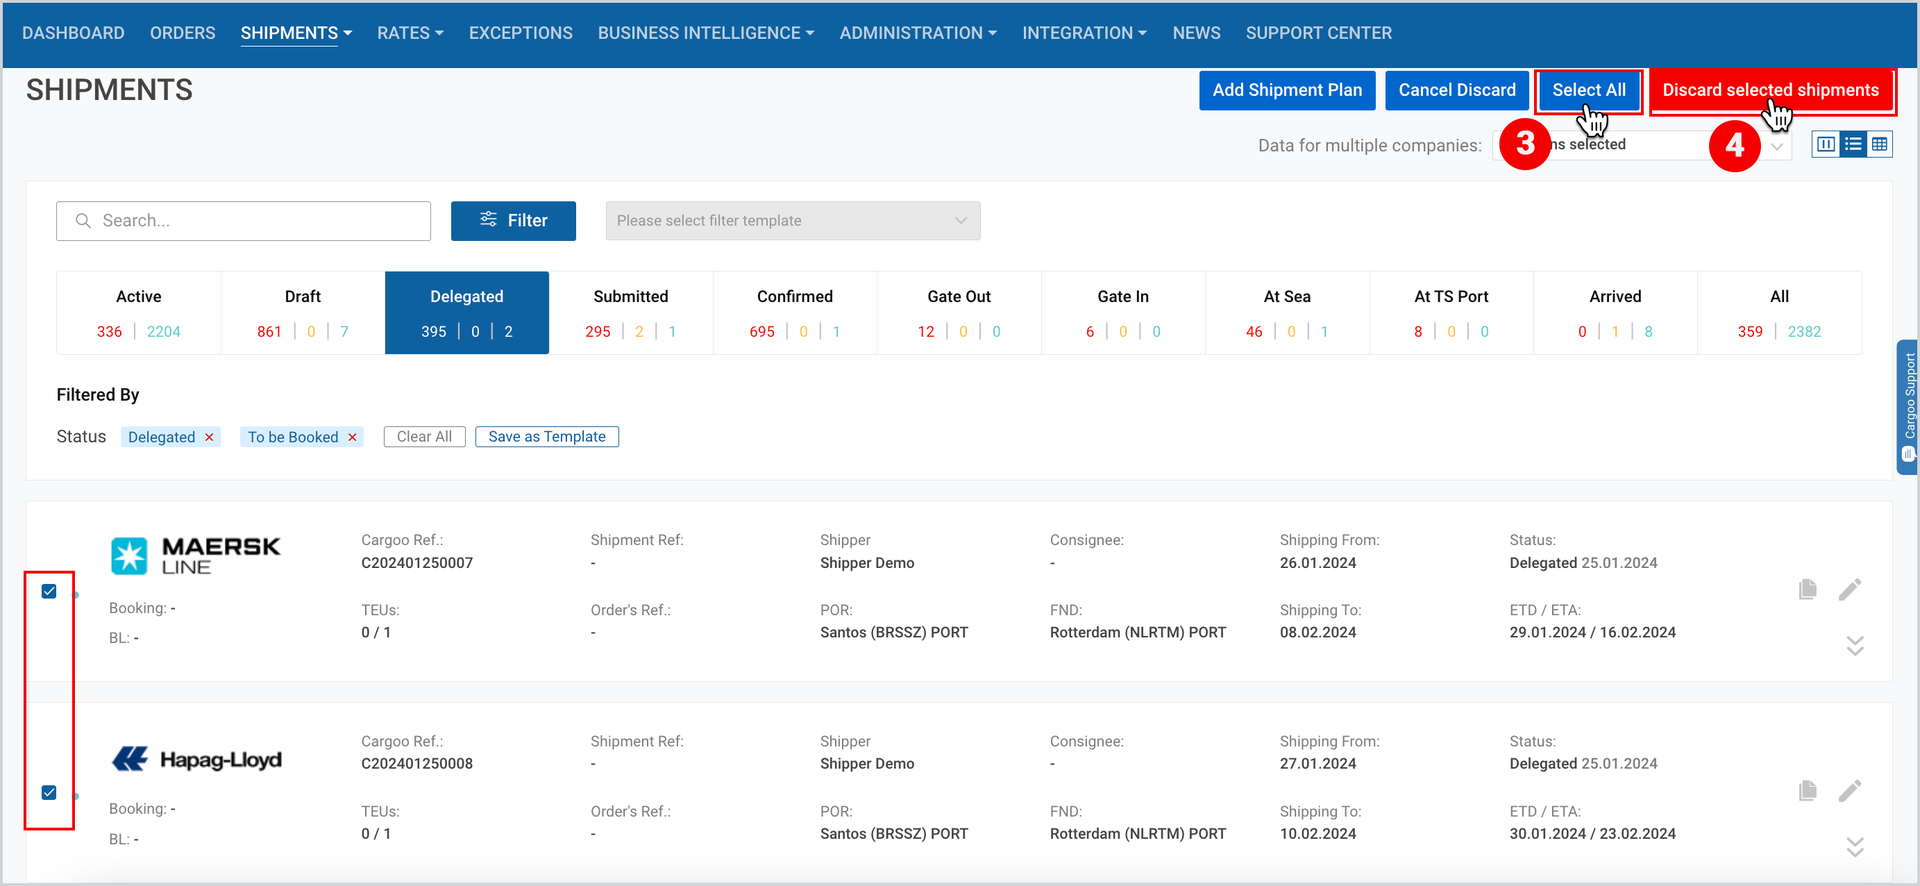
- Filter the shipments in delegated status as described in Filter Your Shipment section or click on Delegated in the Shipment Lifecyle Widgets section.
- Click on Bulk Discard on the upper-right corner.
3. Select the shipments to be deleted by clicking on the checkbox on the left side of the
shipment card (see the below figure). If you would like to discard all delegation for
all delegated shipments, you can click on Select All on the upper-right corner (see the
figure here).
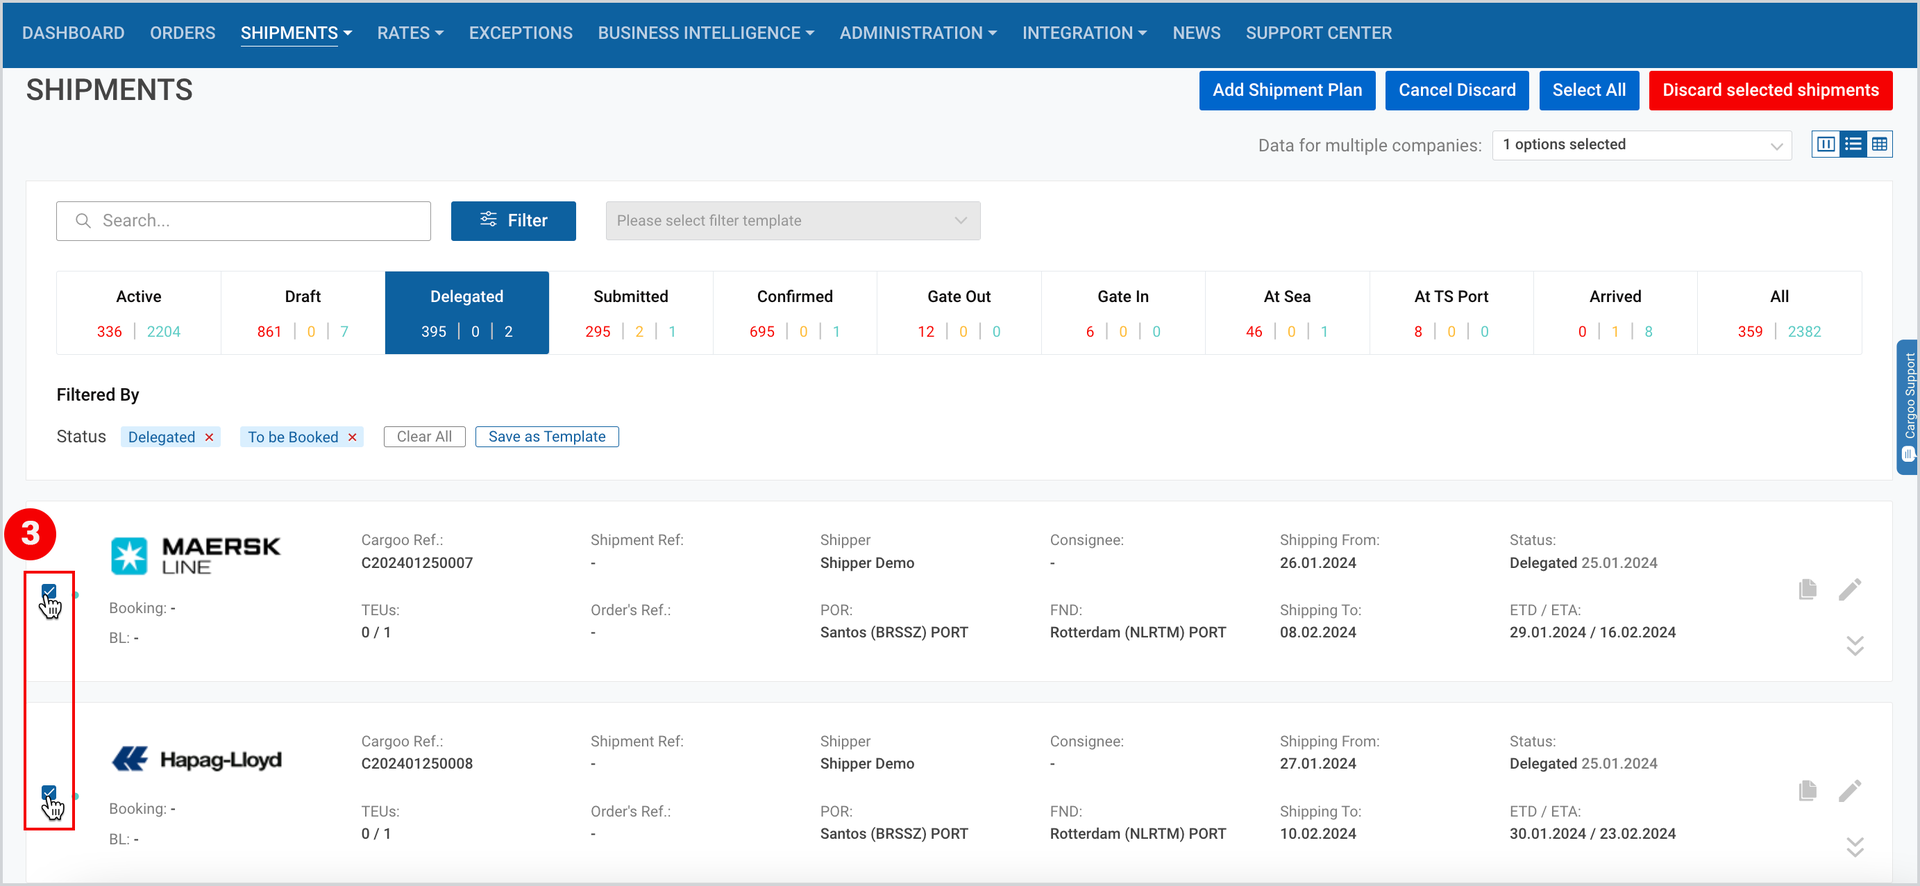
4. After you complete your selection, click on Discard selected shipments on the upper-
right corner.
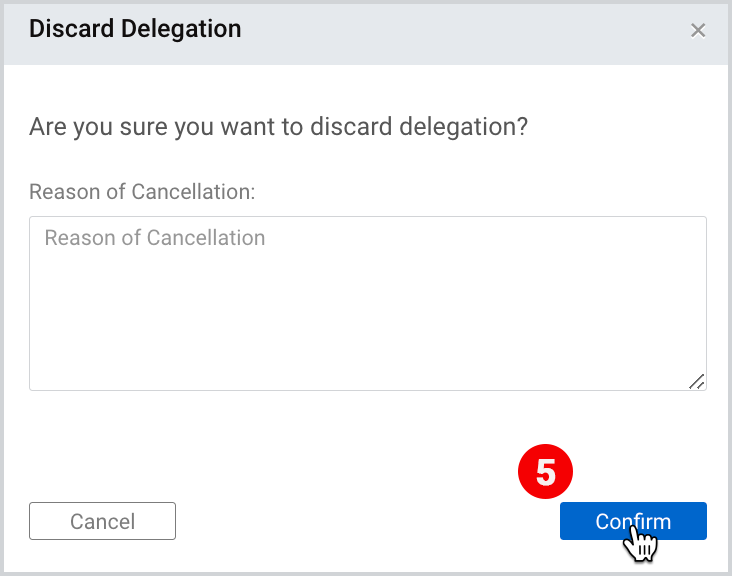
5. As the pop-up window appears, you can insert the Reason of Cancellation (optional),
then click Confirm.
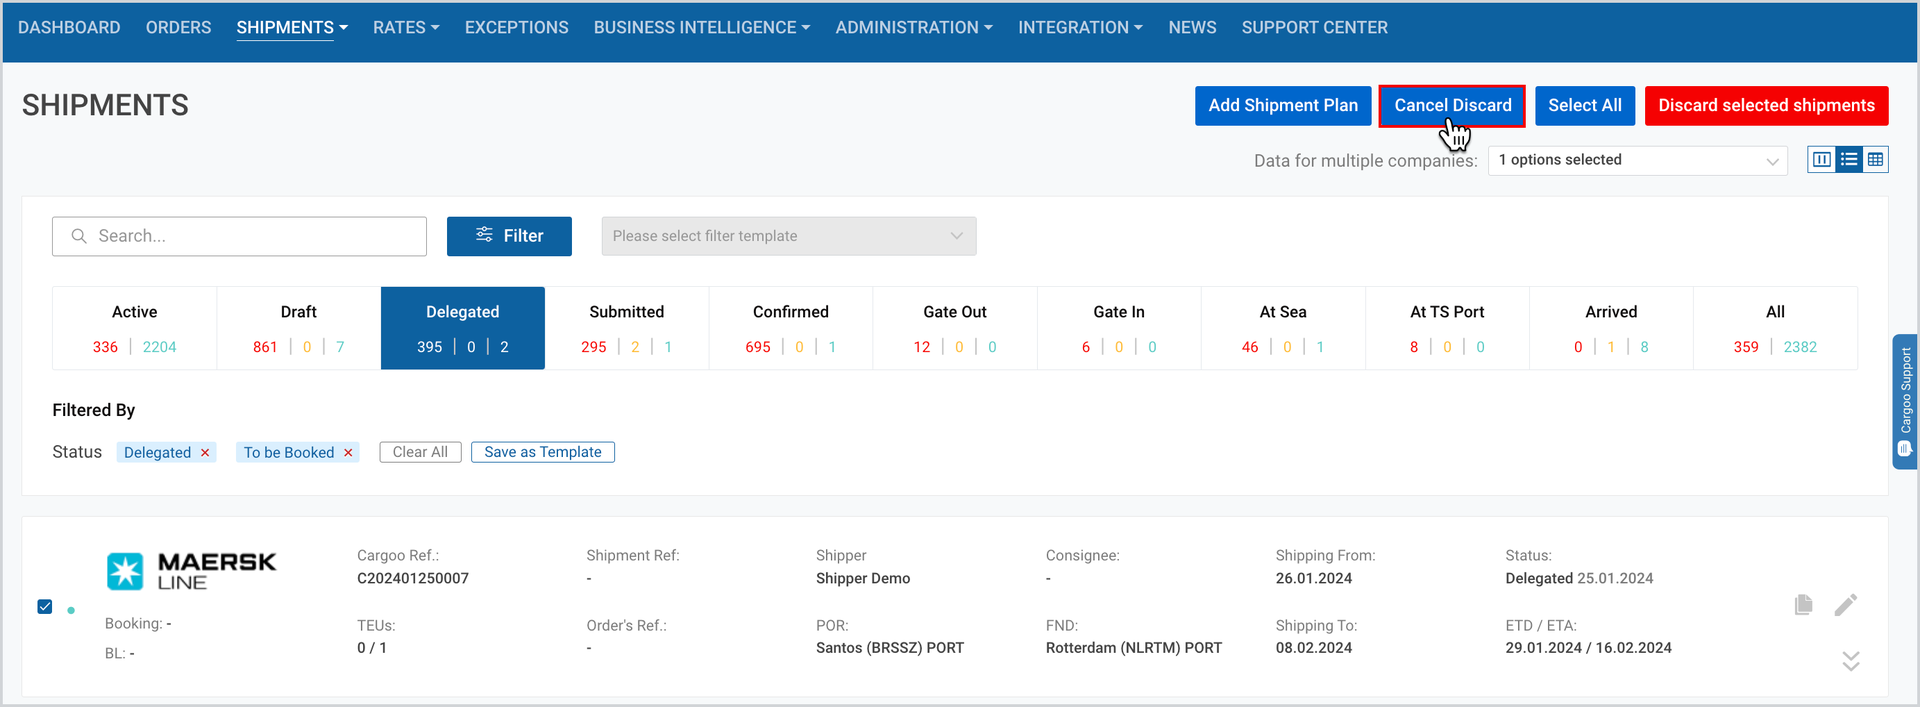
If you decide not to discard delegation for any shipments, you can click Cancel Discard on the upper-right corner. You will then be directed to the standard shipment view.
To download the print version of this article, click the PDF icon: