 Cargoo Support
Rate Groups Setup
Rate Groups Setup module is automatically activated along with the Carrier Contracts, and it is a tool for sharing Purchase Contracts with different customers combined in groups (sales contract).
To access the module
- Under Rates, click Rate Groups Setup.
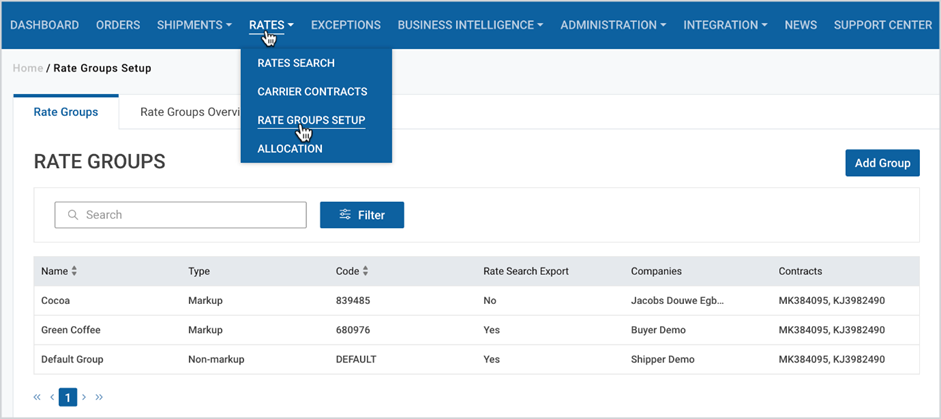
The Rate Groups Setup page is comprised of the following tabs:
- Rate Groups (default)
- Rate Groups Overview
Rate Groups
From this page you can access and manage rate groups list and add new ones.
Access Rate Group
As you click on the Rate Groups Setup under Rates module you can see the list of all your rate groups. You can access specific rate groups by
- Search
- Filter
Search Your Rate Group
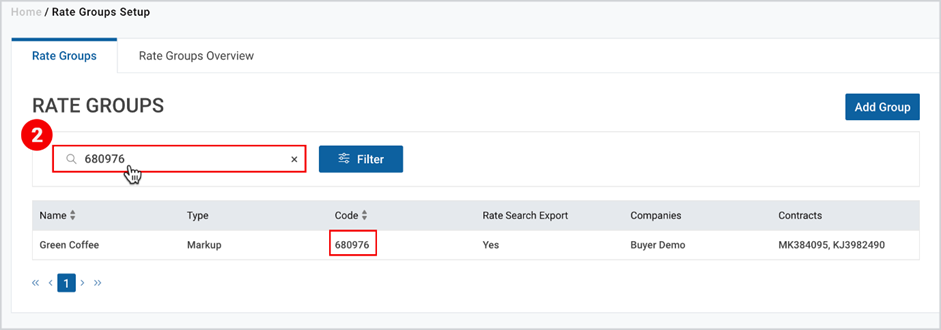
Search can be done by rate group name or code. Search starts working from the first typed character with the drop-down showing the suggested list.
To search for your desired rate group
- Take the step, shown in the Figure here.
- At the upper-left corner of the page, in the Search field, fill in the rate group or code.
Filter Your Rate Group
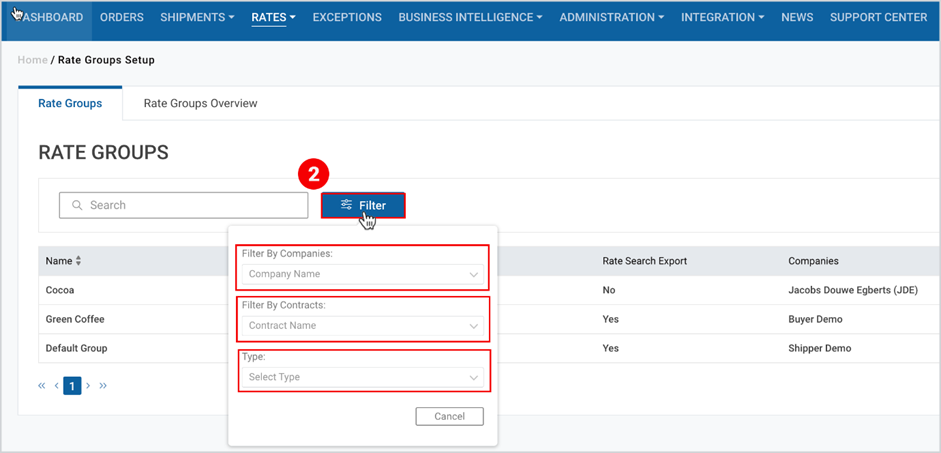
To filter the desired rate group(s)
- Take the step, shown in the Figure here.
- At the upper-left corner of the appeared page, next to the Search field, click Filter and set the desired criteria.
Manage Rate Group
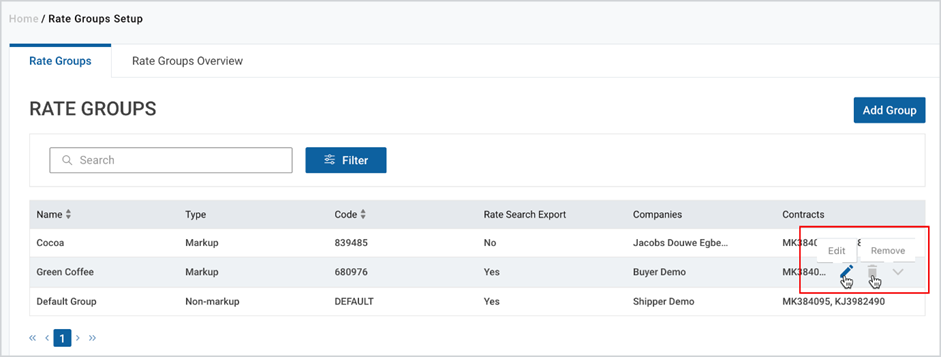
You can manage the desired rate group by the following two clickable icons:
- Edit – by clicking you can edit only the Rate Group Name, Markup and Rate Search Export fields.
- Remove – by clicking you confirm your decision in the appeared pop-up window.
Note | You can edit or remove Rate Group only if you are the owner of the Contract. |
Note | Rate Group can only be removed if there are no linked contracts and/or business partners. |
Add Group
In order to add a new rate group
- Take the step shown in the Figure here.
- Click Add Group.
- Fill in the required details in the pop-up window (described in Table 1 below) and then click Save.
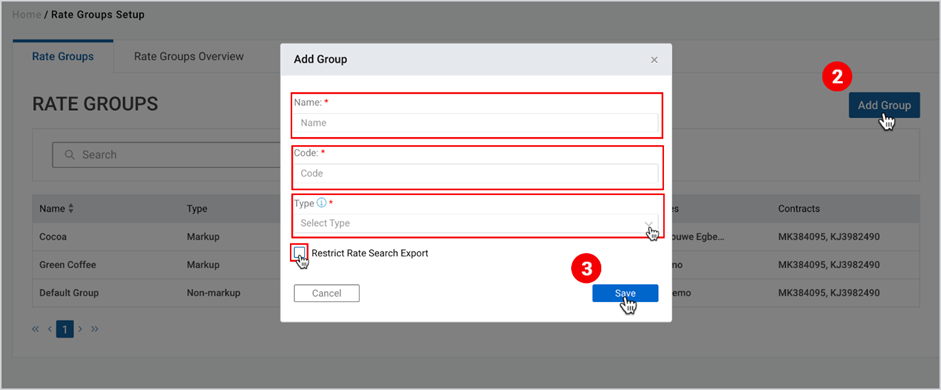
Table 1: Rate Group Structure
FIELD IN POP-UP WINDOW IN THE ABOVE FIGURE | DESCRIPTION |
Name | Fill in/create the name of the rate group (max 100 characters). |
Code | Fill in the group code (max 10 characters) |
Type | Select between Mark-up or non-mark up option from the single-select dropdown. If you select “Non-Markup”, all updates in purchase contracts will be reflected in corresponding sales contracts and displayed in the Rate Search straight away. If you select “Markup”, you will be able to maintain sales conditions, which vary from your purchase condition in the carrier contracts. |
Restrict Rate Search Export | If you select the checkbox, customers of that Rate Group will not be able to export rate search results. |
As you click Save in the popup window, the Rate group will appear on the rate groups list on the same page. It is from here, where you add the desired companies and existing carrier contracts to this rate group.
Add Contract(s) to the Rate Group
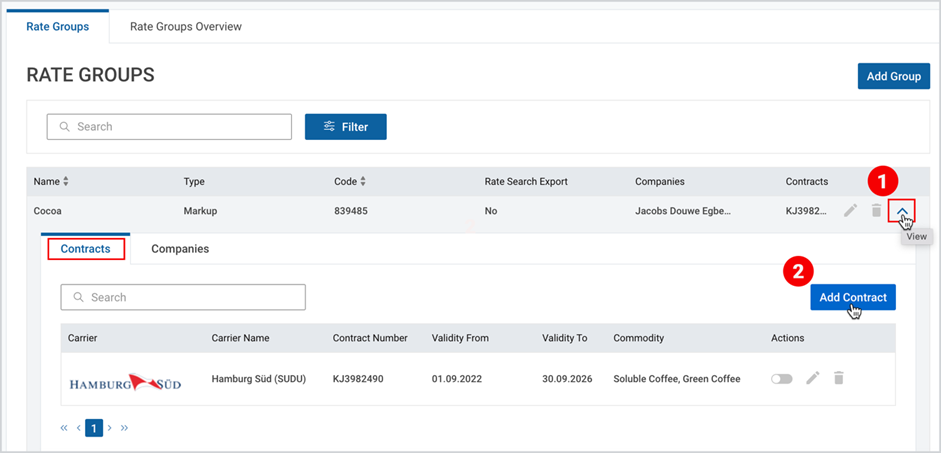
You can add a contract to the created rate group by taking the following steps:
- On the Rate groups list, by hovering on the desired rate group, click “view” button.
- At the right corner of the expanded tab, click Add Contract.
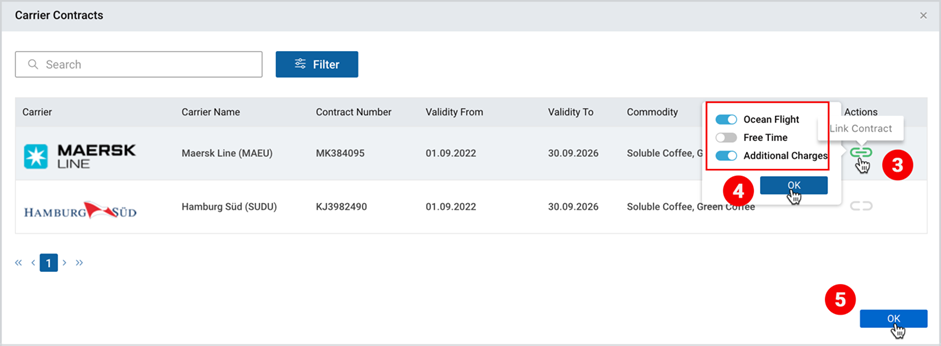
3. Find the desired contract from the pop-up and click Link Contract.
4. Activate Ocean Freight, Free Time, Additional Charges toggles (if you want to link
them as well) and click OK.
5. As the Contract is linked, at the lower right corner of the pop-up window, click OK.
Configure Contracts Added to the Rate Group
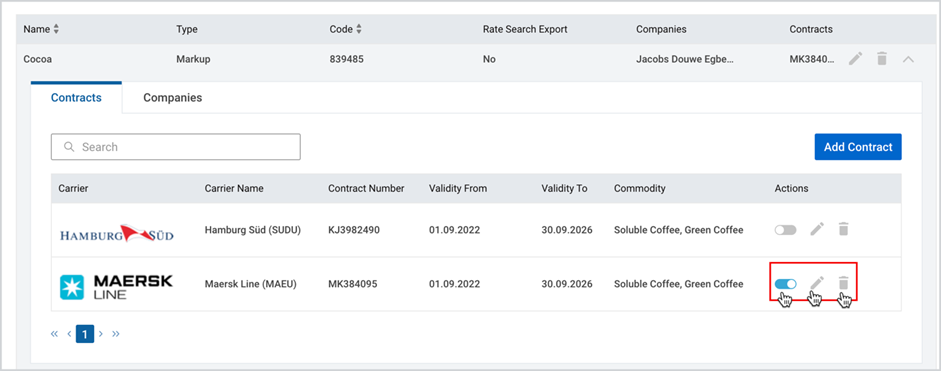
As you add the contract, it will appear on the contract list on the expanded tab of the rate group.
At the right part of each contract, under Actions, from left to right, you can see the following clickable icons:
- Activate/Deactivate toggle – activates/deactivates the given contract for the given rate group)
- Edit - you will be redirected to the Edit Contract page, where the contract details are non-editable, but you can add/edit Ocean Freight, Free Time and Additional Charges (see respective sections of Carrier Contracts).
- Delete (as you delete the contract, all configurations will be removed as well)
Add Company to the Rate Group
You can add companies to the created rate group by taking the following steps:
- Take the first step, displayed in the Figure here.
- Next to Contract sub-tab, click Companies.
- At the right corner of the expanded tab, click Add Company.
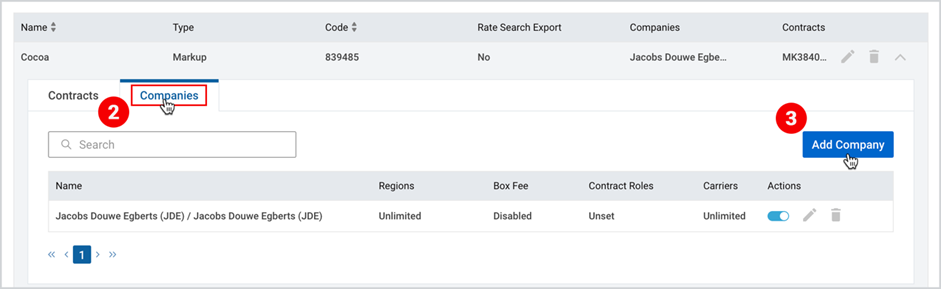
4. Fill in the company name (linked business partner) in the pop-up window and
click Save.
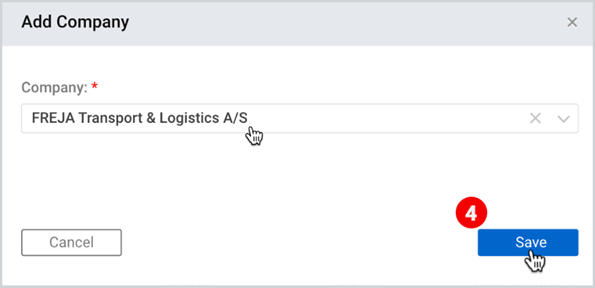
Configure Companies Added to the Rate Group
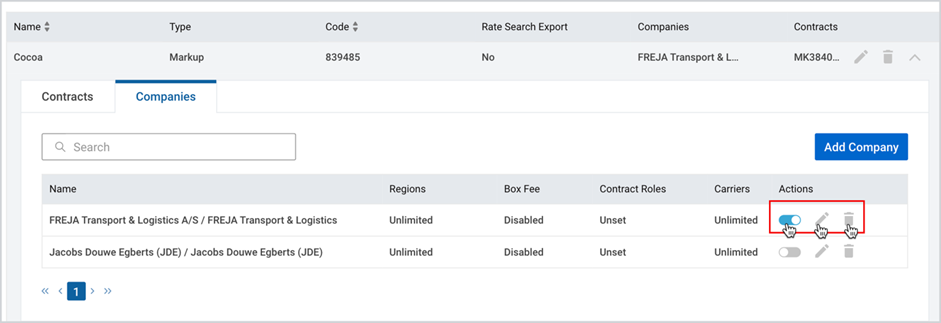
As you add a company to the Rate Group, it will appear on the company list on the expanded tab of the Rate Group.
At the right part of each company, under Actions, from left to right, you can see the following clickable icons:
- Activate/Deactivate toggle – activates/deactivates the given company for the given rate group)
- Edit – see Edit Company configuration below
- Delete - as you delete the company, all configurations will be removed as well)
Edit Company Configuration
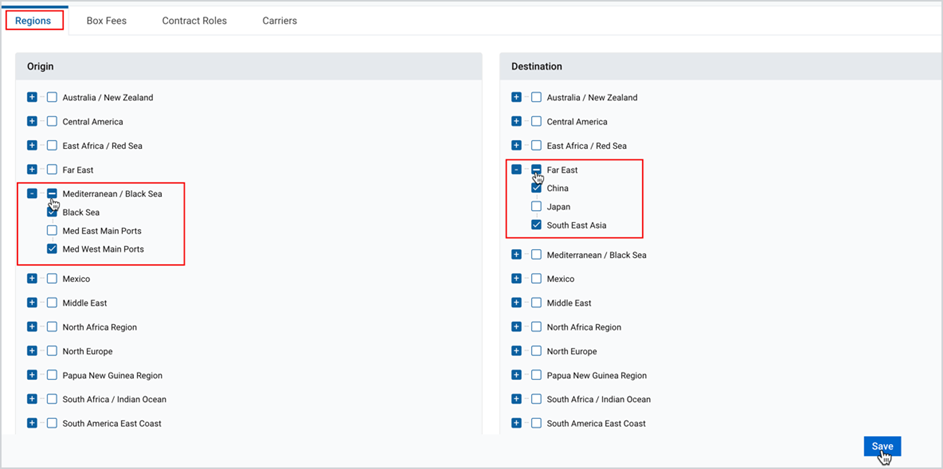
As you click Edit icon under Actions of the desired company, you are redirected to the Configurations page, where you can find the tabs described below:
Regions
By selecting specific origin and destination regions, you can restrict the visibility of created rates from those regions in the rate search.
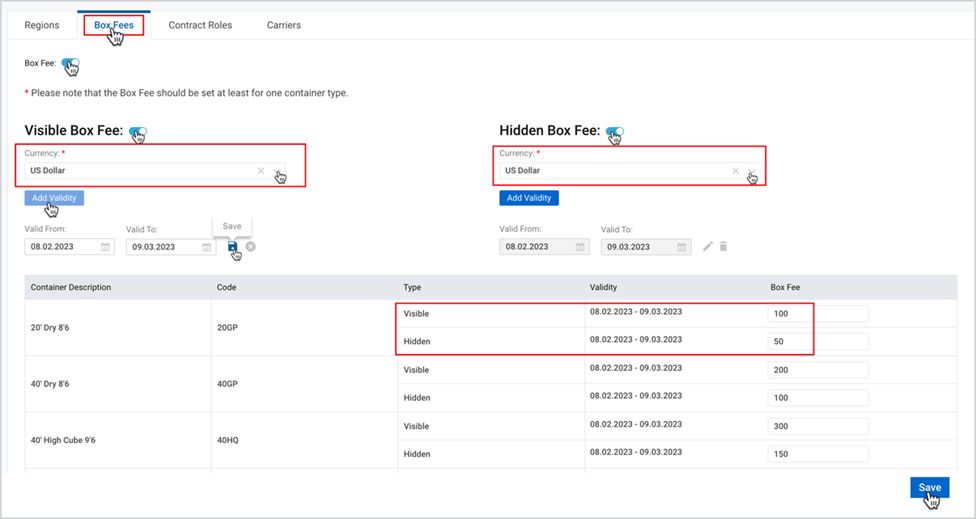
Box Fees
In this tab you can activate or deactivate the respective toggle (deactivated by default).
If you activate the Box Fee toggle, two types of box fees will appear
- Visible box fee (activated by default)
- Hidden Box Fee (deactivated by default)
Depending on the activated toggles you have to fill in
- the currency
- the box fee amount
You can also set validity period for all container types.
Contract Roles
In this tab you can select from the linked business partners
- Freight Payer
- Named Account
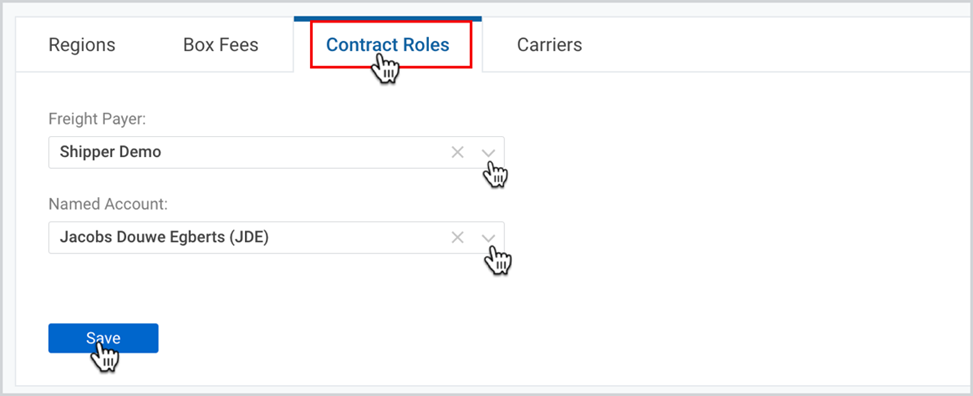
Note | In case you select the Freight Payer and Named Account at the Rate Groups Setup level, then these business partners will be prefilled in the Creation of Shipment Plan, Step 3 – Parties and Charges, and the New Delegation and Booking Tool, Shipping Instructions and Parties instead of those selected in the Freight Payer and Named Account fields while creating a Purchase Contract (see Carrier Contracts, Contract Structure). |
Carriers
From this tab, you can select the carriers, that will not be visible to the given company included in the given rate group.
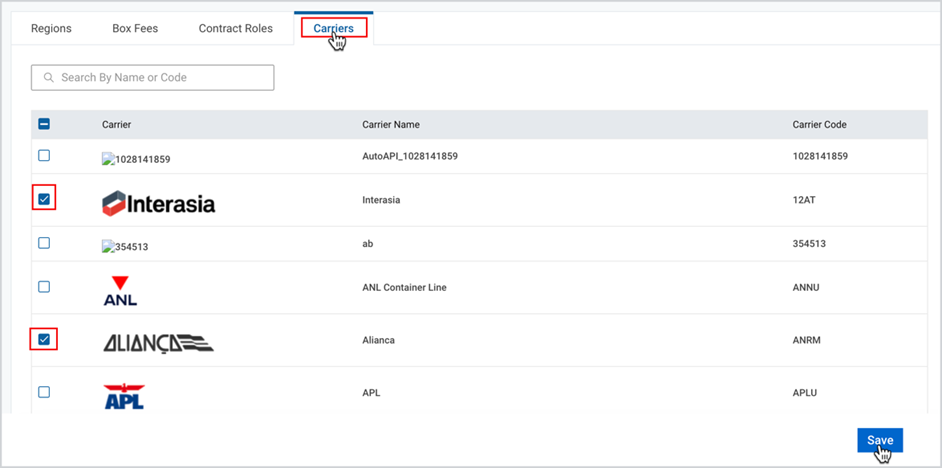
Tip | Do not forget to Save the input data by clicking the Save icon at the lower right corner of the page of each configuration tab. |
Custom Bulk Upload
If you have already created a rate group via Cargoo interface, you can link the Rate Group(s) and Sales Contract Conditions with the Purchase Contract conditions by Custom Bulk Upload. Along with the Purchase Contract details, you can include in the excel file the Rate group code and update ocean freight, free time and additional charges linked to the Sales Contract.
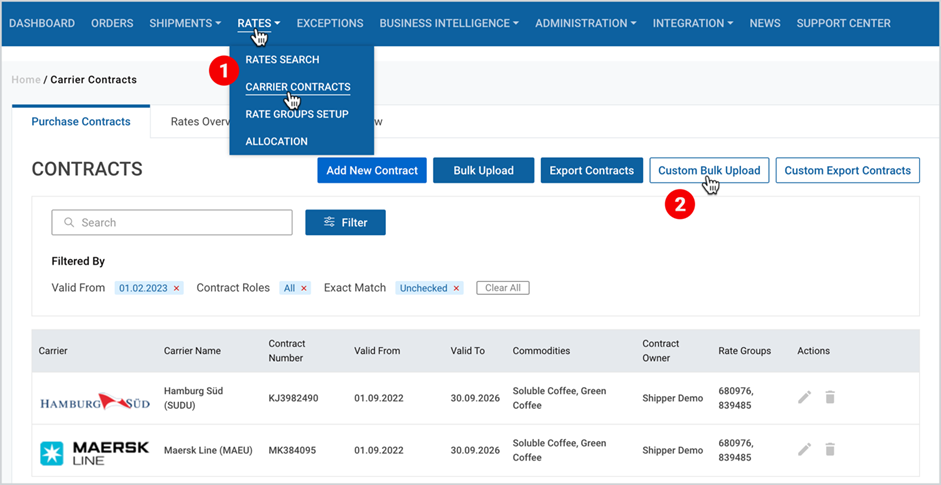
For this purpose, take the following actions:
- Under Rates, click Carrier Contracts.
- At the right part of the appeared page, click Custom Bulk Upload.
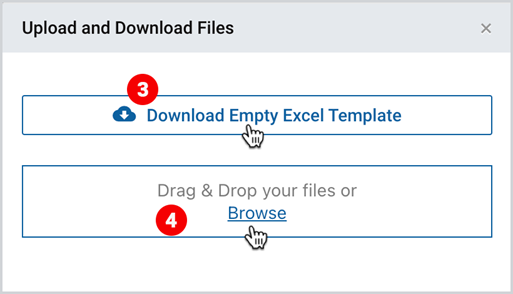
3. As the popup window appears, click Download Empty Excel Template.
4. After filling in your contract details (including rate groups along with its configuration),
Drag and Drop your files or Browse.
Note | As you upload an excel file, in case any of the fields is incorrectly completed, an “Error Results Table” appears, where all errors are displayed and need to be amended. |
Rate Groups Overview
The tab displays the list of all Sales Contracts with the attached Ocean Freight, Free Time and Additional Charges in the configurable/expandable table format.
Here, the Rate Groups Search, Filter work the same way as described in Access Rate Group.
To download the print version of this article, click the PDF icon: