 Cargoo Support
Container Stuffing and Exceptions
As the goods for the specific shipment are assembled and loaded into the relevant containers at the warehouse, responsible office staff creates all the necessary documentation including the containers stuffing information through the Cargoo platform. Thus, through Cargoo’s Container Stuffing functionality, the shipment owner or booking agent, creates and submits to the receiver (buyer) the container load plan - the information on the distribution of the goods loaded into each container as per specific criteria (expiry date, production date, size, etc.), while the receiver (buyer) has the opportunity to confirm, reject or edit the declaration of the distribution. At the same time, this allows the shipment parties to meet the requirements for customs documentation, packing lists and other vital records.
Note | The container stuffing attributes are only visible if they have been added by the particular shipment owner party. |
Create Container Load Plan
To enter the container stuffing details and create container load plan, the given shipment must be in a confirmed status, containers must be available, and all the shipment items must be included.
To access the Container Stuffing functionality:
- Under Main Menu, click Shipments->Shipments.
- Find your confirmed shipment on the shipment list and click on it.
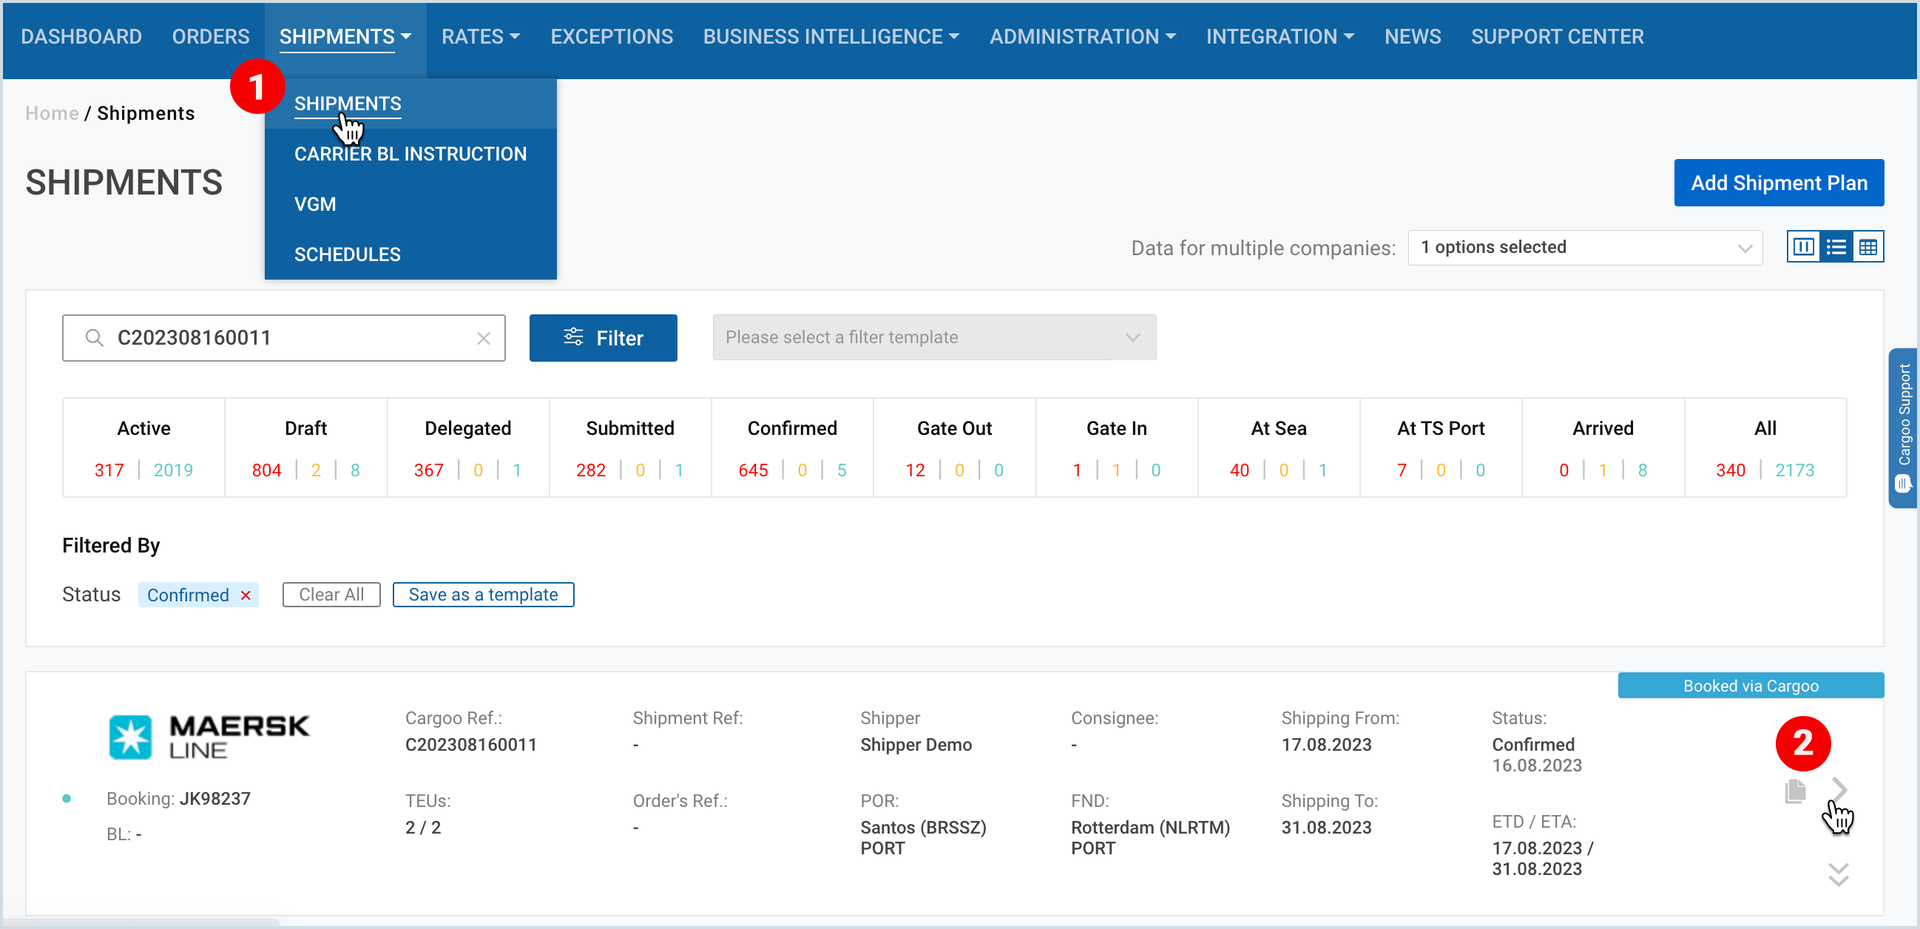
3. Next to Parties tab, click Stuffing.
4. Click Create Container Load Plan.
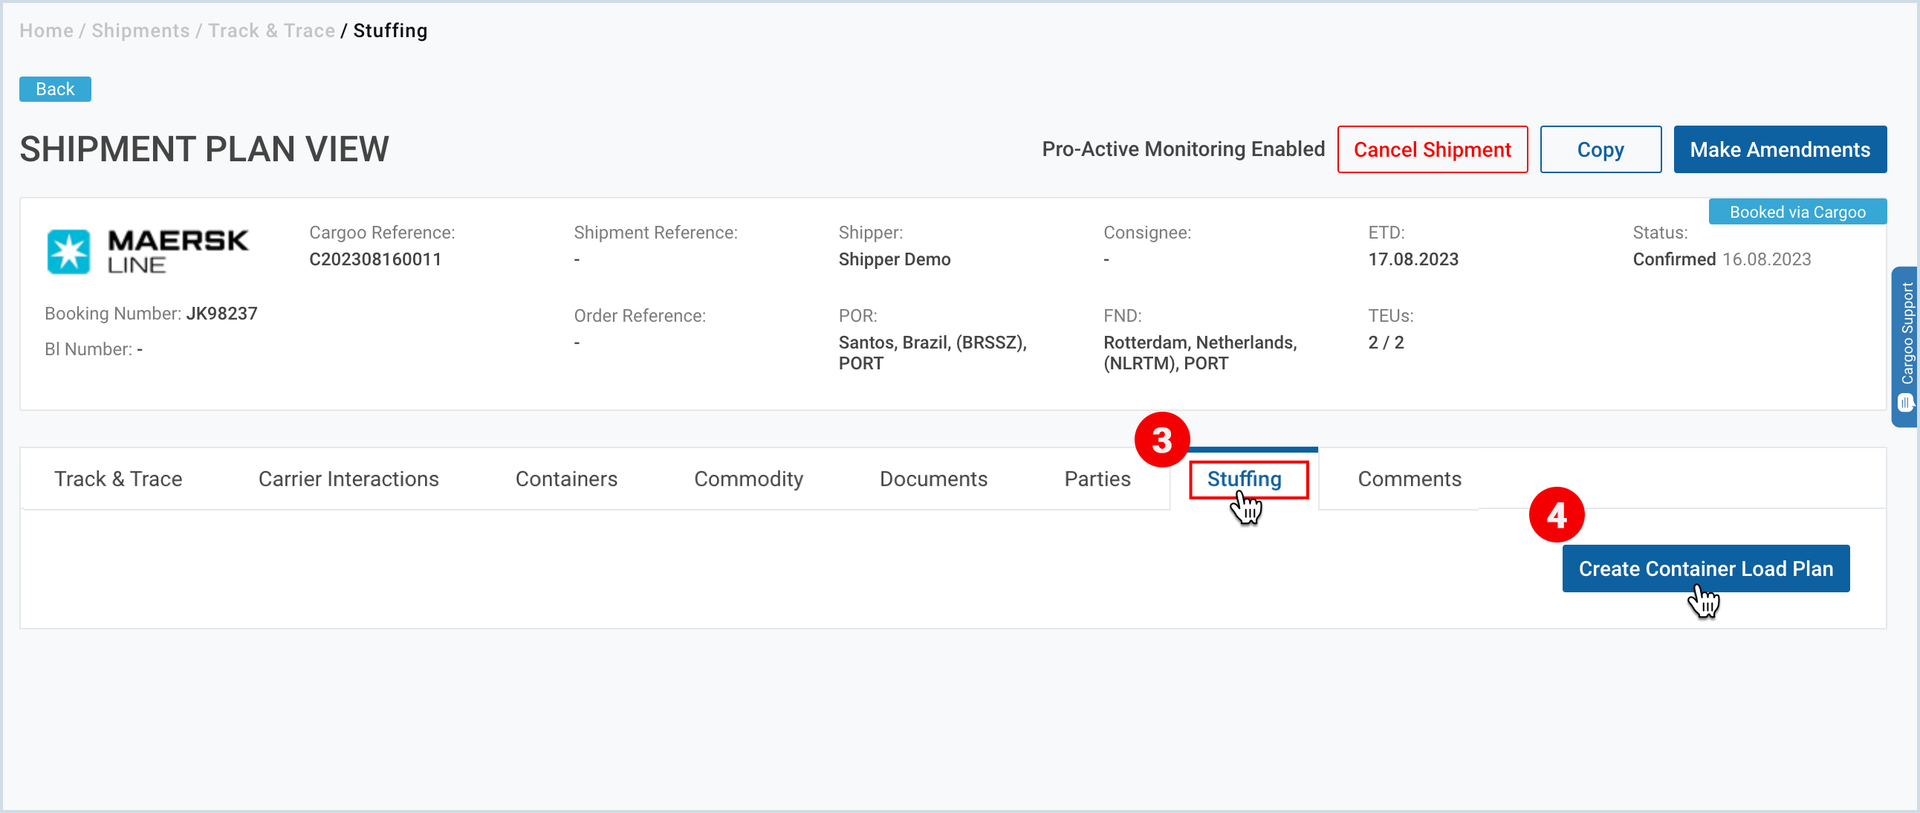
The page will display the following subsections:
- All shipment items - at the left part of the page
- Container types - at the right part of the page
- Drop area (in the middle), where the actual stuffing is declared.
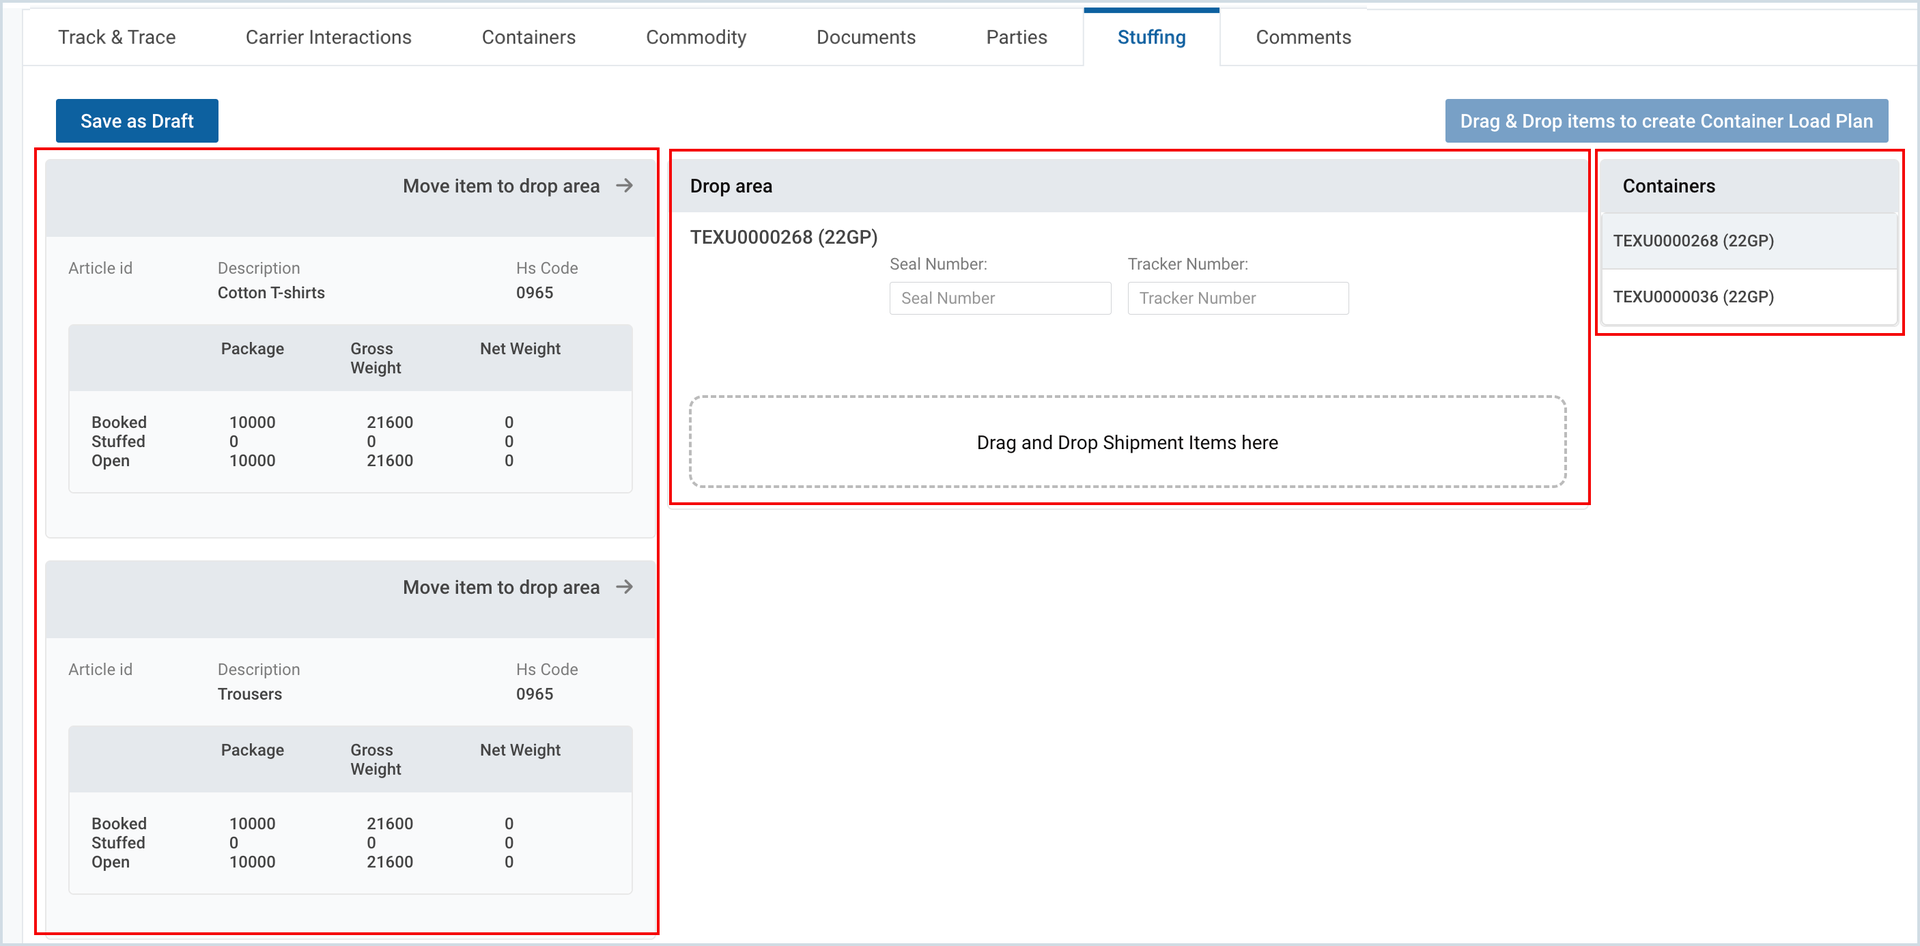
To start the creation of the container load plan
- At the right part of the page, select the required container.
- From the left part of the page, drag and drop the required shipment items to the drop area in the middle.
3. Optionally fill in the container Seal Number and Tracker Number.
4. Adjust the number of packages, gross weight, net weight and volume (if required)
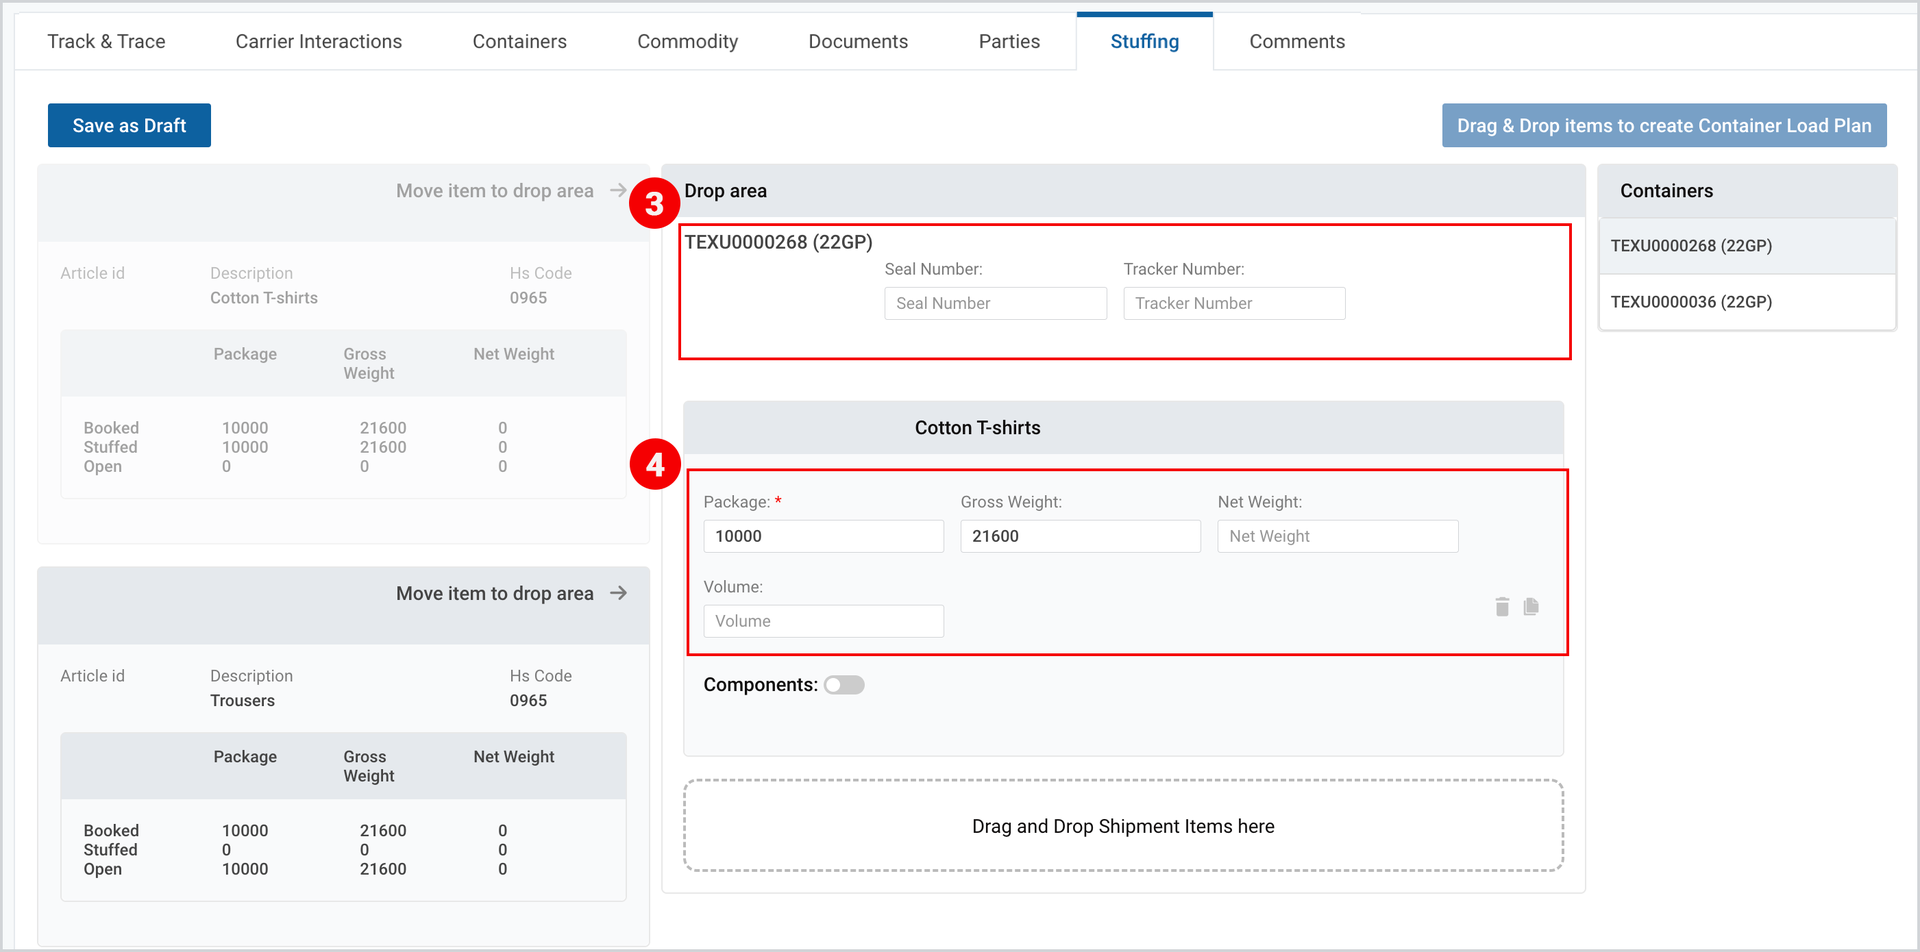
Note | As you make adjustments to the items, the change is immediately displayed on the overall items section at the left part of the page. For example, if the initial package number is 10,000 but you adjust it to 8,000, then the items section will show the open quantity that needs to be distributed in either of the containers. |
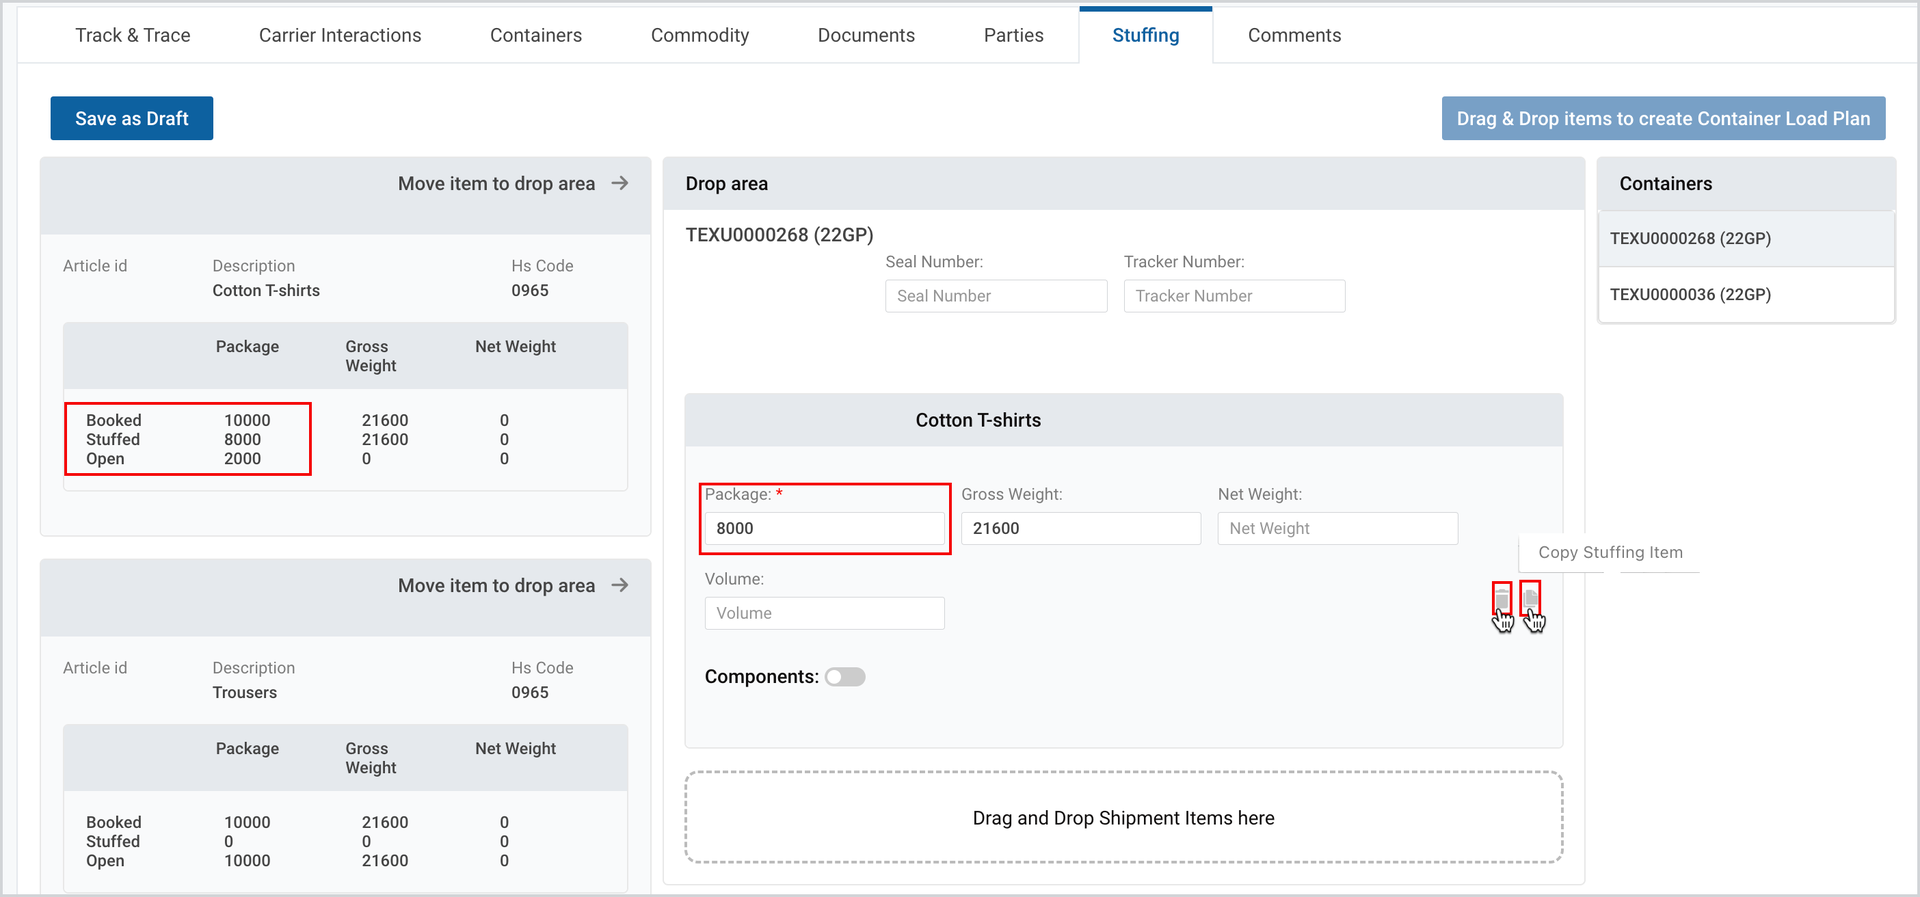
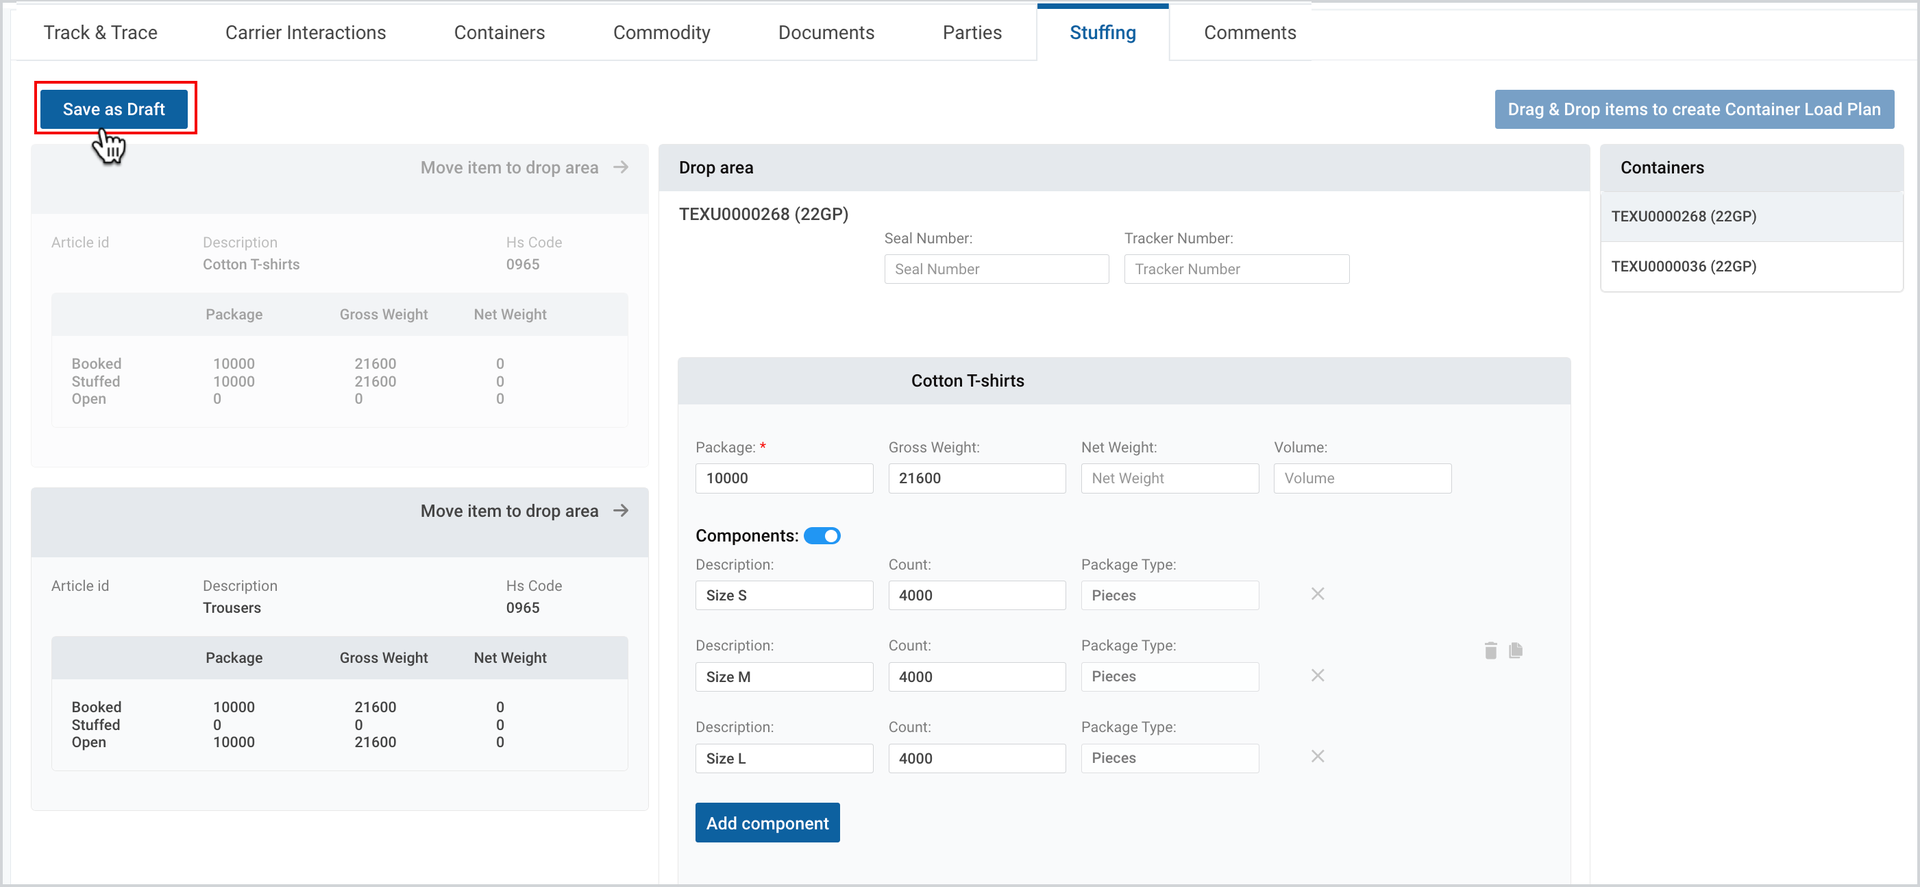
You can duplicate the dropped item by clicking the “Copy Stuffing Item” icon in the drop area (see Figure 6 above).
You can easily remove the dropped item from the current container by clicking on the “delete” icon in the drop area (see Figure above, next to “Copy Stuffing Item” icon).
Components Toggle
For certain cargo items, a shipper will have to declare “components” for individual items that are often referred to as BOMs (Bill of materials). For example, if the item in the order and the shipment is “T-shirts” – 10,000 cartons and the shipper must declare, the quantity of sizes separately, then he/she most probably will activate the components toggle and declare each size and the quantity separately.
Thus, to declare separate components:
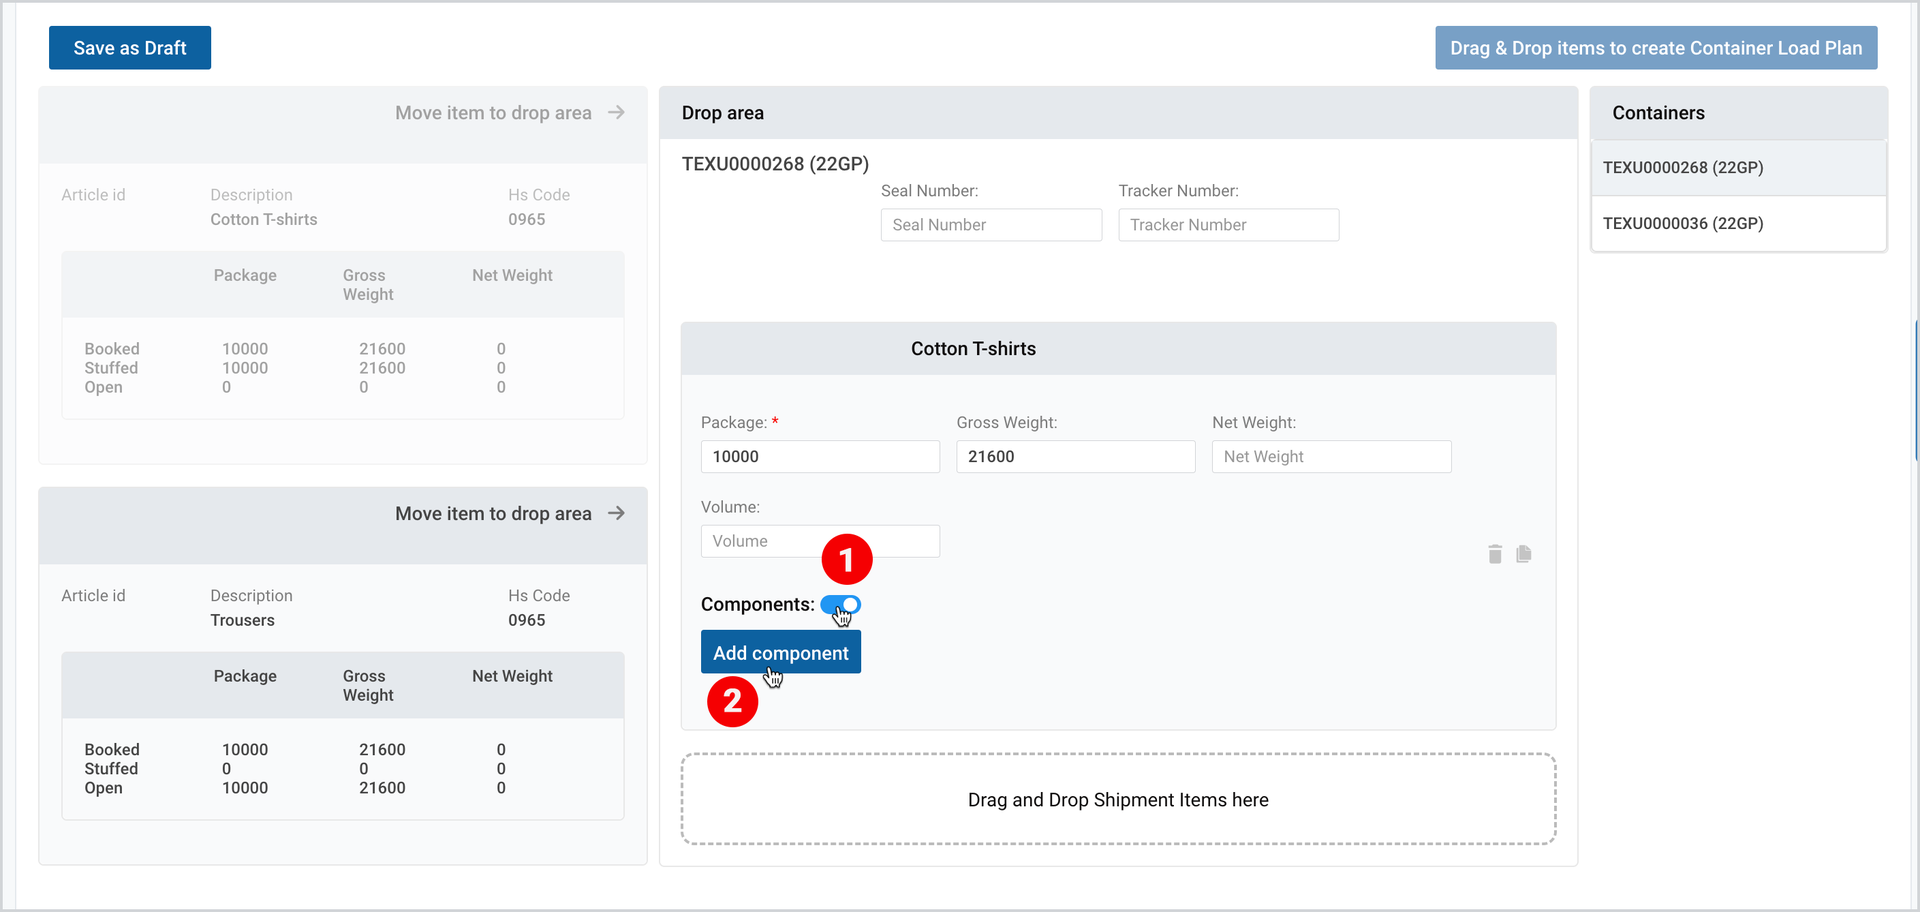
- In the dropping area, under the selected items, activate the Components toggle.
- Click Add Component.
3. Fill in the Description and Count (the package type is pre-filled).
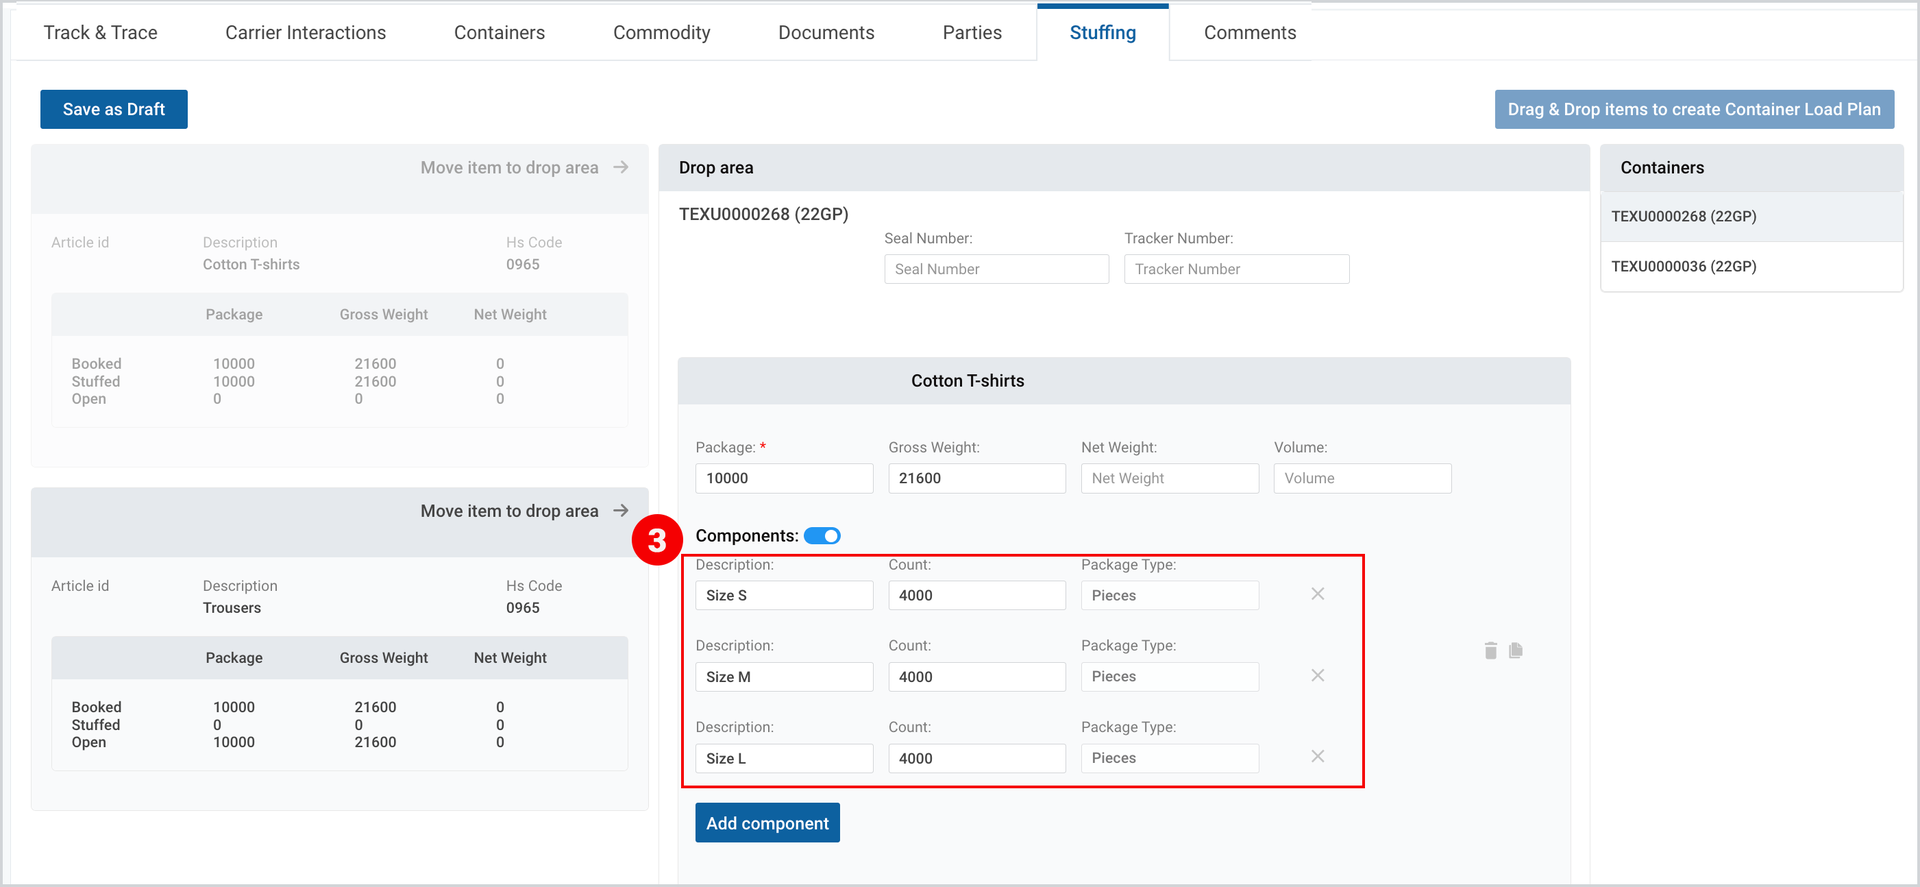
You can add as many components as required. They are also by default editable unless they are finalized. You can remove any of them by clicking the “X” button next to each component.
At any time, you can save the container load plan as draft and come back to it later, by clicking the “Save as Draft” icon at the left part of the Stuffing tab.
Custom Attributes
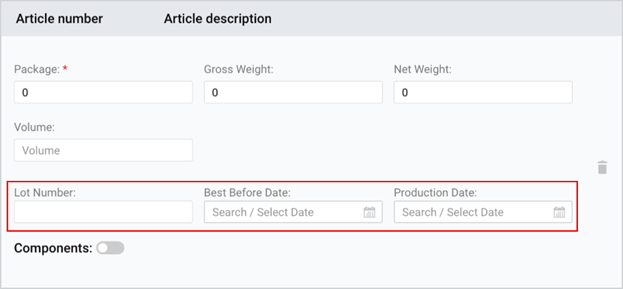
The shipment owner may request additional information to be entered for each item in the container stuffing which must be entered on item or if components exist, on component level.
Data to be entered are as follows:
- LOT Number
- Best Before Date
- Production Date
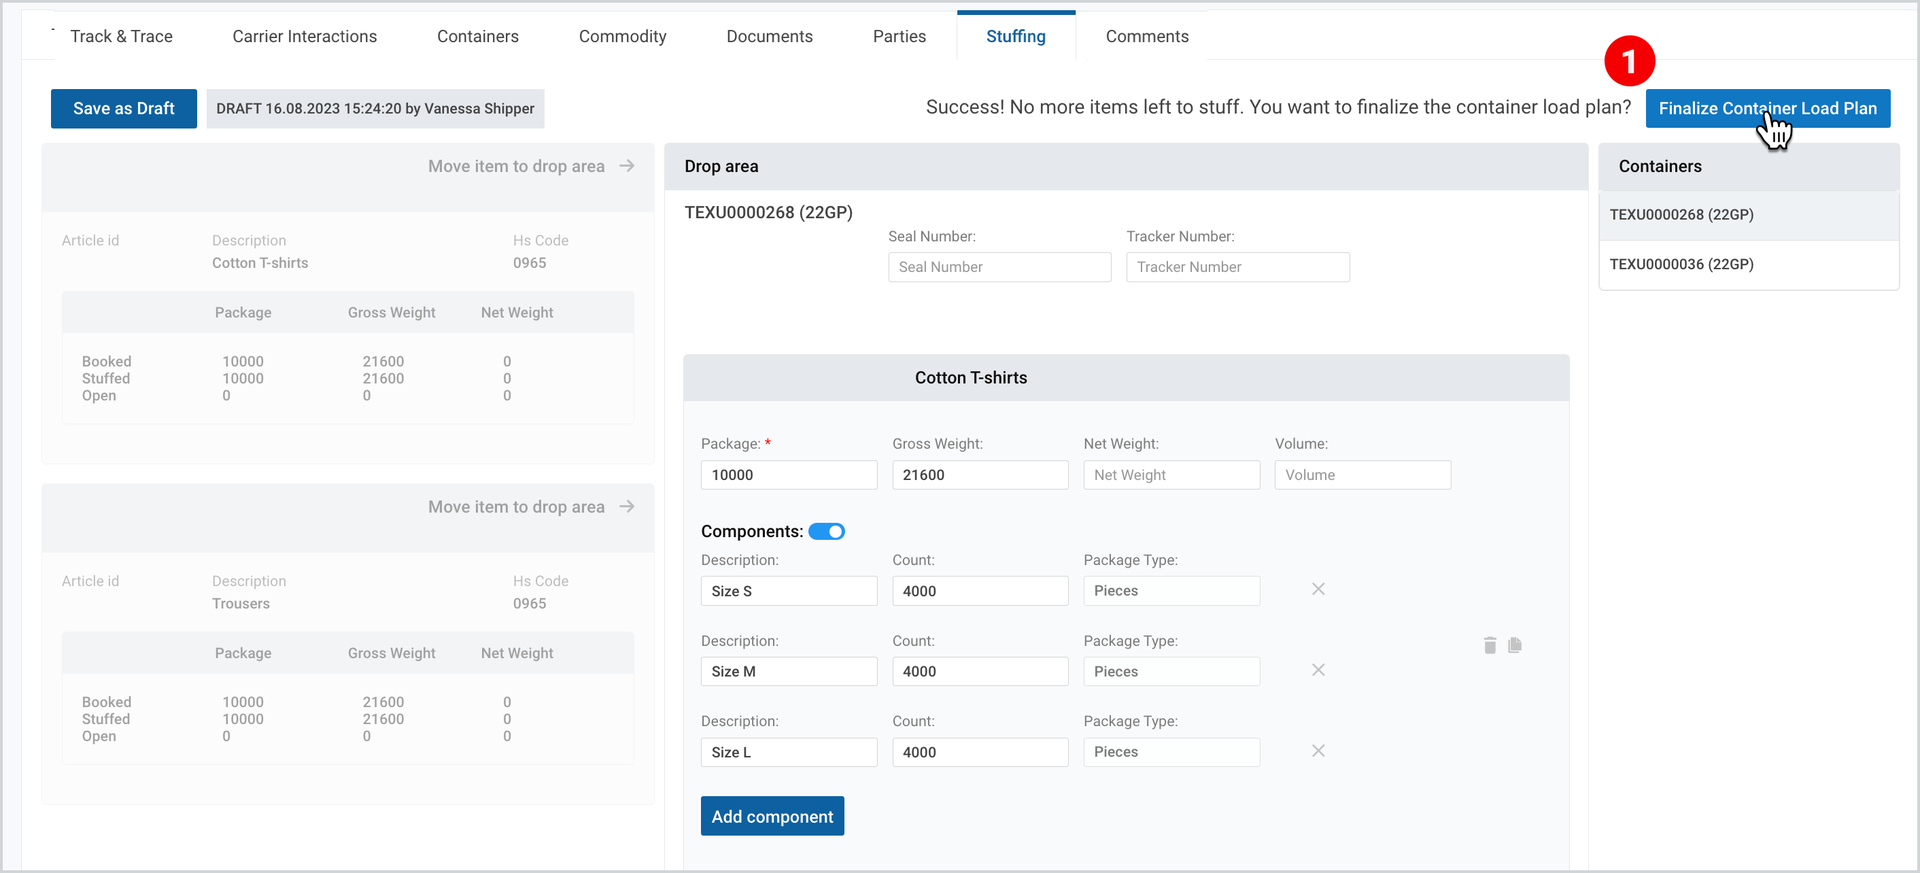
Once all the containers are stuffed, “Finalize Container Load Plan” button will appear at the left part of the Stuffing tab.
- Click on it, to submit it to the verification of the receiver (buyer) party.
2. Click Confirm to verify your decision.
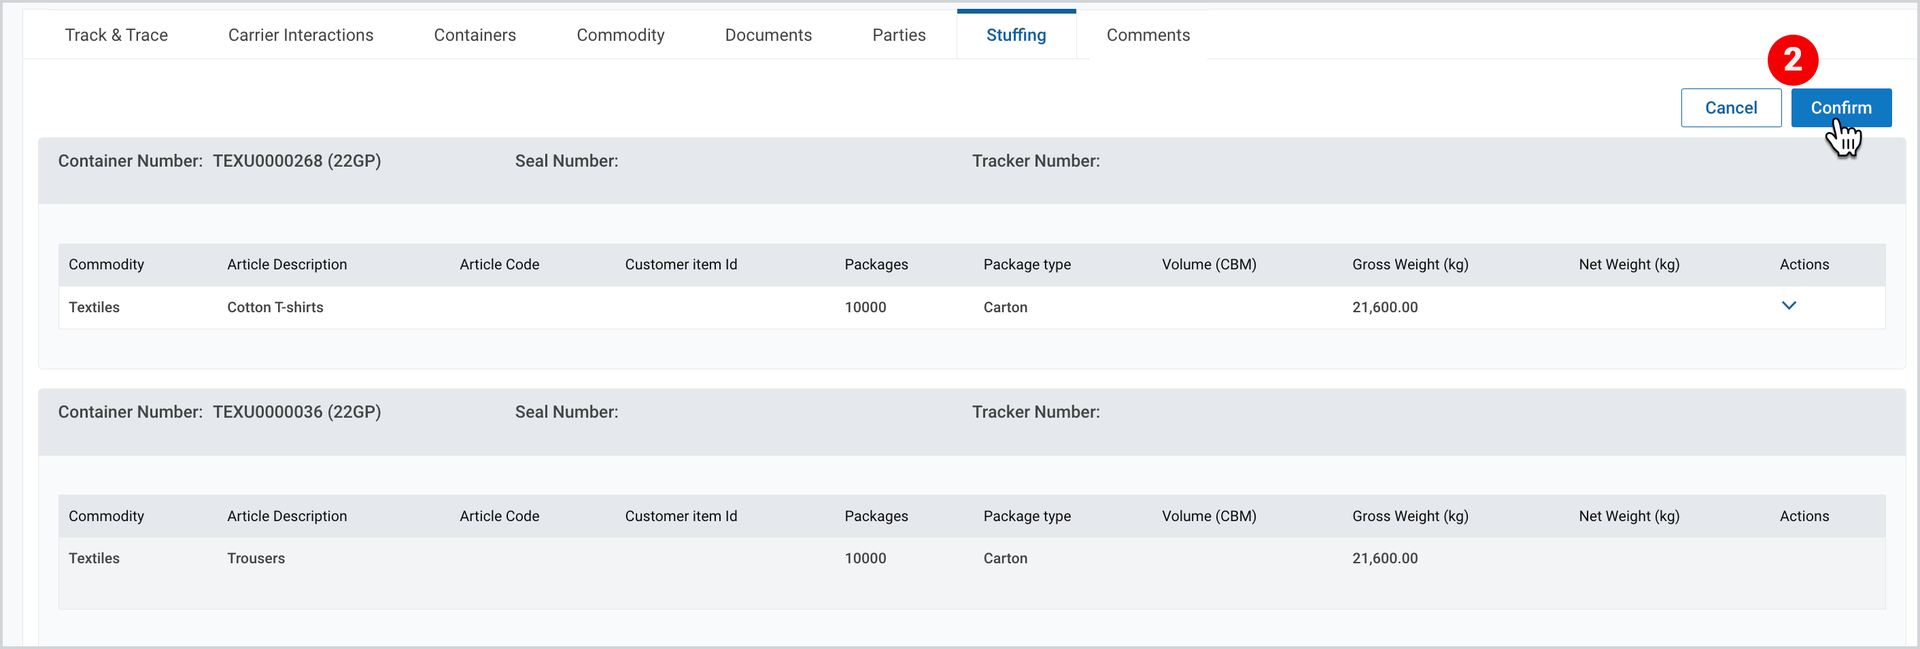
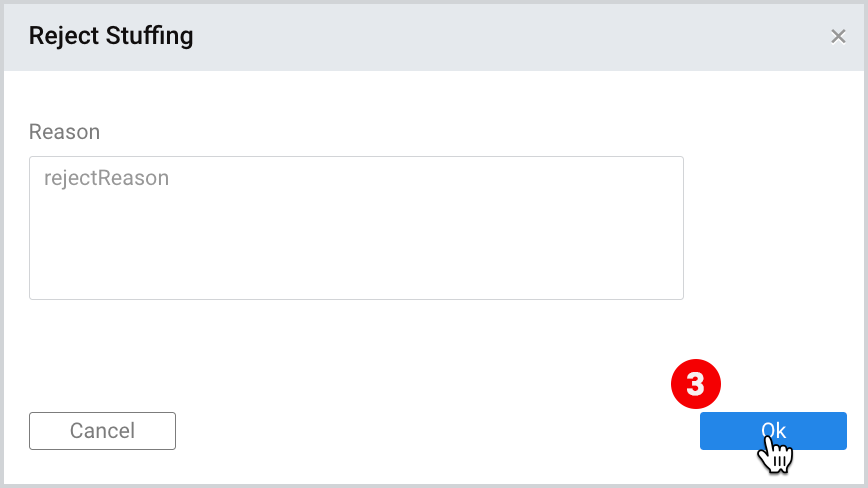
As you finalize the stuffing details the data may automatically be submitted to the receiver party for verification. Data may still be changed by re-opening the stuffing. However, once entries were verified by the receiver party (buyer), you can no longer make amendments to it unless the receiver party (buyer) rejects the load plan. While rejecting the load plan, the buyer must provide a comment to the booking agent with the explanation on what is required to be changed in the plan.
Actions by the Receiver Party (Buyer)
As the Container Load Plan is finalized, for the receiver party (buyer), the following actions become available in the Stuffing tab.
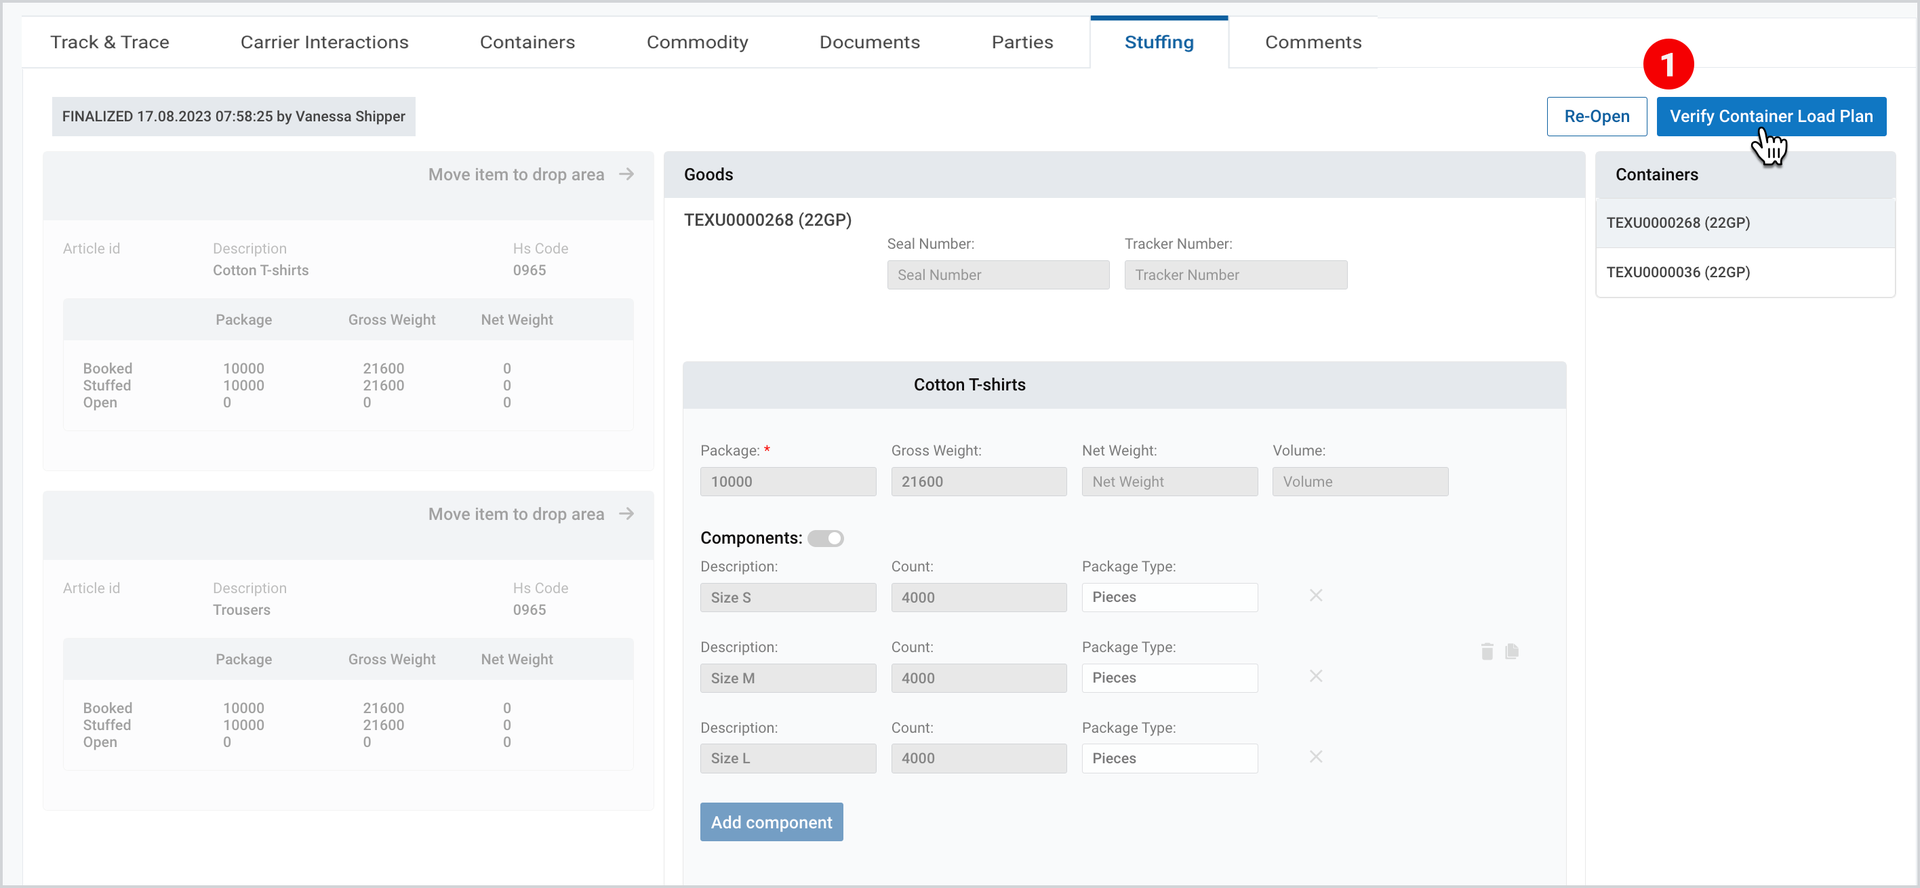
- Verify Container Load Plan
- Re-open
Verify Container Load Plan
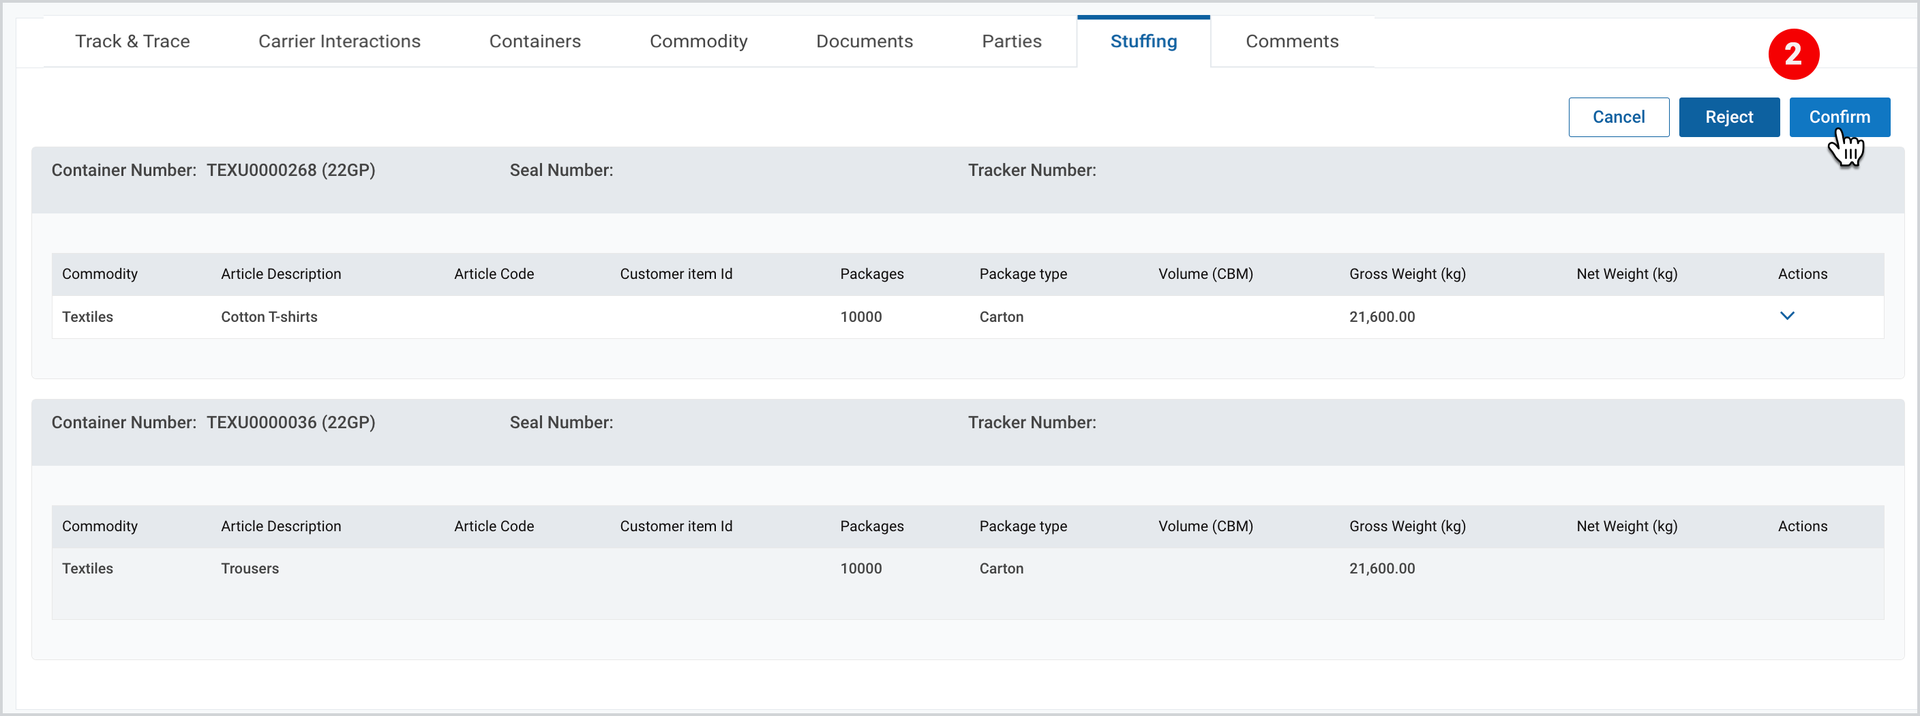
Through this icon the receiver party either confirms or rejects the stuffing details received from the shipper or booking agent before the data is submitted to the ERP system.
To verify the Container Load Plan
- At the right part of the tab, click Verify Container Load Plan.
2. Click Confirm.
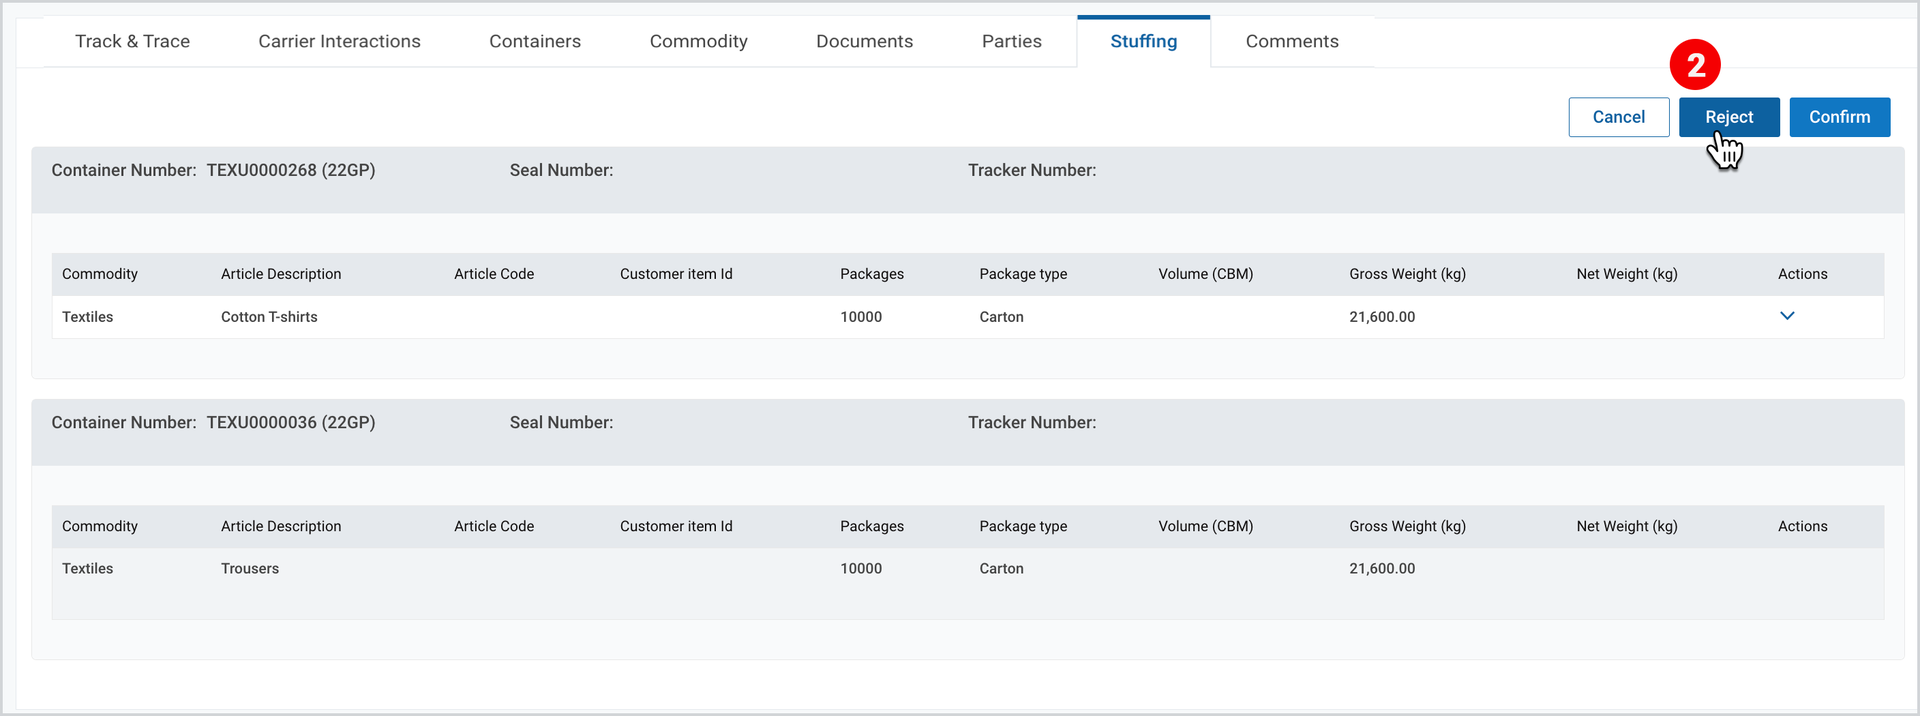
To reject the Container Load Plan
- Follow the step, displayed on this Figure.
- Click Reject.
3. In the pop-up window, fill in the rejection reason and click OK.
Re-open the Container Load Plan
Re-open icon allows the receiver party (buyer) to edit the stuffing details received from the shipper or booking agent.
- At the right part of the tab, click Re-open.
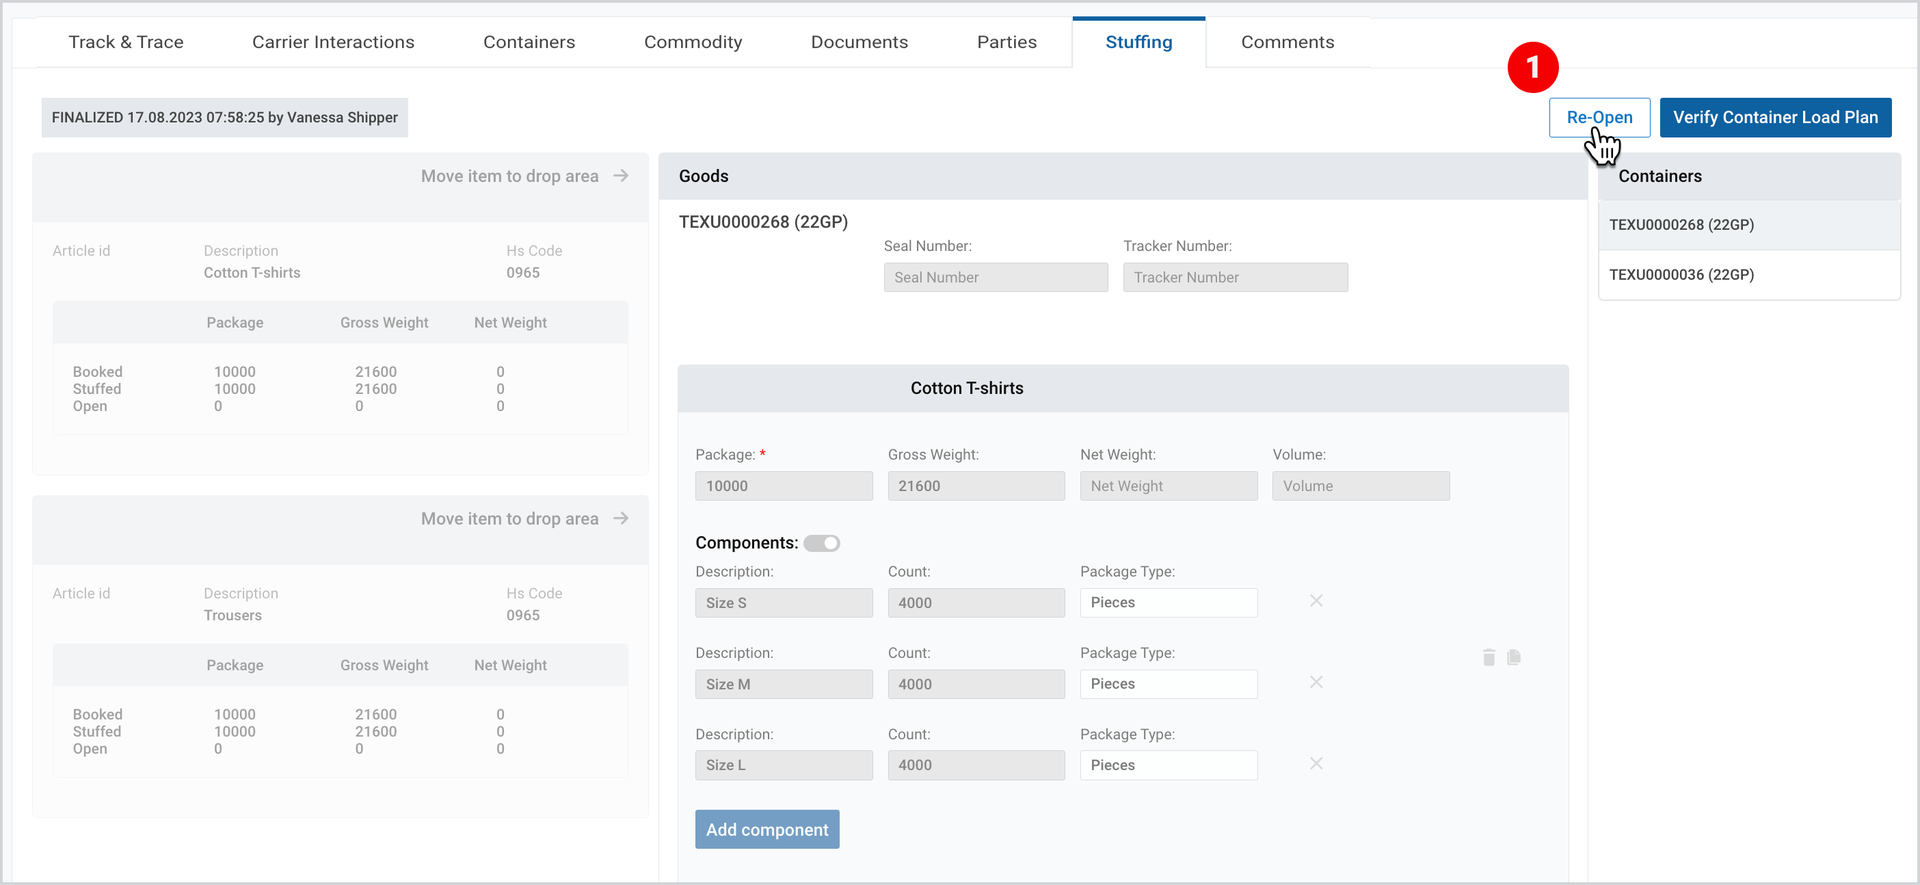
2. Follow the steps displayed on the Figures here.
Note | As you make the required amendments to the stuffing details, you will still need to verify Container Load Plan, either by clicking on the confirm or reject buttons. |
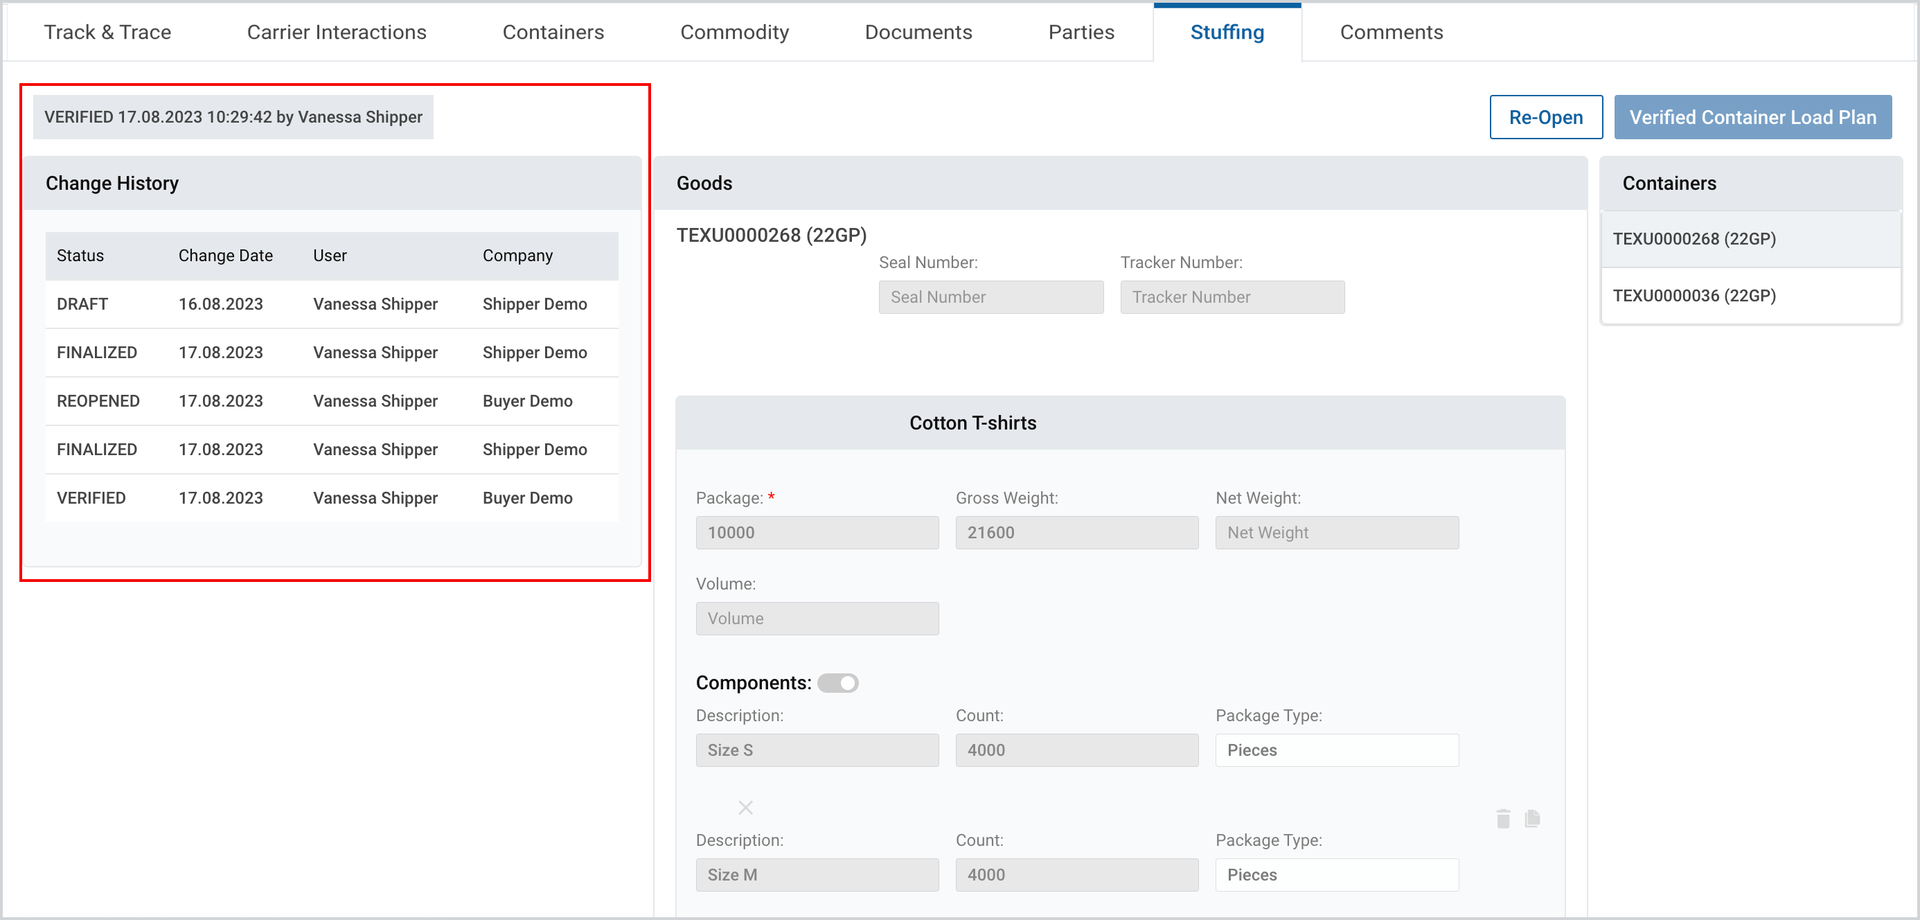
Upon finalization or after verification of the container stuffing, at the left part of the tab, the status update for the latest action on the stuffing is displayed.
Container Stuffing Exceptions
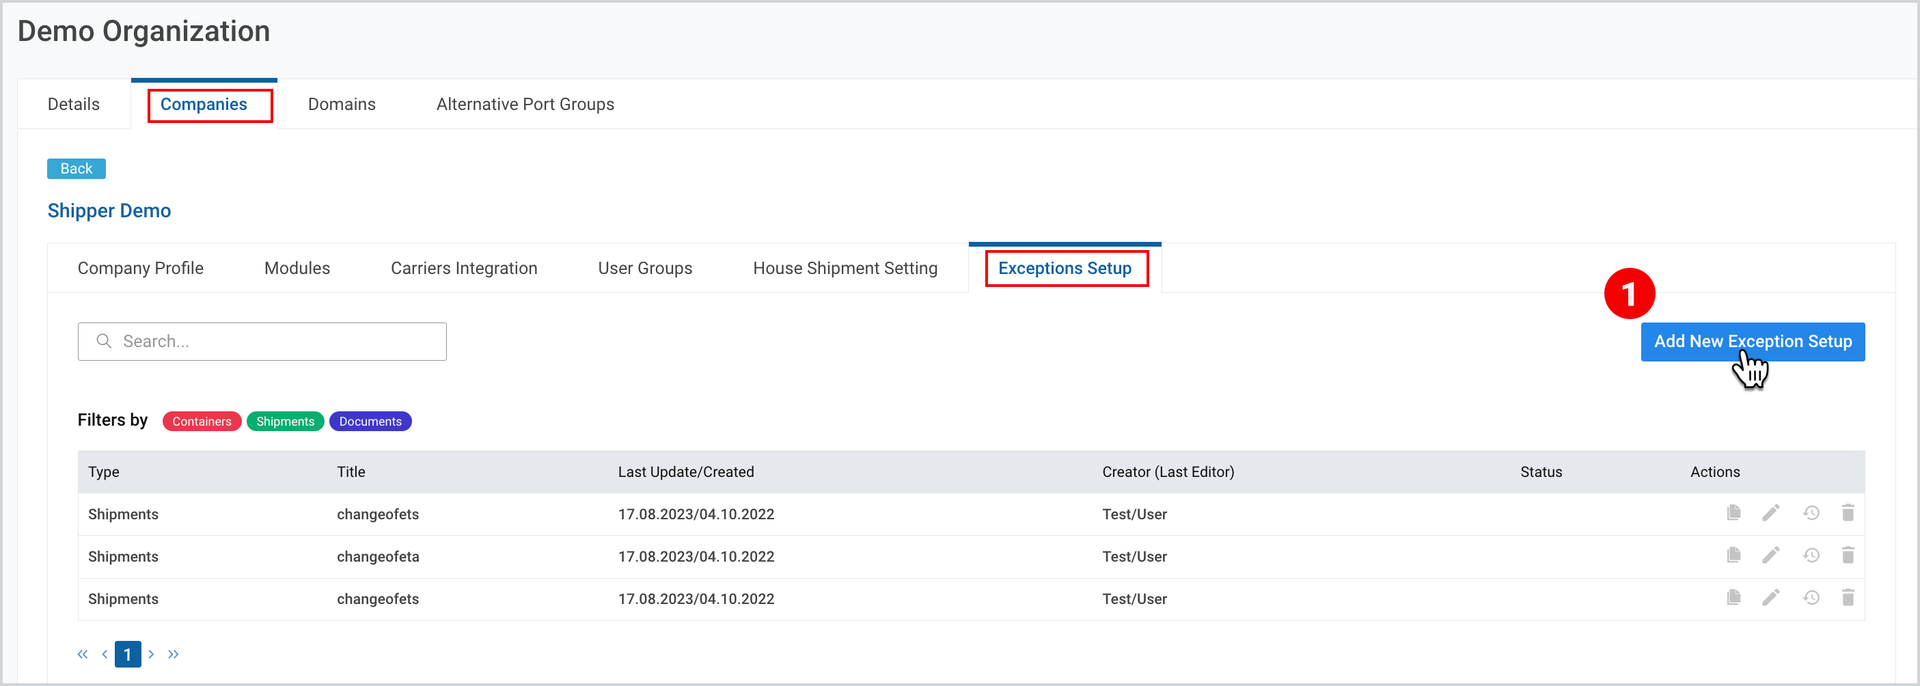
As part of Cargoo’s comprehensive task and exception handling capabilities, it is possible to assign specific roles to handle the finalization and verification tasks for container stuffing. For setting up this configuration:
- Under the company configuration, in the Exceptions Setup tab, click Add New Exception Setup.
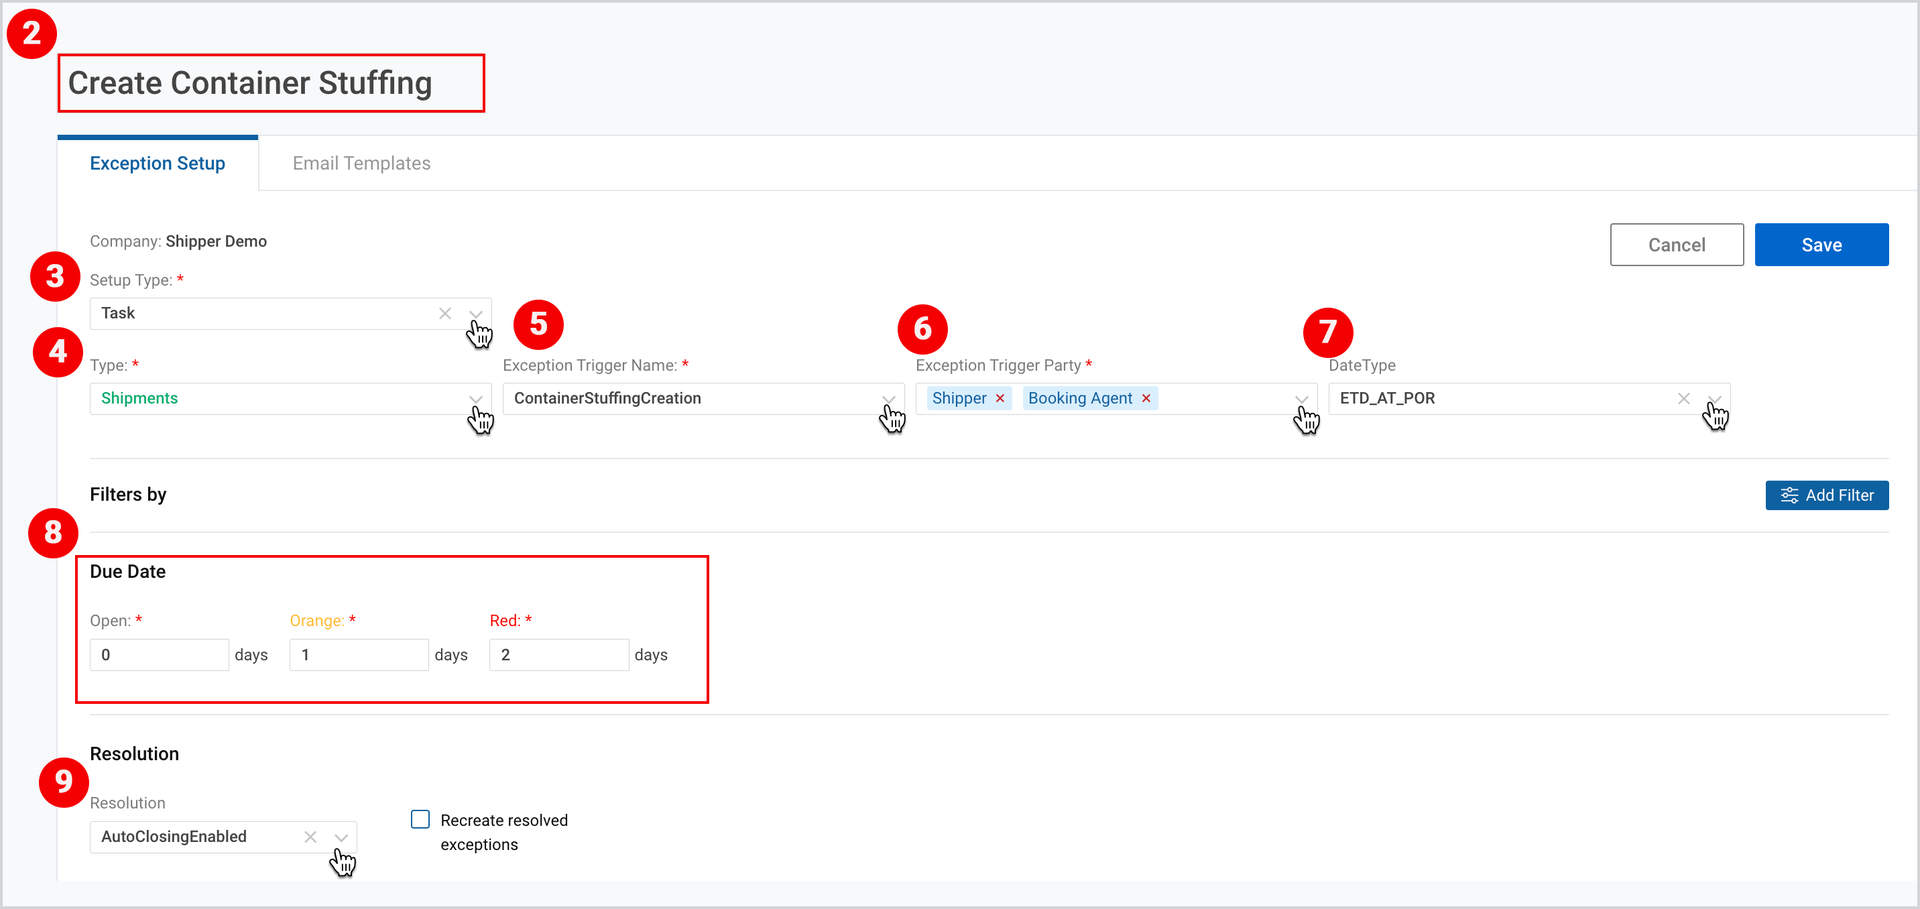
2. Fill in the title for this exception (e.g. Create Container Stuffing).
3. Under Setup type, select Task.
4. Under Type, select Shipments.
5. Under Exception Trigger Name, select either Container Stuffing Creation or
Container Stuffing Verification.
6. Under Exception Trigger Party, select the required party.
7. Select Date Type.
8. Under Due dates, fill in the dates
(Open – the date when the Exception should be generated for the first time;
orange - date when the Exception should be generated - warning level;
and red - date when the Exception status should be change - panic level)
9. Select the Resolution Method – manual or auto-closing. When manual is selected,
the task must be closed by the user and the system does not close the task based
on status changes. When auto-closing is selected and a user finalizes the container
stuffing, the corresponding task will automatically be closed. The same applies to
verification.
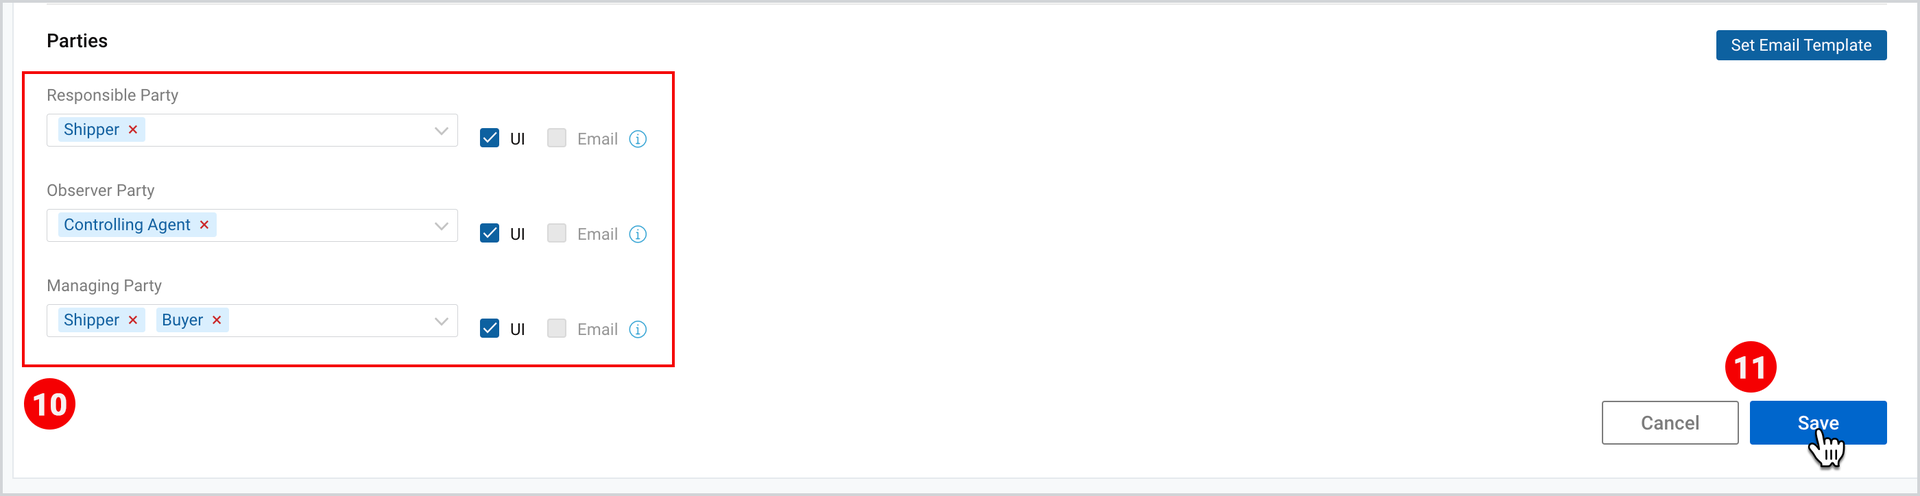
10. Scroll to the bottom of the page, and select the Responsible, Observer and the
Managing parties.
11. Click Save.
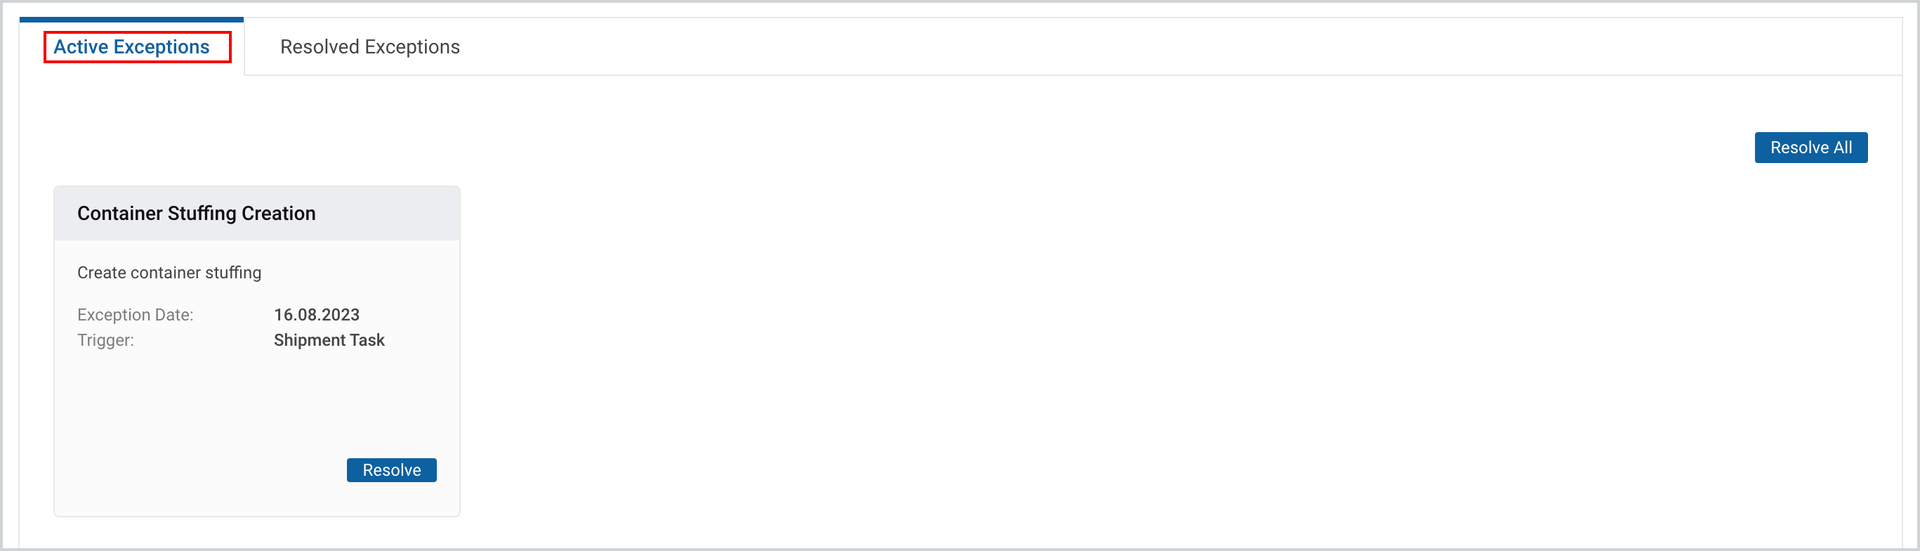
Assigned task and exceptions will be displayed at the bottom of the Track&Trace tab.
To download the print version of this article, click the PDF icon: