 Cargoo Support
Shipment Plan V2
Cargoo’s new enhanced delegation and booking tool (Shipment Plan V2) facilitates an easy and fast process of shipment planning - shipment creation, delegation and booking process.
Depending on your needs, planning process can be started in 3 ways:
- Planning for a particular order(s): for that purpose, start your journey at Orders module.
- Pre-booking, placing booking request without orders by defining main conditions: for that purpose, start your journey at Shipments module.
- You can receive delegated shipment to finalize carrier selection and submit booking request.
You can submit booking request on your own or instruct your partners by delegating shipment to them.
Regardless of starting point, instruction how to work with the tool are identical, so for all flows, refer to “Navigation in Shipment Plan V2” here. The only 2 differences for each option are:
- When you receive delegated shipments, some criteria and parameters will be defined without possibility to update them.
- When planning process starts from order(s), then most of parameters are pre-filled with possibility to modify them and you can finish planning process much faster.
Creation of a Shipment Plan without a Linked Order
You can create a shipment plan without a linked order from the Shipments module.
For the creation of a shipment plan:
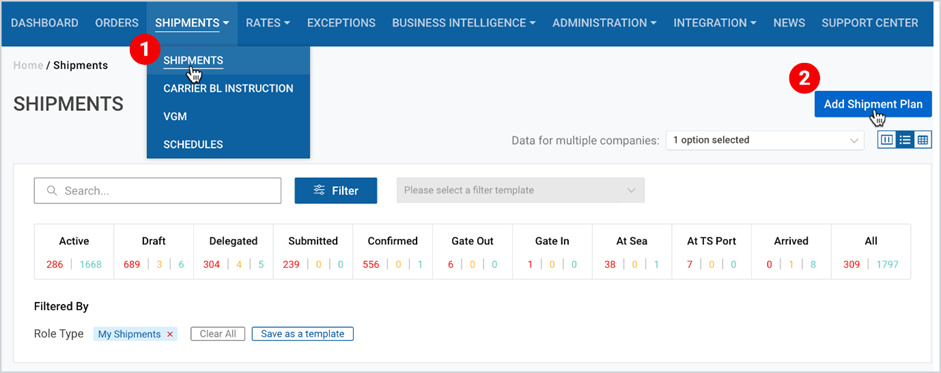
- Under Main Menu, click Shipments ->Shipments.
- At the upper right corner of the page, click Add Shipment Plan.
Creation of a Shipment Plan on Linked Order(s)
You can create a shipment plan by selecting one (single) or multiple orders from the Orders module.
For the creation of a shipment plan from a single order
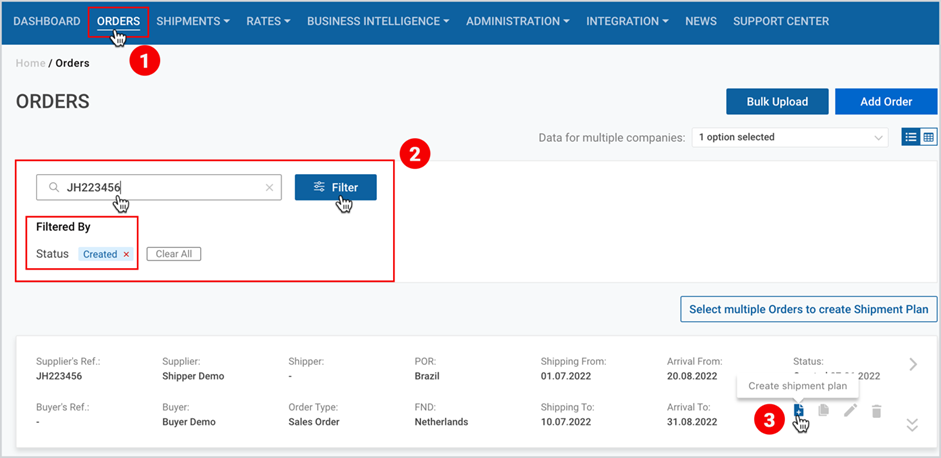
- Under Main Menu, click Orders.
- When the orders list page appears, find your order on the list, or search for a specific reference․
- As you find your desired order card, click “Create shipment plan” icon (the icon is available only to the order creator company, the booking agent, or Origin Handling Agent (OHA).
For the creation of a shipment plan from multiple orders
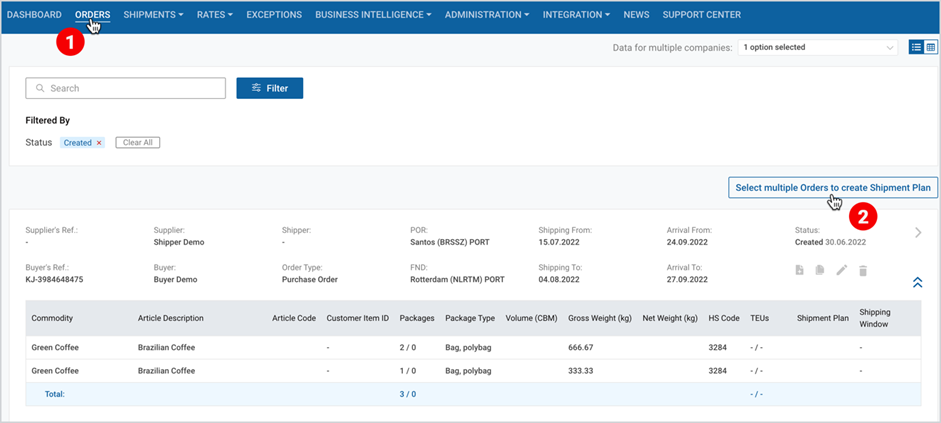
- Under Main Menu, click Orders․
- At the right side of the page, click Select multiple Orders to create Shipment Plan.
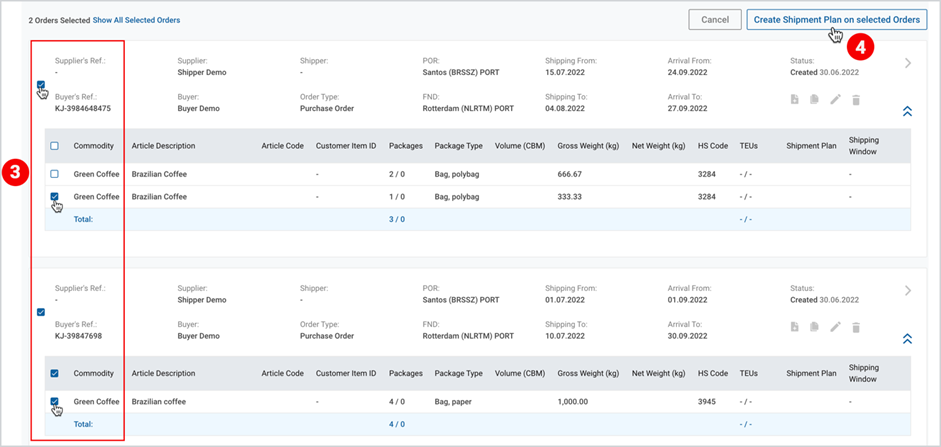
3. At the left side of the order card, select the checkboxes of the desired orders/order items (only open order items can be selected, i.e., the ones without an existing shipment plan for the whole quantity).
4. At the right side of the page, click Create Shipment Plan on selected Orders.
The remaining steps in the usage of the tool are identical to the process of “Creation of a Shipment Plan without a Linked Order’.
The only difference in the creation of a shipment plan based on the linked order(s) is that most of data are already pre-filled based on selected orders.
Navigation in Shipment Plan V2
The new tool (Shipment Plan V2) page includes the following tabs:
- Summary
- Booking Criteria
- Shipping Instructions and Parties
- Charges and Additional References
Summary
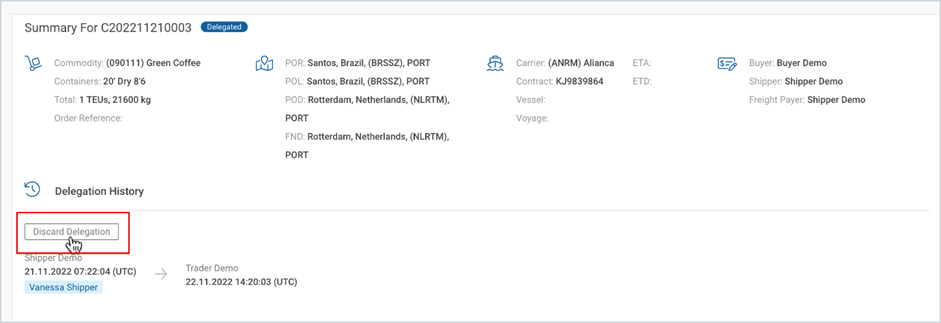
The Summary tab is read only summary of the shipment plan, always visible and represents the main information of the shipment plan. It dynamically changes along with modifying your shipment plan.
For the shipment plan in delegated status, there will be additional information: delegation history and option to discard delegation with optional possibility to provide reason for cancelling delegation.
Booking Criteria
In this tab, you decide if you would like to delegate shipment plan to you partner or book on your own. To proceed with any flow, you shall provide required and optional information based on which, Cargoo will propose options for the transportation: available contracts, rate, allocation and schedules. In case no suitable options are proposed, you can enter data manually.
You can check information to be filled on each field in Table 1, and the visualization is given in the following Figure.
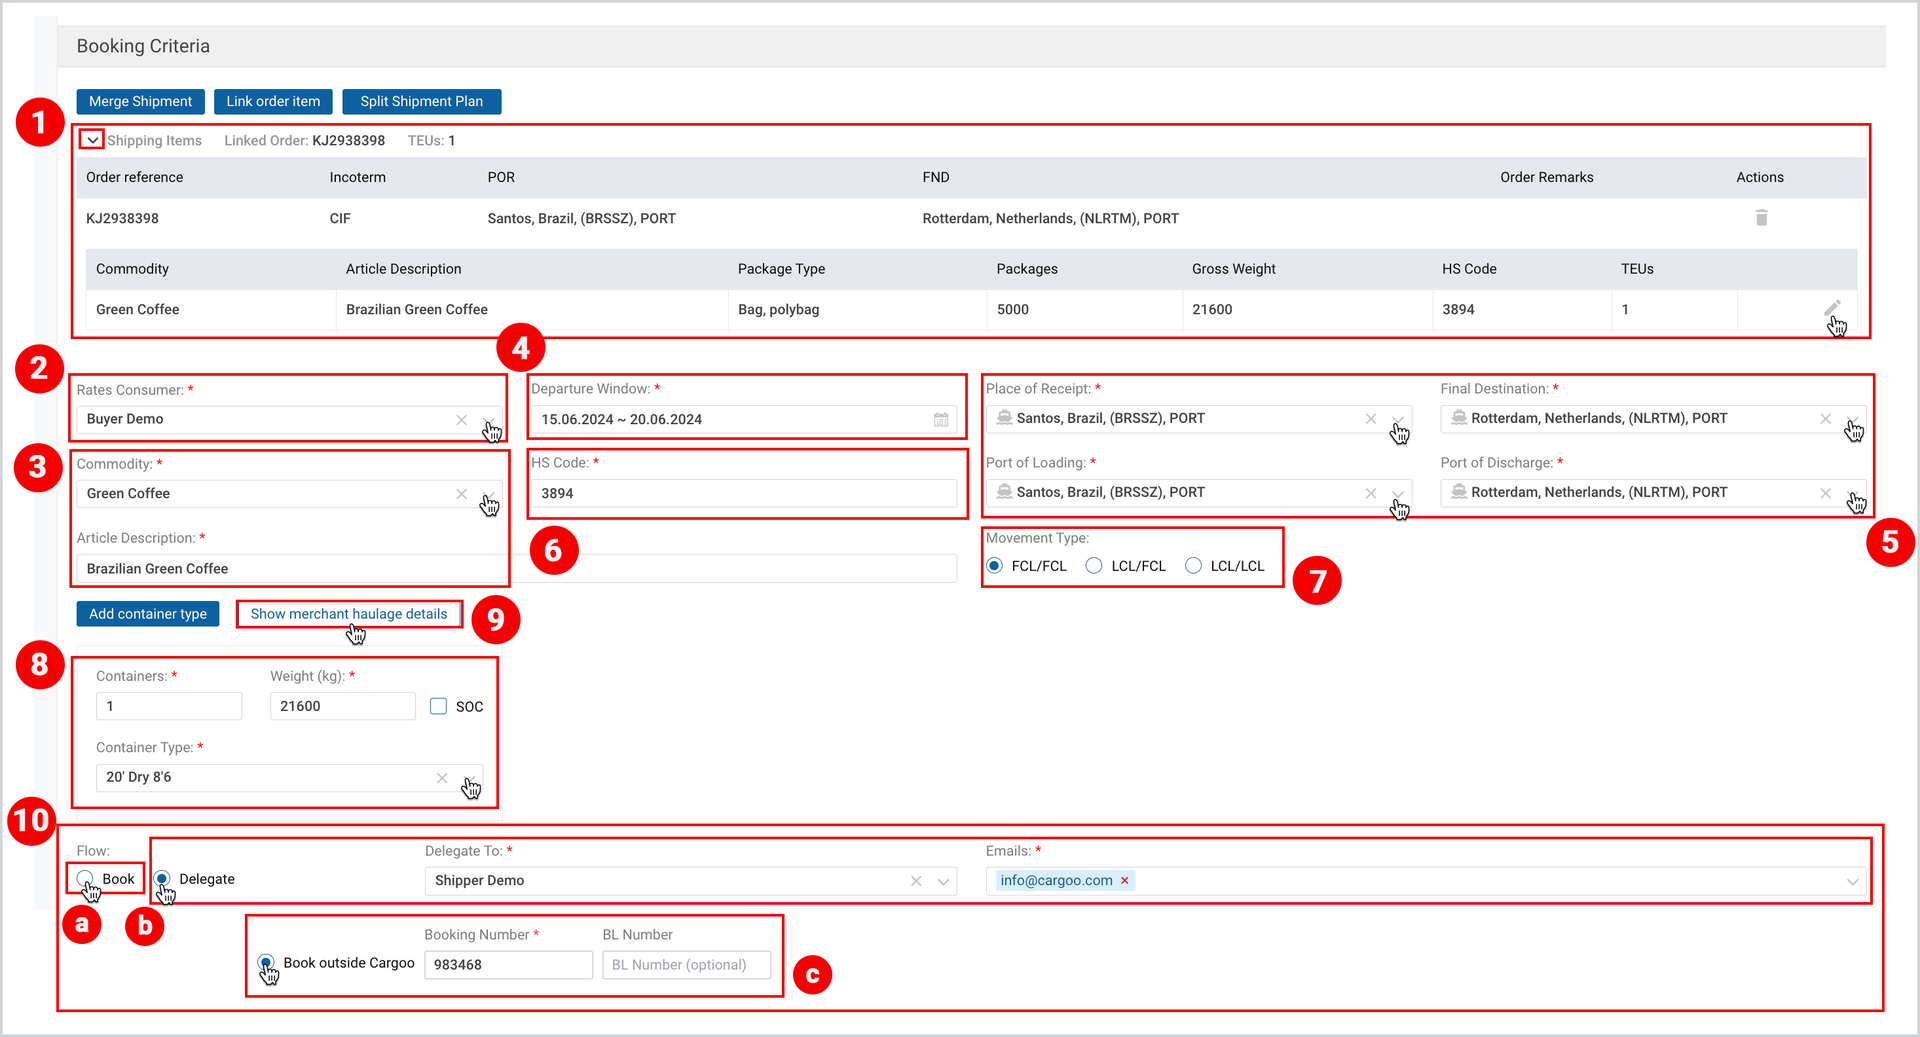
Table 1: Booking Criteria Fields
ITEM IN THE FIGURE ABOVE | FIELD | DESCRIPTION |
1. | Shipping Items | Visible only if shipment plan is linked to order(s). It’s expandable area where you can see and modify information about each shipping item form the order. |
2. | Rates Consumer | Rates Consumer allows you to select Business Partner whose shipment contracts you want to use instead of yours.
If you as a Shipment Creator, Origin Handling Agent or Booking Agent are involved in any Rate Group, then the logged in company name is pre-filled in Rate Consumer field, otherwise the shipment’s Buyer Business Partner name is pre- filled in Rate Consumer field. If there is no buyer’s contract either, the contract should be provided manually.
The rate consumer will be disabled for the further delegated parties, and the selected rate consumer will be automatically transmitted to the next delegated parties. |
3. | Commodity and Article Description | Commodity and Short Description of goods to be shipped. In case shipment plan is linked to order(s), these fields will be pre- filled with order information. |
4. | Departure Window | Time range when goods to be shipped. In case shipment plan is linked to order(s) these fields will be pre-filled with order information. |
5. | Locations | If Place of Receipt and Final Destination are ports, then Port of Loading and Port of Discharge are automatically filled in with the same port names. |
6. | HS Code | In the Submission Flow, in case of shipments from Brazil (POR or POL is in Brazil), it is required to fill in the HS code; otherwise,while sending the booking request to the carrier, the system will generate an error message at the upper-right part of the page. |
7. | Movement Type | The movement type is by default set as FCL/FCL by the system, however you can edit it manually. |
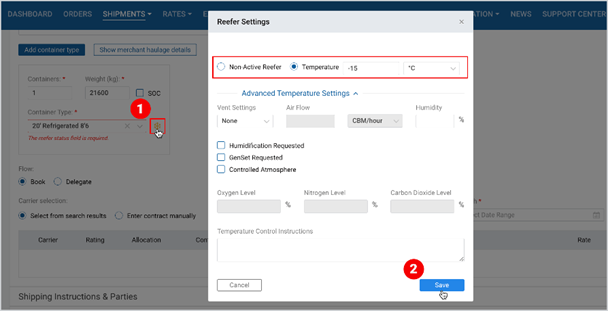
8. | Containers | Under Containers you should fill in the number of containers, the container type and the cargo weight. If you request multiple containers of the same type, then in weight fields enter total weight for all containers. In case the refrigerated container type is selected, you will have to manage the refer container settings. For this action
 |
9. | Haulage Instructions at Origin | Optionally while filling in the container details, you can fill in the haulage details. Based on selected locations, system automatically defines haulage type at origin (merchant or carrier) For this action click on “Show haulage details” |
10. | Flow Selection | Under flow click Book, Delegate to, or Book outside Cargoo.
|
Booking Flow - Booking Outside Cargoo
Step 1. Navigate to the Shipment Plan
SHIPMENTS > Shipments > Select shipment > Open Shipment Plan
Step 2: Select Your Booking Flow
At the start of the booking process, you now need to choose whether to Book via Cargoo (system submission), Delegate and Book Outside Cargoo (manual booking).

For Book via Cargoo: Submit your booking as usual.
For Delegate: Delegate your booking as usual.
For Book Outside Cargoo: Input shipment information manually.
Note: If the user does not have CRT, Booking Agent, or Origin Handling Agent role assigned, only Delegate and Book via Cargoo options will be available.
Step 3: Add booking details for a shipment booked outside Cargoo
For users selecting Book Outside Cargoo, the system will prompt them to select between two statuses:
Submitted: A booking placed outside Cargoo but not yet confirmed by the carrier.
Confirmed: A shipment booked outside Cargoo and confirmed by the carrier.
Step 4: Complete the Booking
Option 1: Submitted Booking
- Enter ETD (required), ETA (optional), Booking Number (optional) and BL Number (optional)
- The system allows users to work with a Cargoo contract for submitted bookings.
- If allowed by the organization, users can enter the contract manually under Carrier Selection. The following fields will be required:
- Carrier Name (selected from a drop-down menu)
- Contract Number (entered manually)
- ETD
- ETD and ETA can be set by selecting schedules provided in Cargoo (preferred option) or specify date manually when Cargoo has no information about schedules.
- Optional fields include Contract Validity, ETA, Vessel, and Voyage.
Option 2: Confirmed Booking
- Enter Booking Number (required), BL Number (optional), ETD (required), and ETA (required).
- ETD and ETA can be set by selecting schedules provided in Cargoo (preferred option) or specify date manually in case Cargoo has no information about schedules.
Step 5: Submit Outside Cargoo
If booking outside Cargoo, users will need to confirm the shipment manually. A pop-up reminder will inform the user that no booking request will be sent to the carrier and that they are responsible for providing the Booking Number of Confirmed Bookings to enjoy updated tracking information.
Important Considerations
- Role-Based Restrictions: Users who are not CRT, Booking Agent (BA), or Origin Handling Agent (OHA) will only see the Delegate and Book via Cargoo options.
- Past Bookings: You can add a booking to the system even if the shipping window is in the past. However, schedule options won’t appear for bookings with past shipping windows.
- Tracking Responsibility: Users who choose Book Outside Cargoo must manually enter booking confirmation details in Cargoo. Once a Booking Number is added, the system will automatically update the booking status and dates.
- Amending Confirmed Shipments: Booking amendments can only be made in the system for shipments that were booked via Cargoo.
Carrier Selection
While selecting a carrier, you can pick options proposed by Cargoo (default option), add a new carrier contract manually; continue with any carrier (only in delegate flow); or without carrier selection (only delegate flow).
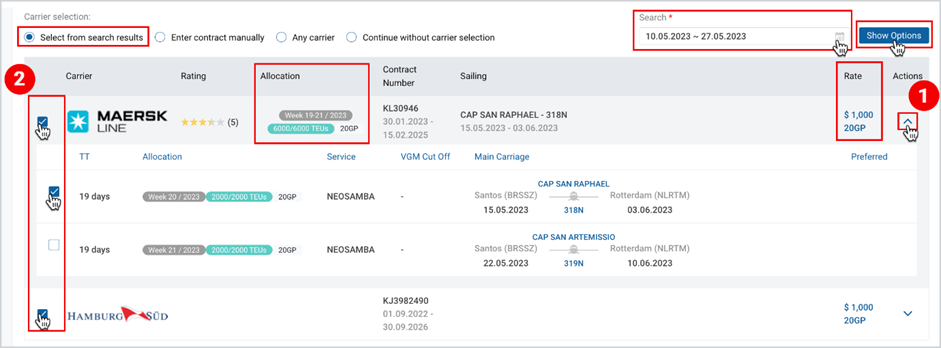
Search dates are by default equal to Departure Window. Upon necessity, you can search for options beyond requested Departure Window. In case you change Search dates or any booking criteria, you shall click “Show Options” (see the Figure here) to see updated results.
Note |
|
Select Existing Carrier Contract from Search Results
At this step, the system will suggest the available carrier contracts matching with booking criteria you specified at the beginning. Depending on configurations you can see:
- Carrier ratings
- Allocation (see the Figure here)
- Rate (You can see detailed rate breakdown by clicking on Rate) (see the Figure here)
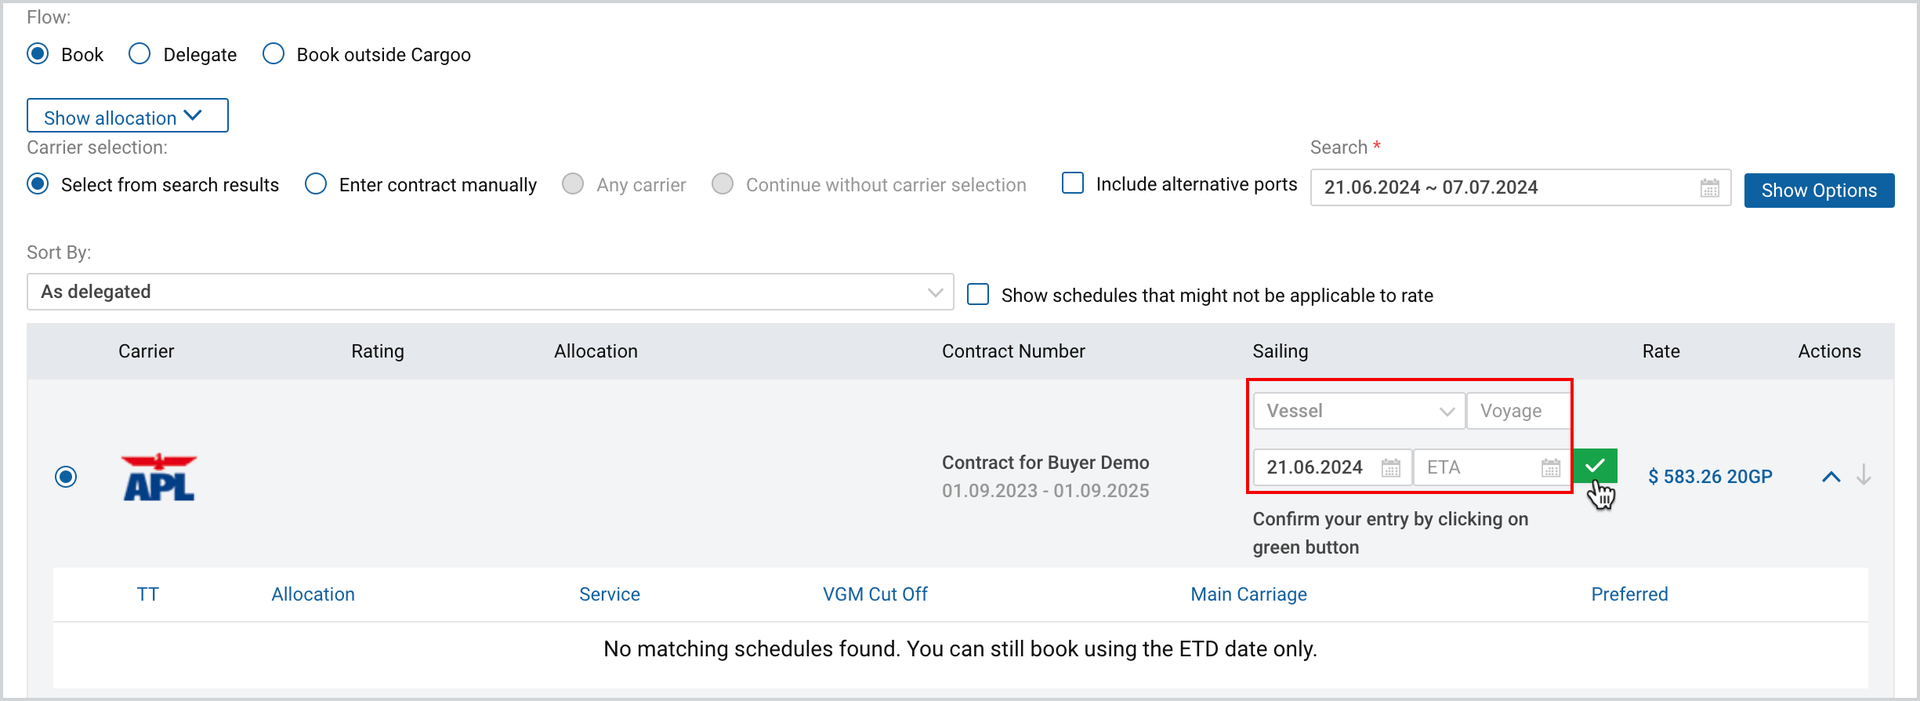
To see and select available schedules
- Click on “expand” icon
- From the drop-down menu select the desired carrier(s) and the schedule(s).
Sometimes, the system can provide a carrier without shipment schedule options. In this case, only in book flow, you have to provide ETD (required), vessel and voyage information. In the delegation flow, you can continue without filling in the ETD.
Enter Contract Manually
This option is used if no carrier contract is available on the carrier contracts list as per the set parameters, or the shipment plan creator wants to add a new carrier contract and use it while submitting the booking request. You cannot at the same time select a carrier from the suggested list and add a carrier manually. Either of the selection will be dropped.
Note | In case of the “Delegate” flow, this option will be available to the delegated party only if it is enabled for shipment creator party. Thus, clients can decide if they prefer to give such options to their business partners. |
To add a carrier contract:
- Click Enter Contract Manually
- From the drop-down menu select the desired carrier.
- Type in the Contract number (required field).
- In case of booking flow and no schedules shown by the system, you are requested to provide at least ETD.
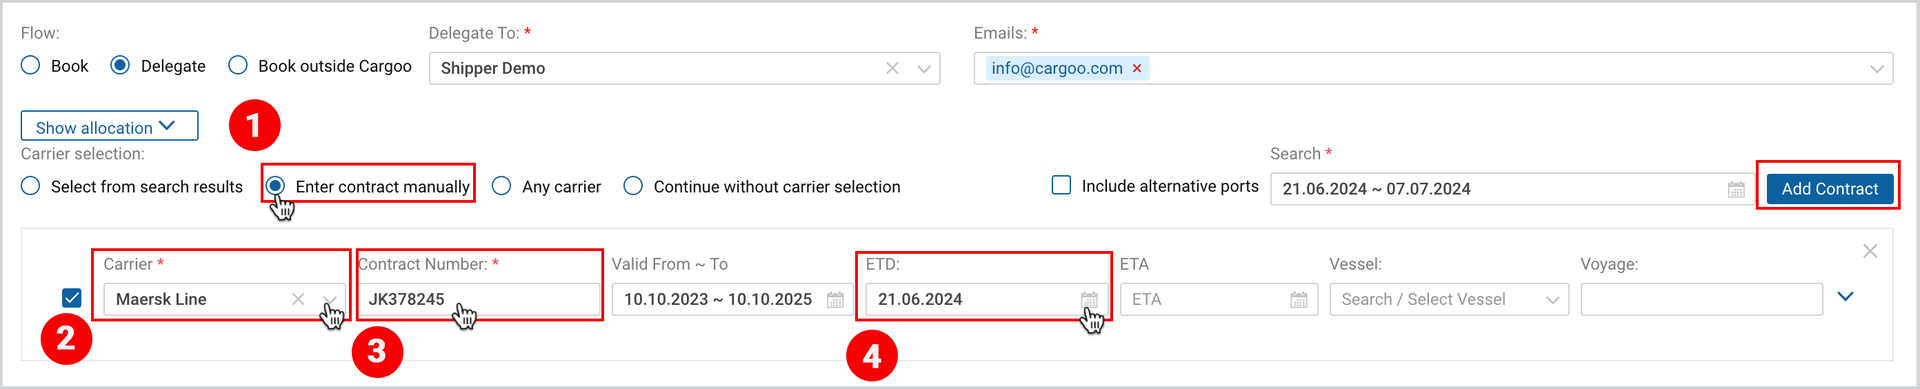
Note | The carrier selection options for Book outside Cargoo flow are the same as in the Book flow, except, if you select Enter Contract Manually, you have to provide ETA as well. |
Any Carrier (Only Delegate Flow)
If you as a delegating/shipment creator party do not want to select specific contract(s) you have a possibility to proceed with Any Carrier option. In this case the next delegated party will see all the available/valid contracts as per pre-set criteria and the rate consumer. The delegated party is able to select contract(s) at his discretion or can again select the Any Carrier option to delegate to the next party. The delegated party can further select from the list of contracts that are available for shipment creator party (not their own contracts) and can again select the Any Carrier option to delegate to the next party.
To proceed with this option:
- Under the suggested Carrier selection options, select Any Carrier.

Continue without Carrier Selection
The shipment creator can delegate shipment plan using the option “Continue without Carrier selection”, which is being used when at the point of creation/delegation Creator either does not have an active contract yet or wants to come back and select alternative contracts at the later stage.
To proceed with this option
- Under the suggested Carrier selection options, select the Continue without carrier selection.

Once carrier selection is completed, expand tab “Shipping Instructions and Parties”.
Shipping Instructions and Parties
In this tab you can define the following details:
- Parties (manually or apply template)
- Requested Documents (manually or apply template)
- Instructions to shipper (manually or apply template)
- Booking Contact and emails for Shipment updates
The details of the tab are given in Table 2 below and the visualization - in the following Figure.
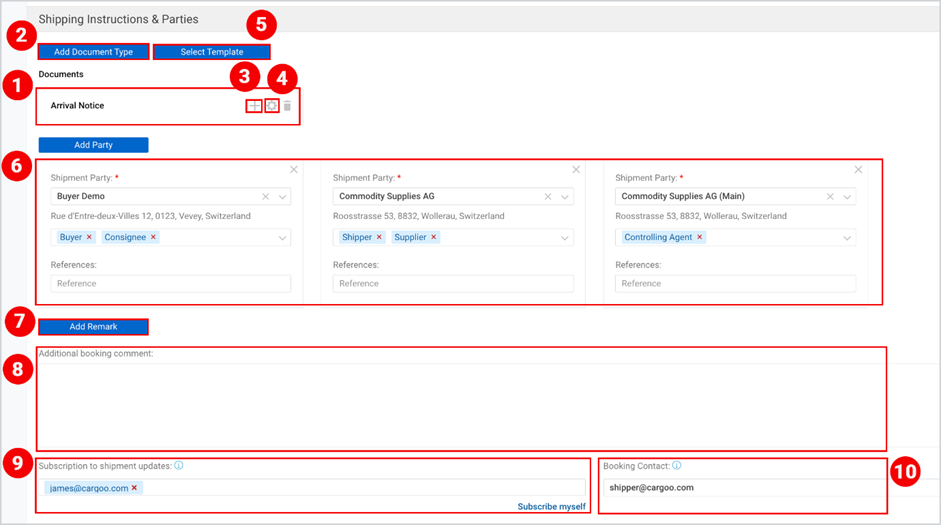
Table 2: Shipping Instructions and Parties Fields
FIELD | DESCRIPTION (numbers are taken from Figure above ) |
Documents (1) | At this step you can set optional and required shipment documents. You can either attach your documents one by one (2) or apply a template (5) (GSI document based on the company setup from the GSI section of the Administration module, where you can define documents and parties). The same document cannot be added twice.
|
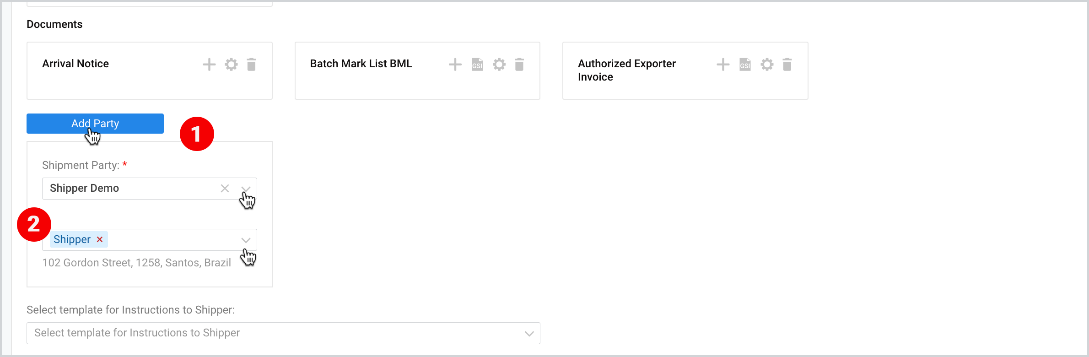
Parties | At this step you are asked to define parties for shipment plan (parties list can be modified at later stages of shipment as well).
For this action
Optionally you can enter shipment reference that will help the party link Cargoo shipment plan with references in their IT-systems.
In the Book Flow booking request can be submitted only by Shippers or Booking Agents, so at least one of these parties must be set. |
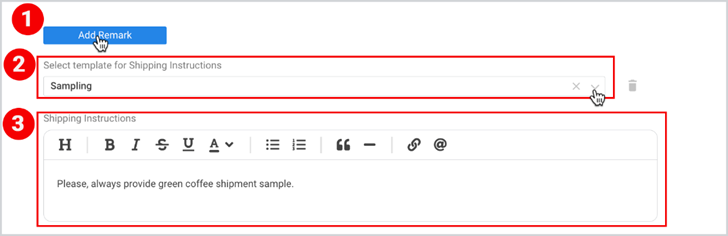
Add Remark | Optional field (7), where you can select multiple remarks (to be submitted to the shipper) from the following available remark types:
For each remark type, you can leave a comment as a free text, or use the available templates, that are pre-set as per each remark type by the org or company admin from the Remarks feature of the Administration module. For this action:
|
Additional Booking Comment | Optional field, any comments that you would like to send to the carrier (available only for “book” flow)
|
Booking Contact | Pre-filled with current user email address (may be adjusted upon need) and available only for “book” flow. This is the address that will be used for all e-mail communication with the carrier, and booking confirmations or rejections will be sent to it. |
Subscription to Shipment Updates | Subscribed users receive the following notification types from Cargoo when:
|
Charges and Additional References
In this tab you select Incoterm, additional terminal charges (based on Incoterm), and leave additional comments. The details of the tab are given in Table 3 below and the visualization - in the following Figure.
Table 3: Charges and Additional References Fields
ITEM IN THE FIGURE ABOVE | FIELD | DESCRIPTION |
1. | Incoterms | Incoterms 2020. |
2. | Charges | Based on selected Incoterm, the system defines charge types and default parties (editable) responsible for the following charges:
For each charge you shall define payment terms
and select party responsible to pay the charges. |
3. | Comments | You can communicate with parties in the shipment plan. You can message privately your business partner or specific user by tagging them with “@” sign or leave comments available for all parties of the shipment plan. |
Once you have filled in all the required data,
- Save the captured data for further completion.
- For Book flow, click Book Shipment.
- For Delegate flow, click Delegate Shipment.
- For Book outside Cargoo flow, click Confirm Shipment. In this case, no booking request will be sent out to the carrier, it will only be manually updated on Cargoo with status “Confirmed”. The booking party is responsible for the data in Cargoo (Track & Trace, including booking updates, container events, etc.).
To download the print version of this article, click the PDF icon: