 Cargoo Support
Carrier Contracts
Carrier Contracts module is a tool for managing Carrier Contracts (CC) in the system. There are two types of carrier contracts – Purchase Contracts and Sales Contracts. Purchase Contracts define the terms and conditions between a carrier and a company, while Sales Contracts are those purchase contracts that are shared with different customers, combined in rate groups (see Rate Groups Setup). In other words, in Sales Contracts, the company acts as an intermediary seller of its Purchase Contract.
To access the module:
- Under Rates, click Carrier Contracts.
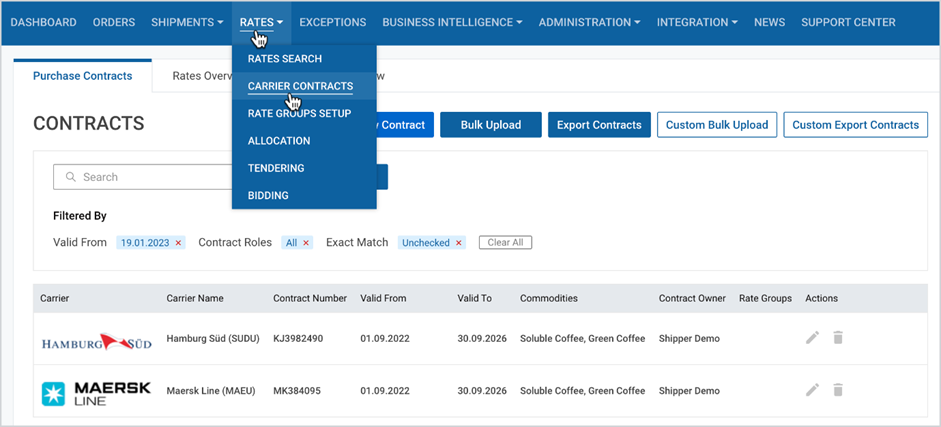
Carrier Contracts List
As you click on the Carrier Contracts under Rates module you can see the list of all your carrier contracts.
The page displays the following features through which you can access specific contracts:
- Search
- Filter
Search Your Contract
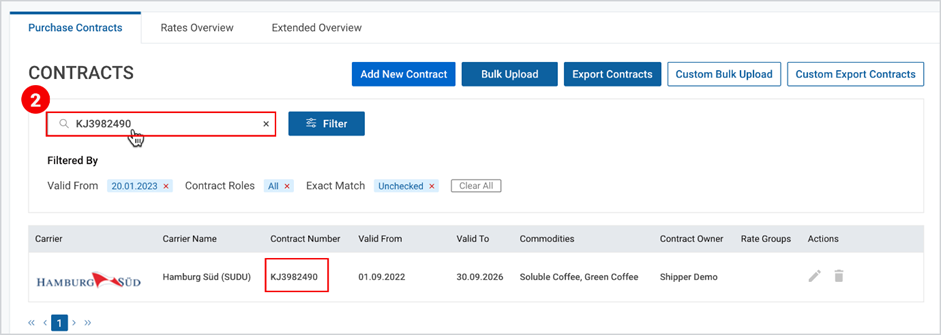
Search can be done by carrier name or contract number. Search starts working from the first typed character with the drop-down showing the suggested list.
To search for your desired contract
- Take the step, shown in the Figure here.
- At the upper-left corner of the page, in the Search field, fill in the contract number or carrier name.
Filter Your Contract
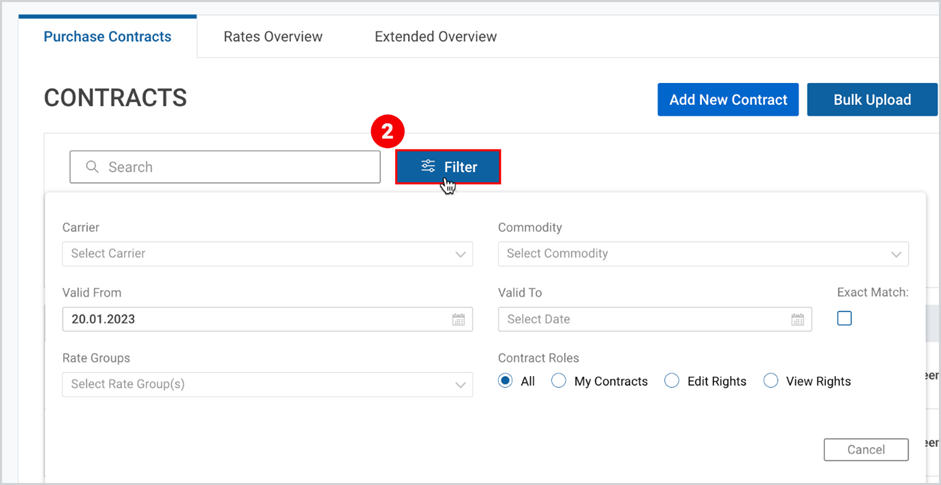
To filter your desired contract
- Take the step, shown in the Figure here.
- At the upper-left corner of the appeared page, next to the Search field, click Filter and set the desired criteria.
Edit or Remove the Desired Contract
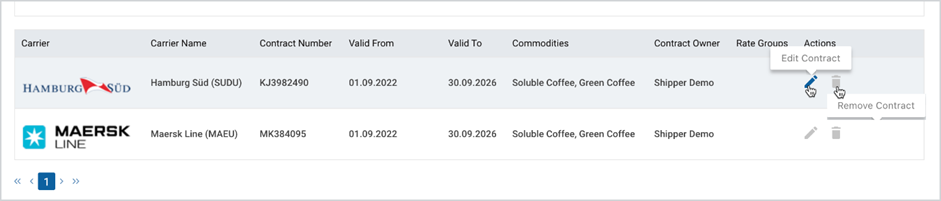
At the right part of each contract, there are two clickable icons:
- Edit Contract – by clicking you will be redirected to the Edit Contract page to make the required changes (see Table 1, Item 8).
- Remove Contract – by clicking you confirm your decision in the appeared pop-up window (see Table 1, Item 8).
Note | In case the removal is confirmed the checking is done for the links to Rate Groups (sales contracts).
|
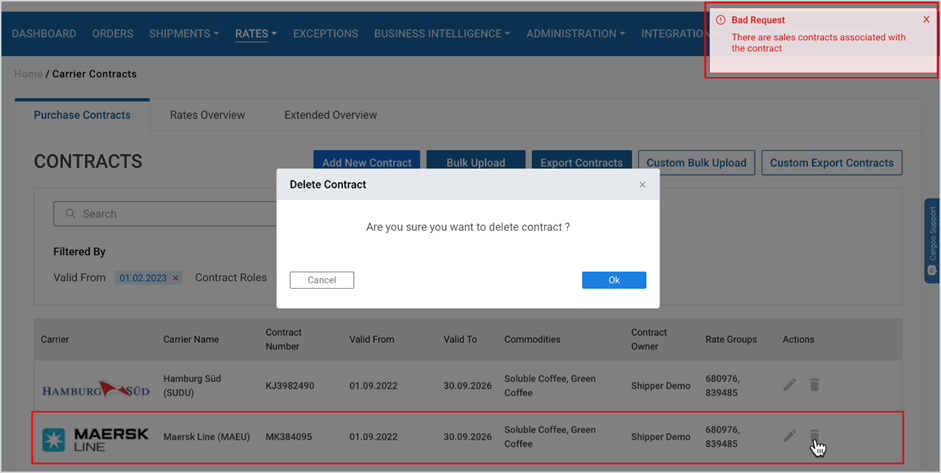
The Carrier Contracts page is comprised of the following tabs:
- Purchase Contract
- Rates Overview
- Extended Overview
Purchase Contract
This feature allows you to add purchase contracts both through Cargoo interface or bulk upload them into the system.
Bulk Upload Contract
If you do not want to create a purchase contract manually through your Cargoo account, you may bulk upload all your carrier contracts. In this case you fill in the already downloaded excel file and upload it into the Cargoo system.
To bulk upload your contracts
- Take the step shown in the Figure here.
- Next to Add New Contract, click Bulk Upload.
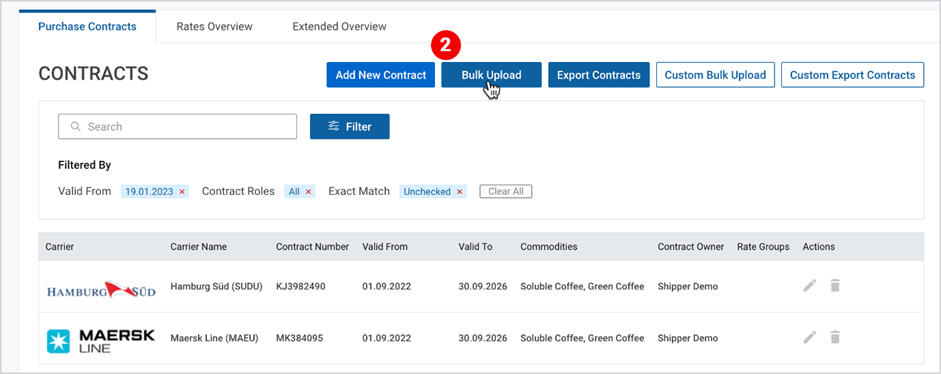
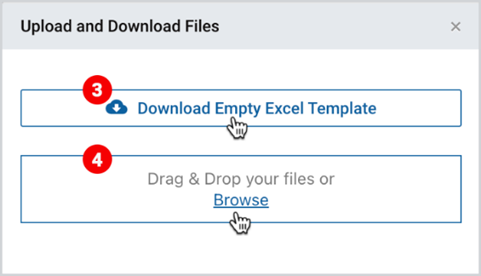
3. As the popup window appears, click Download Empty Excel Template.
4. After filling in your contract details, Drag and Drop your files or Browse.
Note | As you upload an excel file, in case any of the fields is incorrectly completed, an “Error Results Table” appears, where all errors are displayed and need to be amended. |
Custom Bulk Upload
Custom Bulk Upload includes Purchase Contract creation with linkage to the Rate Groups and Sales Contract Conditions. For details, see Rate Groups Setup.
Add New Contract via Cargoo Interface
To start the creation of a purchase contract through the Cargoo interface, you have to take the following steps:
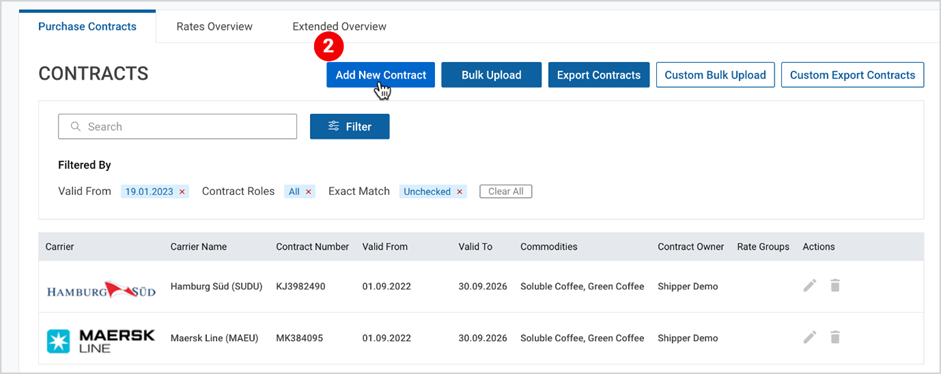
- Take the step shown in the Figure here.
- Click Add New Contract.
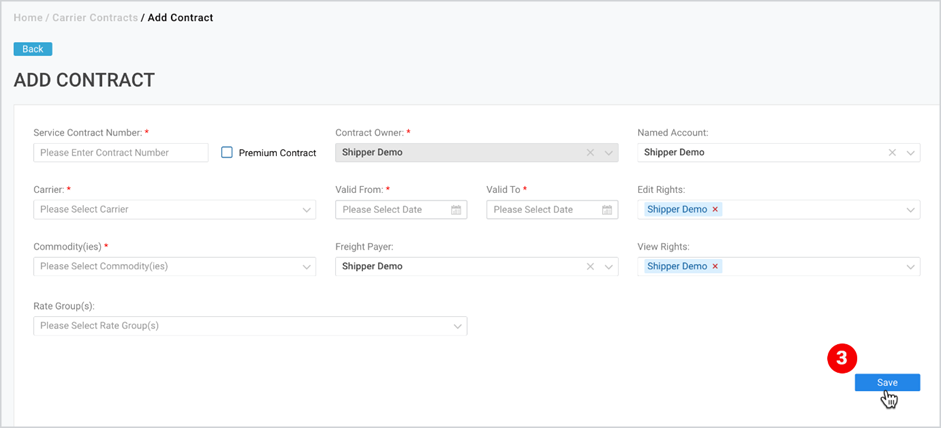
3. As the Add Contract page appears, fill in the required/optional details, described
in the Contract Structure below, and then click Save.
Contract Structure
After clicking the Add Contract button, you are redirected to the Add Contract page, where you have to fill in the required and optional information, given in Table 1 and visualized in the figure below.
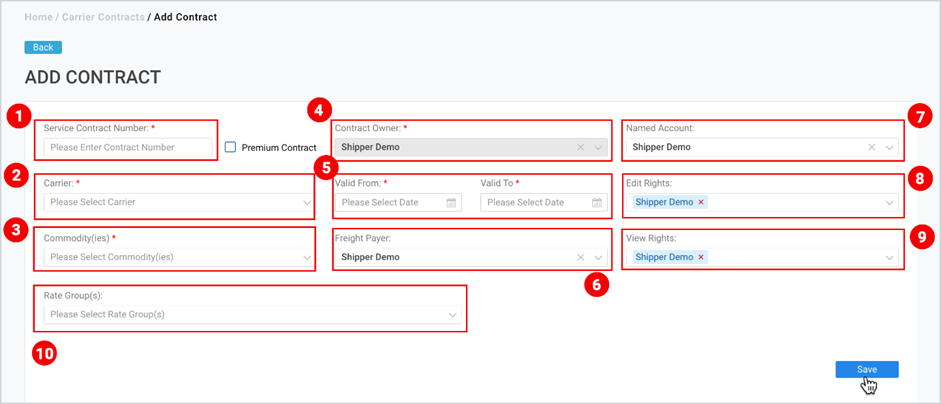
Table 1: Contract Structure
ITEM IN THE FIGURE ABOVE | FIELD | DESCRIPTION |
1. | Service Contract Number | Fill in the contract number (max 50 characters) |
2. | Carrier | Select a Carrier from the single-select dropdown list. |
3. | Commodity(ies) | Select commodity(s) set for your company from the multiselect drop-down list. |
4. | Contract Owner | Current company name is prefilled by default (non-editable) |
5. | Validity | Fill in the validity period of the contract. Dates can be selected in the past, and “Valid to” and “Valid from” dates can be the same, i.e. one-day contract. |
6. | Freight Payer | Select from the list of linked Business Partners from the single-select dropdown. Current company is pre-selected. |
7. | Named Account (optional) | Select from the list of linked Business Partners from the single- select dropdown. Current company is pre-selected. |
8. | Edit Rights (optional) | Select from the list of linked Business Partners from the single-select dropdown. Current company is pre-selected. The selected BPs can edit, remove and export the CC. |
9. | View Rights (optional) | Select from the list of linked Business Partners from the single- select dropdown. Current company is pre-selected. can view, export but cannot edit or remove the CC. |
10 | Rate Groups | Select rate groups from multi-select searchable dropdown (see Rate Groups Setup). |
Note | A duplicity check is in place. The saved Contract can be edited, except commodities fields. It is visible in read-only mode. Regarding validity, if you choose to edit it, it will affect Ocean Freights, Free Time and Additional Charges and Allocation. |
Note | While editing or adding a new Contract, if either of the first 5 fields is added/updated with the values that match with the already existing contract, then the contract cannot be saved, and an error message will appear at the upper right corner of the page. |
As you click Save, the following three sub-tabs will appear under the saved contract, that are its structural components.
- Ocean Freight
- Free Time
- Additional Charges
Ocean Freight
Ocean Freight is the main (base) charge of the Purchase Contract.
It can be added via Cargoo interface or bulk upload (excel file format is supported).
Bulk Upload Ocean Freight
Bulk upload function is available for creation of multiple Ocean Freights instead of creating them one by one. In this case you fill in the already downloaded excel file and upload it into the Cargoo system.
To bulk upload the ocean freight
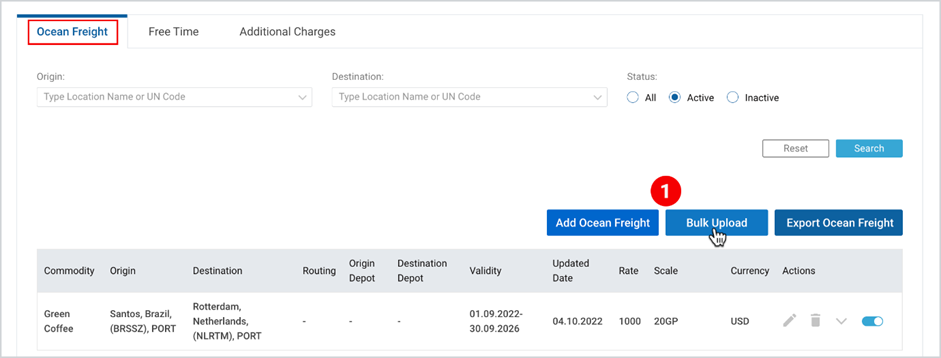
- Under your saved contract, in Ocean Freight tab, click Bulk Upload.
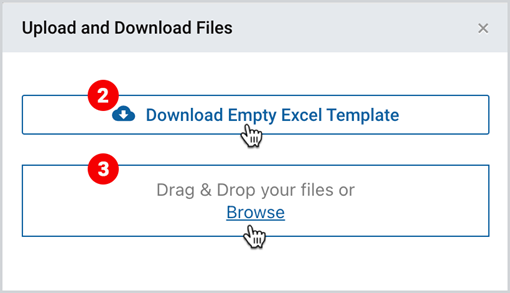
2. As the popup window appears, click Download Empty Excel Template.
3. After filling in your ocean freight details, Drag and Drop your files or Browse.
Note | As you upload an excel file, in case any of the fields is incorrectly completed, an “Error Results Table” appears, where all errors are displayed and need to be amended. |
Add Ocean Freight via Cargoo Interface
To start the creation of ocean freight via Cargoo interface
- Under your saved contract, in Ocean Freight tab, click Add Ocean Freight.
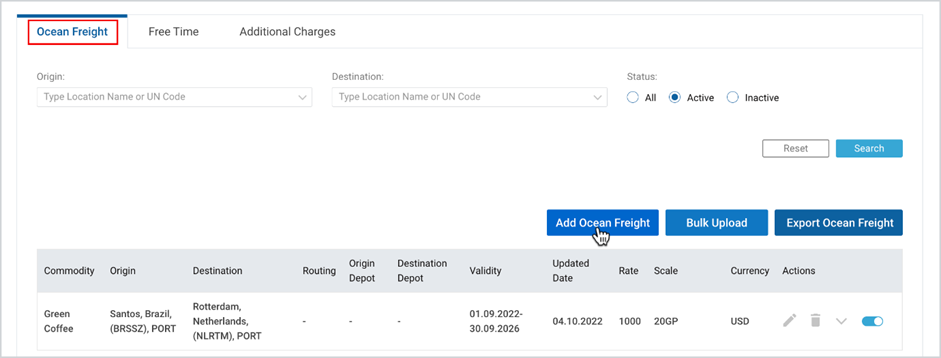
You can check information to be filled on ocean freight through the Cargoo interface in Table 2 and the visualization is given in the Figure below.
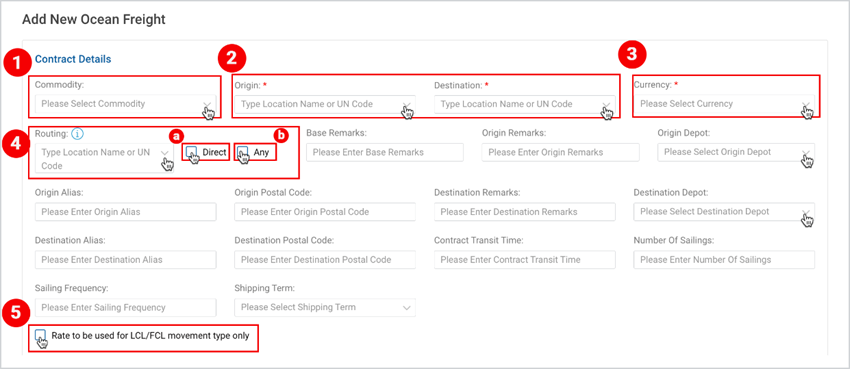 |
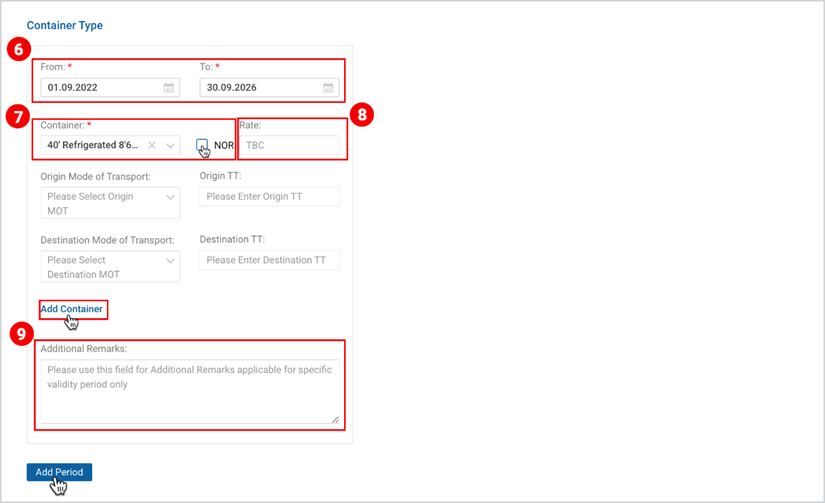 |
Table 2: Ocean Freight Details
ITEM IN THE FIGURE ABOVE | FIELD | DESCRIPTION |
CONTRACT DETAILS | ||
1. | Commodity | This is an optional field, and if no commodity is selected, All commodities are selected by default and appear in the related row. |
2. | Locations | Single-select searchable dropdown, where you have to type the origin and destination - location names or UN code. |
3. | Currency | Select from the list of currencies. |
4. | Routing | Here you have to type in location name or UN code. If you select “Direct” (a) checkbox, the system will save the Routing field as direct option. However, it is not possible to set Direct routing in case Origin or Destination type is DOOR.
If one or multiple locations are selected as Transshipments, there is a possibility to configure if the ocean freight rate imposes strictly mentioned transshipment locations only, or the carrier transport plan can be flexible enough just to contain the selected locations, not excluding other stops not indicated in the ocean freight rate. This flexibility can be achieved by selecting “Any” (b) checkbox. |
5. | Rate to be used for LCL/FCL movement type only (checkbox) | If selected, the added/edited Ocean Freight is set to be used for LCL/FCL movement type only.
|
Other fields | Other fields that are optional to fill in are the following:
| |
CONTAINER TYPE | ||
6. | Time period |
|
7. | Container | Select the container type from the single select searchable dropdown. In case refrigerated container is selected, NOR (Non Operating Reefer) checkbox will appear, when selected refrigeration unit will be turned off. |
8. | Rate | Type in the rate/amount of the ocean freight. |
9. | Additional Remarks | This field is applicable only for specific validity period only, so that it can be possible to display those specific remarks per validity in Rate Search in addition to a general base remarks (if exists). Grouping of additional remarks is done in accordance with the validity period, so if different remarks are added for the same validity period but for different container types, an “Error Results Table’ (after Excel upload) appears, where all errors are displayed and need to be amended. |
Other fields | Select from the single-select drop down menu
| |
Tip | Do not forget to Save the input data by clicking the Save icon at the lower right corner of the page. |
Access Ocean Freight
You can access the desired ocean freight from the list by filtering via
- Origin
- Destination
- Status – All, active inactive
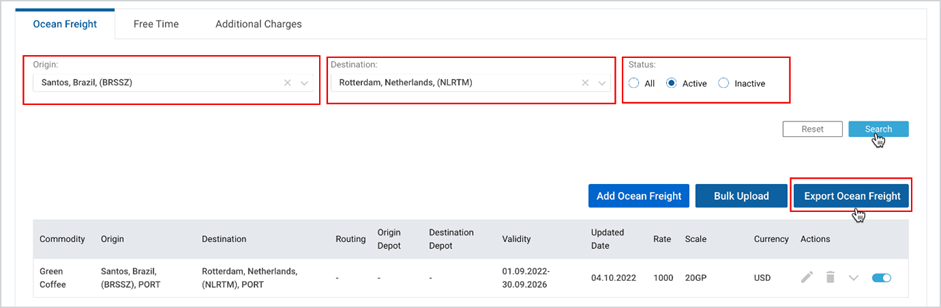
In case you want to have all the list of ocean freights at hand, you can click Export Ocean Freight to download it in excel format (see the Figure above).
Manage Ocean Freight
You can manage each Ocean Freight by editing, removing, deactivating/activating it.
To edit an ocean freight
- At the right part of the desired ocean freight, and under Actions, click Edit icon and make the required changes (see Figure below).
To remove an ocean freight
- At the right part of the desired ocean freight, and under Actions, click Remove icon and confirm your decision (see Figure below).
To deactivate an ocean freight
- At the right part of the desired ocean freight, and under Actions, click Deactivate toggle (see Figure below).

To activate the ocean freight back
- Filter the list via status inactive (see the Figure here) and click on the “activate” toggle.
Free Time
Free Time is one of the charges (Ocean Freight, Free Time and Additional Charges) of the Purchase Contract. It can be added via Cargoo interface or bulk upload (excel file format is supported).
Bulk Upload Free Time
Bulk upload function is available for creation of multiple free times instead of creation one by one. In this case you fill in the already downloaded excel file and upload it into the Cargoo system.
To bulk upload free time(s)
- Under your saved contract, in Free Time tab, click Bulk Upload.
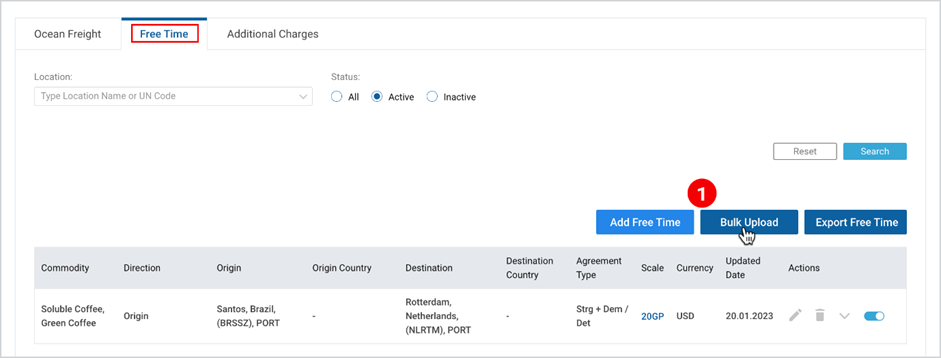
2. As the popup window appears, click Download Empty Excel Template.
3. After filling in your ocean freight details, Drag and Drop your files or Browse.
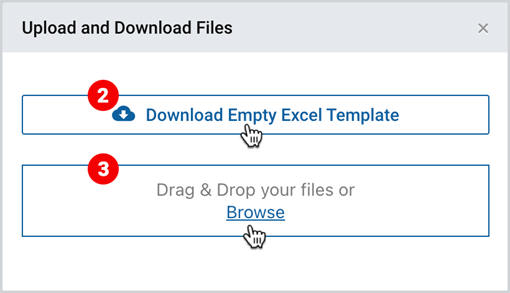
Note | As you upload an excel file, in case any of the fields is incorrectly completed, an “Error Results Table” appears, where all errors are displayed and need to be amended. |
Add Free Time via Cargoo Interface
To start the Free Time creation process via Cargoo interface
- Under your saved contract, in Free Time tab, click Add Free Time.
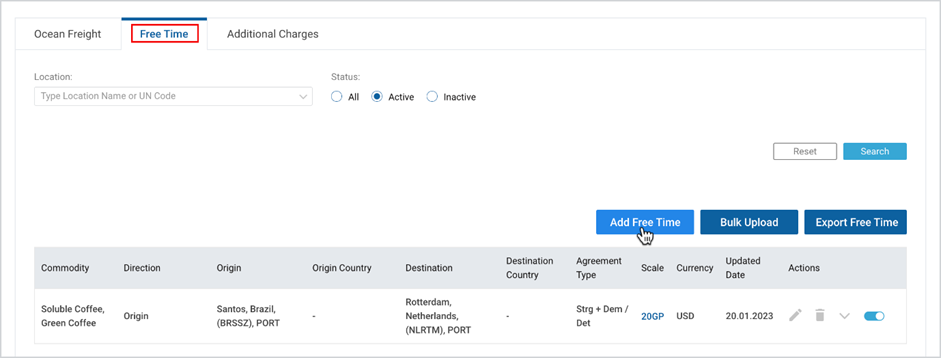
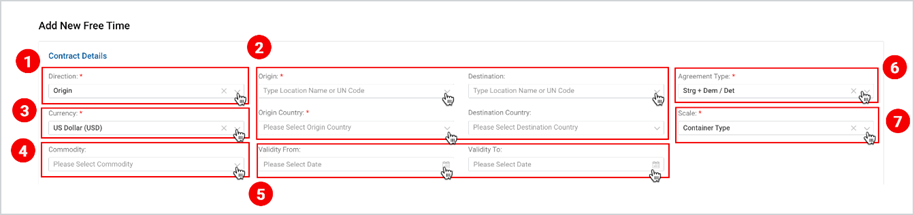
You can check information to be filled on free time through the Cargoo interface in Table 3 and the visualization is given in Figure below.
 |
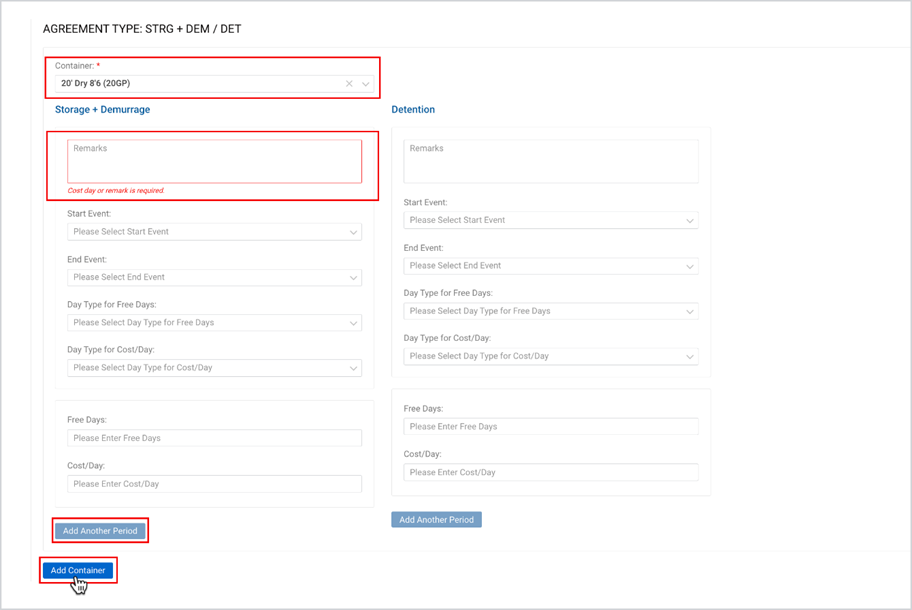 |
Table 3: Free Time Details
ITEM IN FIGURE ABOVE | Field | description |
1. | Direction | Select either of the following directions from single-select searchable drop-down
|
2. | Locations | Select locations, including
|
3. | Currency | Select currency from the searchable drop-down (single-select). |
4. | Commodity(ies) | Select commodity from searchable drop-down (single-select). If no commodity is selected All commodities are selected by default and appear in table' related row. |
5. | Validity | Validity Period (dates can be selected in the past, and “Valid to” and “Valid from” dates can be the same, i.e. one-day contract). |
6. | Agreement Type | Select one of the following agreement types from the searchable drop-down list
Depending on the selected Agreement Type, from 1 to 3 embedded windows appear to fill in the information. If any of the charges are combined a single window appears for them.
Regardless of the selected agreement type all windows contain the same fields. In all windows, only Remarks is a required field, where you need to mention cost day or leave a remark. |
7. | Scale | Select the scale from the searchable drop-down (single-select)
In case the container type is selected, in the appeared embedded windows (agreement type selection), you have to select the container type as well. In addition, you have the opportunity to add a new container and fill in the desired information for that container. |
Tip | Do not forget to Save the input data by clicking the Save icon at the lower right corner of the page. |
Access Free Time
You can access the desired free tine from the list by filtering via
- Location
- Status – All, active inactive
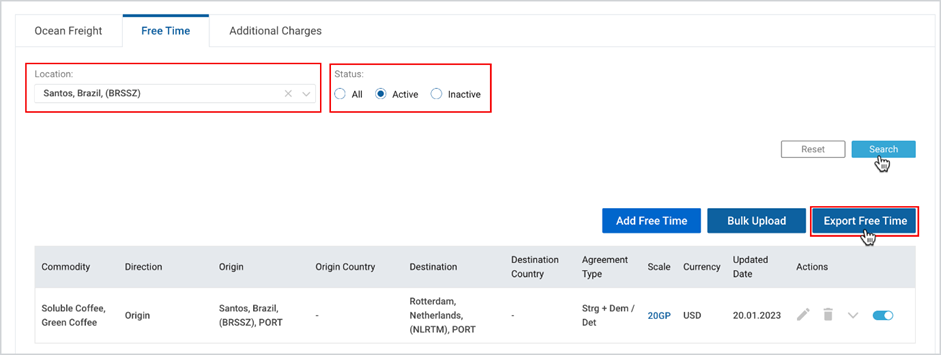
In case you want to have all the list of free times at hand, you can click Export Free Time to download it in excel format (see Figure above).
Manage Free Time
You can manage each Free Time by editing, removing, deactivating/activating it.
To edit and ocean freight
- At the right part of the desired free time freight, and under Actions, click Edit icon and make the required changes (see Figure below).
To remove a free time
- At the right part of the desired ocean freight, and under Actions, click Remove icon and confirm your decision (see Figure below).
To deactivate a free time
- At the right part of the desired ocean freight, and under Actions, click Deactivate toggle (see Figure below).

To activate the free time back
- Filter the list via status inactive (see Figure above) and click on the activate toggle (see Figure here)
Additional Charges
Additional Charges is one of the charges (Ocean Freight, Free Time and Additional Charges) of the Purchase Contract.
It can be added via Cargoo interface or bulk upload (excel file format is supported).
Bulk Upload Additional Charge
Bulk upload function is available for creation of multiple additional charges instead of creation one by one. In this case you fill in the already downloaded excel file, and upload it into the Cargoo system.
To bulk upload additional charge(s)
- Under your saved contract, in Additional Charges tab, click Bulk Upload.
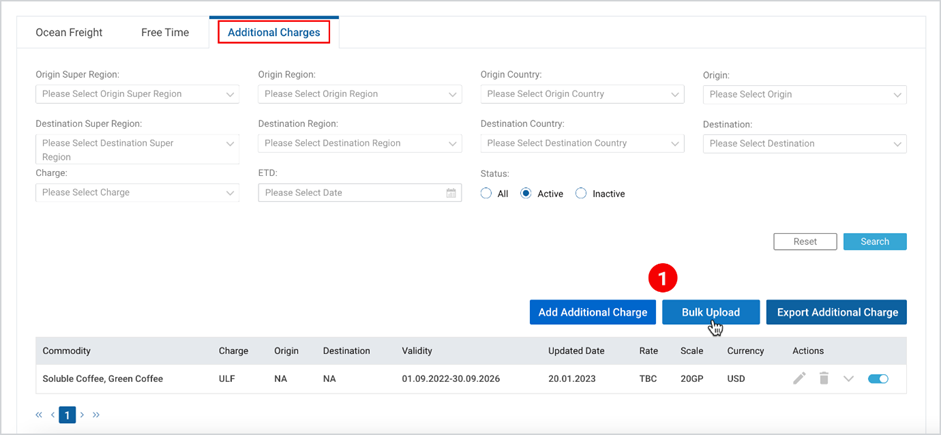
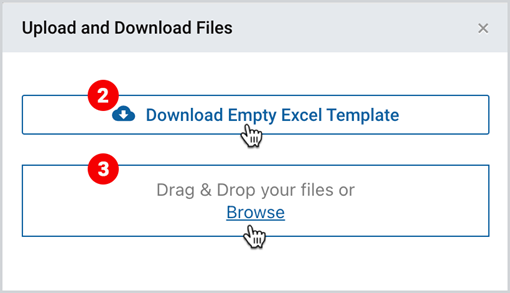
2. As the popup window appears, click Download Empty Excel Template.
3. After filling in your ocean freight details, Drag and Drop your files or Browse.
Note | As you upload an excel file, in case any of the fields is incorrectly completed, an “Error Results Table” appears, where all errors are displayed and need to be amended. |
Add Additional Charges via Cargoo Interface
To start the Additional Charge creation process through the Cargoo interface
- Under your saved contract, in Additional Charges tab, click Add Additional Charge.
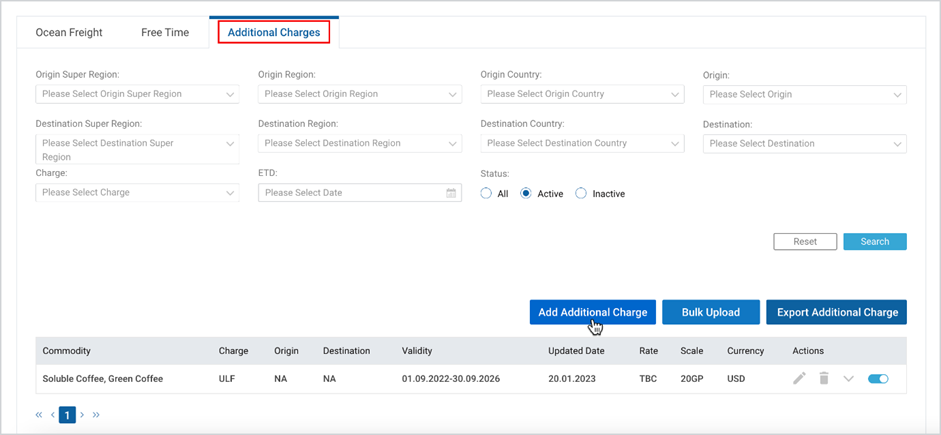
You can check information to be filled on additional charges through the Cargoo interface in Table 4 and the visualization is given in Figure 26 below.
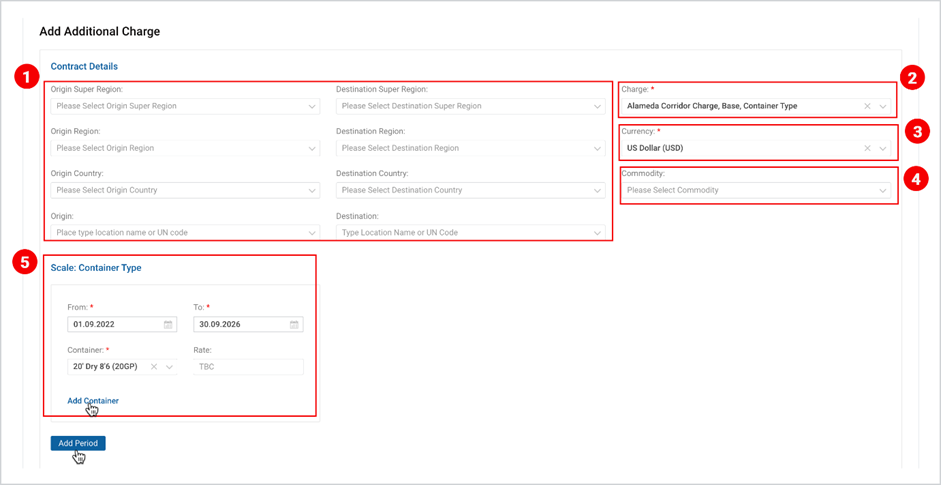
Table 4: Additional Charge Details
ITEM IN FIGURE ABOVE | FIELD | DESCRIPTION |
1. | Locations | Locations include
|
2. | Charge | Select the charge type. |
3. | Currency | Select the currency. |
4. | Commodity | Select the commodity from the drop-down list. If no commodity is selected, All commodities are selected by default and appear in table' related row. |
5. | Scale | Select the time period for scale and fill in the rate. In case in the Charge (2) you have selected “container type”, in scale a new field will appear, where you have to select the container type and the rate. You can add additional containers upon necessity. You can also add new scale by clicking on “Add period” icon. |
Tip | Do not forget to Save the input data by clicking the Save icon at the lower right corner of the page. |
You can access the desired additional charge from the list by filtering via
- Locations, including
- Origin Super Region
- Destination Super Region
- Origin Region
- Destination Region
- Origin Country
- Destination Country
- Origin
- Destination
- Charge
- ETD
- Status – All, active inactive
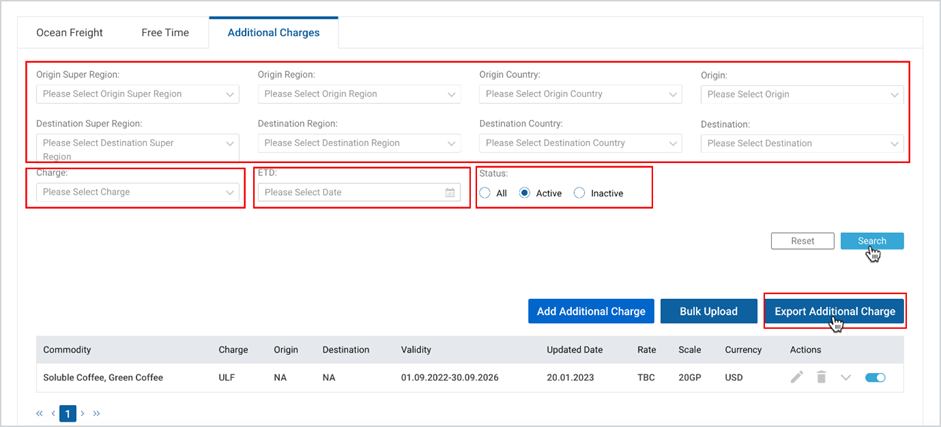
In case you want to have all the list of additional charges at hand, you can click Export Additional Charge to download it in excel format (see Figure above).
Manage Additional Charge
You can manage each Free Time by editing, removing, deactivating/activating it.
To edit additional charge
- At the right part of the desired free time freight, and under Actions, click Edit icon and make the required changes (see Figure below).
To remove the additional charge
- At the right part of the desired ocean freight, and under Actions, click Remove icon and confirm your decision (see Figure below).
To deactivate the additional charge
- At the right part of the desired ocean freight, and under Actions, click Deactivate toggle (see Figure below).

To activate the additional charge
- Filter the list via status inactive (see Figure here) and click on the activate toggle.
Rates Overview
Displays the same information from Purchase Contracts grouped by Ocean Freights, so that it becomes visible which additional charges and free time conditions are applied to each Ocean Freight.
Here, Ocean Freight Search, Filter, Bulk Upload and Export work the same way as described in Purchase Contracts here.
Extended Overview
Displays the list of all Ocean Freights from all Purchase Contracts in the configurable table format. In addition, there is calculated Sales All-in Rate column that displays total sum of Ocean Freight and all applicable additional charges.
Here, the Ocean Freight Search, Filter, and Export work the same way as described in Purchase Contracts here .